Project Team Member Workflow (Tutorial) from DB 39.5.7
Please note
- The following workflow applies to database versions 39.5.7 to 39.5.12.
- The following table contains links to the other versions:
Objective
- This tutorial is intended to show first-time users how to use the program and its functions on the basis of typical use cases.
Please note
- All exercises are based on the PLANTA demo data. This data must be installed beforehand.
- The screenshots used are merely examples of functions. The screenshot layout may deviate from the program.
Working with PLANTA project
Log in
Procedure
- Double click on the PLANTA icon.
- The PLANTA logo is now displayed and the network connection to the server is established.
- Before the PLANTA logo, a form with two input fields for the user ID (user code) and the password appears.
- In the upper input field, enter R1 for the user with the Project Team Member role (PLANTA demo user).
- Demo users do not have passwords so that there is no input necessary in the second field.
- Confirm with OK.
PLANTA project Surface
Information
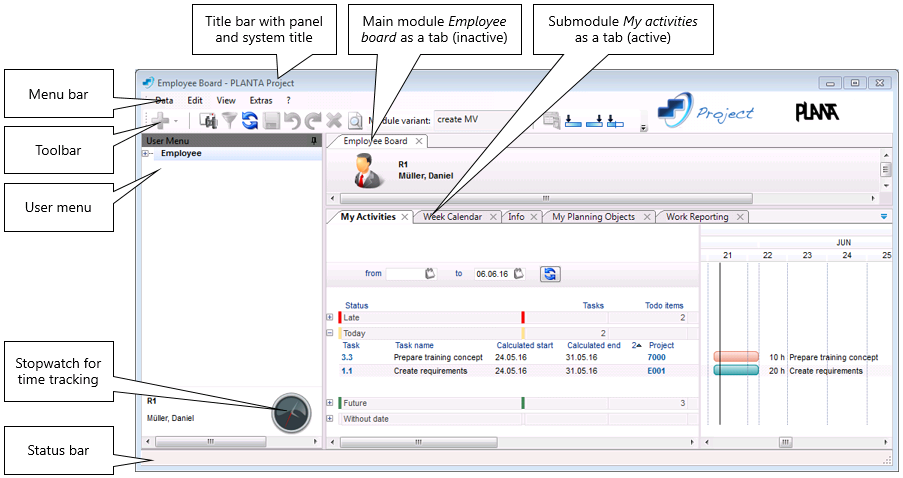
- Title bar: Forms the first line of the screen. The current panel name and the system name are displayed here.
- Menu bar: Forms the second line of the screen. Consists of individual pull down menus with menu items.
- Toolbar: Forms the third line of the screen. Consists of buttons for the most commonly used menu items. If the symbol is colored it means that the corresponding menu item is activated. If the symbol is gray it means that the menu item is deactivated. What menu items are activated or not is determined by the customizing.
- Panel: Consists of a user menu, a main module and submodules. The main module and submodules can be arranged (docked) differently within a window. They can be laid over each other like index cards or positioned next to or above/below each other.
- Status bar: The status bar is used to output messages about the progress of the program which do not require confirmation from the user in a message box. The message in the status bar always refers to the focused module, not to the whole panel.
Module
Information
- A module enables data from the database to be displayed and edited, e.g.:
- Project data
- Task data
- Assignment data (task-resource assignment)
- Data is displayed in the form of records.
- A record summarizes attributes/parameters of an object (project, task, resource etc.) with their corresponding values.
- Values are displayed in separate data fields.
- What data fields may belong to a record (record structure) is determined by the customizing of the corresponding data area
Example

- Here, five records are displayed: one project record and five task records.
- The project record consists of three data fields (Project, Project name and Remaining effort) and their corresponding values.
- The task records consist of four fields (Task, Task name, Remaining duration and Remaining effort) and their corresponding values.
- All Remaining duration fields (of all task records) form a column. The data logical Remaining duration column equates to the layout column.
Module Variants
Information
- In PLANTA project, almost every module can easily be modified in the user's mode according to the user's individual requirements and saved as a variant of the modified module.
- For instance, it is possible to display the fields that are most frequently used in a module while hiding all other fields.
- For some modules, PLANTA already provides default module variants.
- Every standard module has a module variant listbox in its toolbar.
- If module variants of a module are available, they are displayed in the listbox together with their Base variant.
- If there are no module variants available, the listbox field is displayed gray.
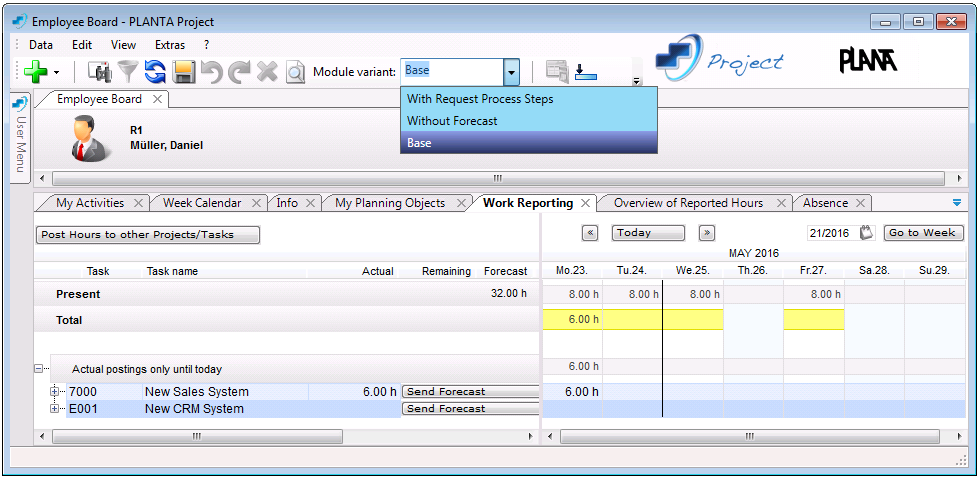
- In order to switch to a module variant, do the following:
- Open the module variant listbox.
- Select the required variant.
- The new variant is loaded.
Edit Data/Insert New Entries/Delete Entries
Activate/Mark/Unmark
Procedure
- Activate
- Via mouse-click or input
- Only one data field can be activated (not the entire record). The record in which the activated field is located is focused. It is highlighted in light green.
- Mark
- Via CTRL + mouse-click
- The entire record is marked.
- The marked record is highlighted in dark blue.

- Demark
- Via CTRL + click on the marked record
Edit
Edit existing values
- Which data fields can be edited and how they can be edited in existing records depends, among other things, on the data field type.
- Input data fields: Here, you can make inputs and edit them at any time. These fields are blue upon activation.
- Output data fields: Here, no data can be edited. These fields are gray upon activation.
- Link data fields: These are data fields whose values are displayed in the form of hyperlinks. If you click on a link, you will be led to another module, for instance.
- Listboxes: These are input fields to which listboxes containing values belong, so that you can either select a value from the default list or make a manual input.
- Mandatory data fields: These are fields that implicitly have to be filled with values. You cannot save if these fields are not filled. These fields are marked with an asterisk.
- Checkboxes: These are fields which only accept Yes/No entries by setting or removing a checkmark.
- Traffic lights: These are fields with a traffic light function (color).
- Continuous text fields: These are fields in which you can enter longer texts.
Enter new values
- You can enter new values either manually or copy them from other fields. For this purpose, you can use PLANTA's own Drag&Drop Copy function replacing the conventional CTRL + C and CTRL + V.
- Field to field (default setting)
- By pressing CTRL and holding the left mouse button, drag the content of the source field to the target field.
- As soon as the cursor is over the target field, release the left mouse button.
- The source field value is copied to the target field.
- Field to column
- Define the operation in the menu bar via Edit Drag&Drop Copy Field to column.
- Mark all the target records (CTRL + click on the start record and SHIFT + click on the end record)
- By pressing CTRL and holding the left mouse button, drag the content of the source field to the target field (target column).
- As soon as the cursor is over the target field, release the left mouse button.
- The value of the source data field is entered in all records of the target column for the marked records.
- Column to column
- Define the operation in the menu bar via Edit Drag&Drop Copy Column to column.
- Mark all the target records (CTRL + click on the start record and SHIFT + click on the end record)
- By pressing CTRL and holding the left mouse button, drag the content of the source column to the target column.
- As soon as the cursor is over the target field, release the left mouse button.
- The values of the fields from the source column are entered in the corresponding data fields of the target column for all marked records.
Insert new records
- To insert new records, focus the required record (by clicking on a field in the required record) and
-
- select the required option by right-clicking or
- click on the plus symbol in the toolbar or
- click on the plus symbol in the data area heading line.
Initial situation
 Result
Save
Procedure
- You can save data
- by clicking the disk symbol in the toolbar,
- by using the shortcut CTRL + S or
- by using the Edit--> Save menu items.
- If some of the data records are still invalid (blank lines) when you save, the following message appears: Mark invalid data records?
- If this message is confirmed with Yes, the records with empty IDs are marked. These records can be edited or deleted.
- If the message is confirmed with No, the invalid records are not marked.
Delete
Procedure
- Mark the required record and press the Delete button in the toolbar.
- The following message appears: Delete marked data?
- Confirm it with Yes.
- If the record to be deleted contains dependent data (subordinate records), they are depending on their settings either instantly deleted or the following query is displayed: Delete dependent data?. This query either be confirmed or not.
Documentation/Online Help
Information
- For the PLANTA project documentation, PLANTA uses an online documentation tool based on TWiki software.
- The webs (websites), which are divided into separate topics (websites), constitute the documentation frame work.
- Webs
- Up to version C 39.5.0, PLANTA has provided an extra web (a website) for every new release. The PLANTA Wiki Webs that have been released up to now, are listed in the PLANTA Wiki Menu Bar.
- From version C 39.5.0, various releases are documented in one web (called Current). It is versionized by tabs that are displayed next to each other.
- Topics
- The topics are constructed differently according to their topic and content. The following types of topics are distinguished:
- Module topics: They contain descriptions of individual modules (a topic contains the description of a module).
- Data field topics: They contain descriptions of individual data fields (a topic contains the description of all data fields used in a data table).
- FAQ topics: They contain the answers to frequently asked questions.
- Function topics: They contain descriptions of individual, important functions e.g. WorkBreakdownStructure.
- Workflow topics (tutorials): They contain workflow and process related descriptions that again contain working processes, concrete examples and exercises, e.g. the Project Workflow. They can be used as basis for trainings or self-studies.
Read and write authorizations
- Each PLANTA project user has read-only access to the complete documentation.
- Currently, only PLANTA employees have modification rights.
Open documentation
- There are several ways to open the PLANTA documentation:
- If PLANTA project is already opened, you can do so by
- opening the required module and pressing F2 or selecting the ? Module Description menu item. You are directly led to the description of the current module.
- activating the required data field and pressing F1 or selecting the ? Data Field Description menu item. You are directly led to the description of the current data field.
- Or you can open the documentation independently from modules and data fields by pressing CTRL + M or selecting the ? Open Manual menu item. The start page of the documentation opens from which you can navigate to the required themes via the search function of the table of contents.
- You can also access the PLANTA documentation without being logged on to PLANTA project via http://wiki.planta.de
 .
.
Note
- If you press F1 or F2 on a field or in a module that is not contained in the standard program but was individually customized in your system, a page on the PLANTA Wiki is opened, informing you that you currently are on an customized object.
Navigate and search
- Navigate
- You can navigate through the structure of the web by using the table of contents.
- In the other direction, you can navigate via the topic path at the top of each topic.
- If you want to navigate between two topics on the same level, first switch to the parent topic and from there switch to the required topic.
- Search:
- Jump Input field:
- Search input field:
- The string specified here is searched for in the topic content. The input Schedule, for instance, finds approx. 60 topics. If the entered string is supposed to be a compound (word combination), please put them in quotation marks, e.g. "copy project".
- Via table of contents
Employee Board
Information
- Each PLANTA project user has the Employee Board menu item in the user menu.
- Via this menu item, the Employee Board panel is opened which summarizes modules that are relevant to all PLANTA users regardless of their particular role, e.g. the Reporting Of Hours Worked module or the Todo Item module.
- The following examples are explained using the PLANTA demo user R1, whose only role is that of a Project Team Member and who has no modification rights for the project.
My Activities
Initial situation
- Employee Mr. Daniel Müller starts PLANTA project with his user R1 and wants to inform himself about the activities planned for him today and to complete them.
Procedure
- Log on to PLANTA project with R1 user code (no password).
- The Employee Board of employee R1, Mr. Müller, is opened and the My Activities module is automatically focused.
- In this module, all the tasks to be completed (todo) by Mr. Müller (Tasks, Todo items, Risk measures, Opportunity measures and Process steps ) are grouped by date status (Late, Today, Future, Without date).
- In the Todo items column in the Today status group, Mr. Müller sees the entry 1. This means that he has to complete one todo item.
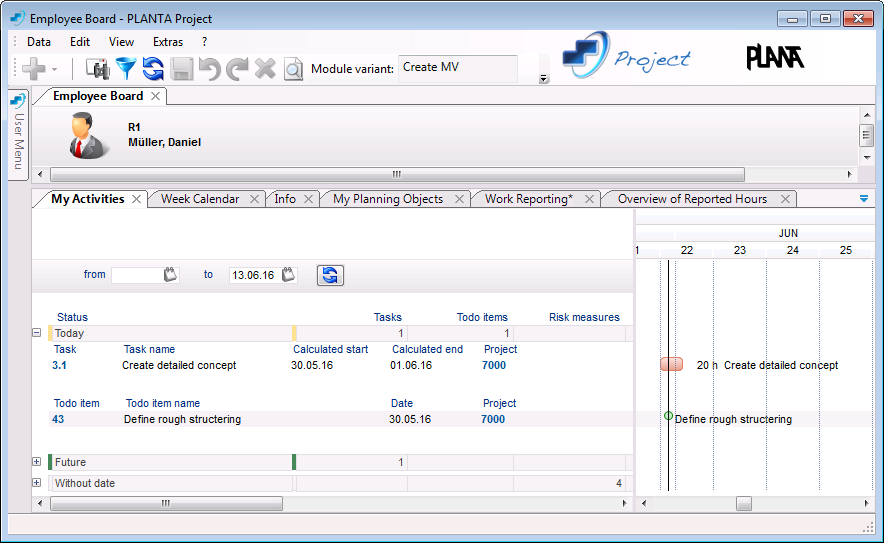
- Mr. Müller completes 80% of this todo item and, then, wants to enter its degree of completion in PLANTA project. However, he cannot do this directly in the My Activities module. He has to open the editing module for this todo item.
- Therefore, he clicks on the link on the todo item name.
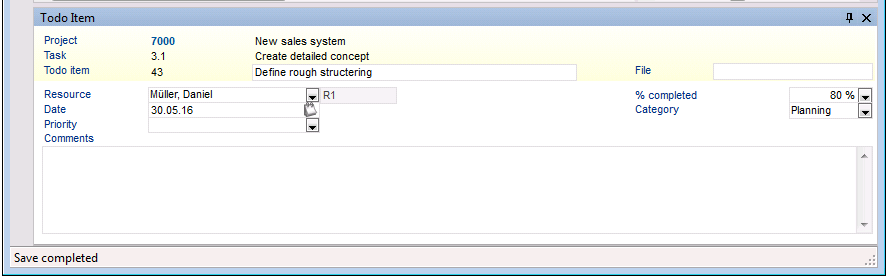
- The Todo Item module opens, in which all important data that refer to the todo item are displayed.
- In the % completed field, Mr. Müller enters the degree of completion in %. In this case, it is 80%.
Reporting of Hours Worked
Initial situation
- Mr. Müller wants to report the hours he already spent on the completion of todo item.
Note
- PLANTA project standard does not provide the reporting of hours worked to todo items. Each todo item refers to a certain task or is part of it. This means, hours worked are reported to the corresponding task.
Procedure
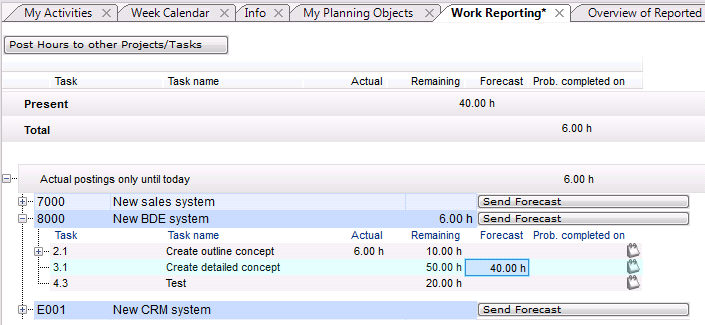
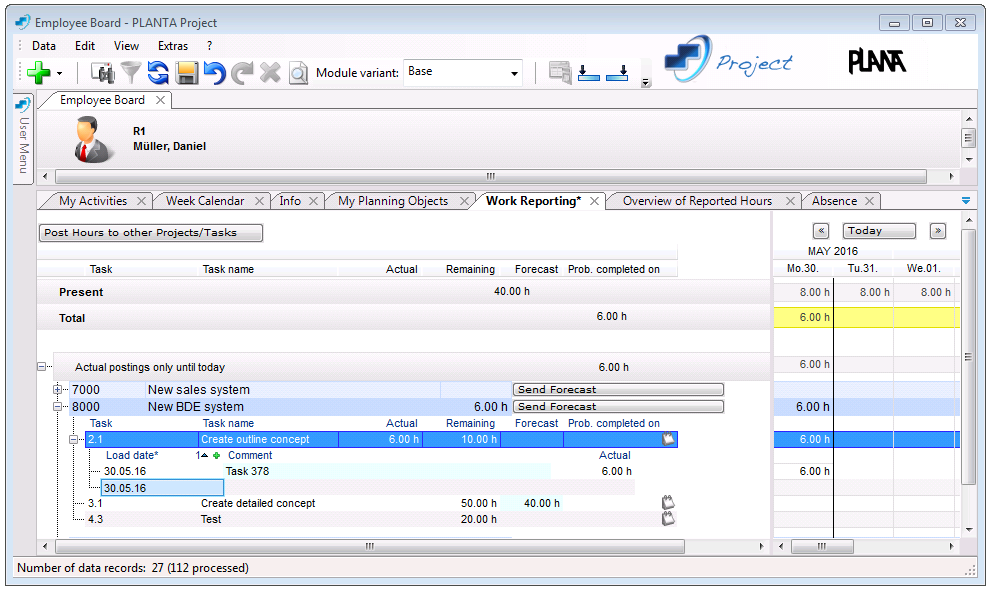
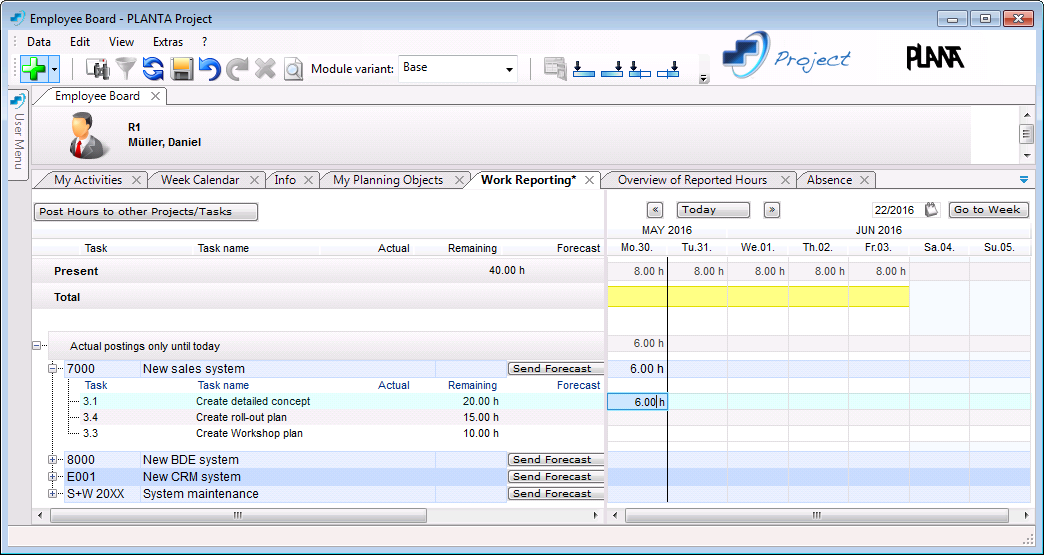
- In his employee board, Mr. Müller clicks on the Work Reporting tab.
- In the left window, all projects and - if you expand them - all tasks are displayed for which the employee is scheduled.
- He expands the record of project 7000 and sees the record of task 3.1 to which he wants report hours worked.
- In the right window, in the record of task 3.1, he clicks in the field below today's date and enters the number of hours he worked for task 3.1, e.g. 6h.
Details
- If the project manager refreshes the schedule of project 7000 afterwards, he or she will see the work reporting of resource R1.
Initial situation
- While working on todo item 43, Mr. Müller has encountered several problems. Now, he is afraid that for the completion of the corresponding task a higher effort will be needed. He wants to inform the project manager of this additional effort.
Procedure
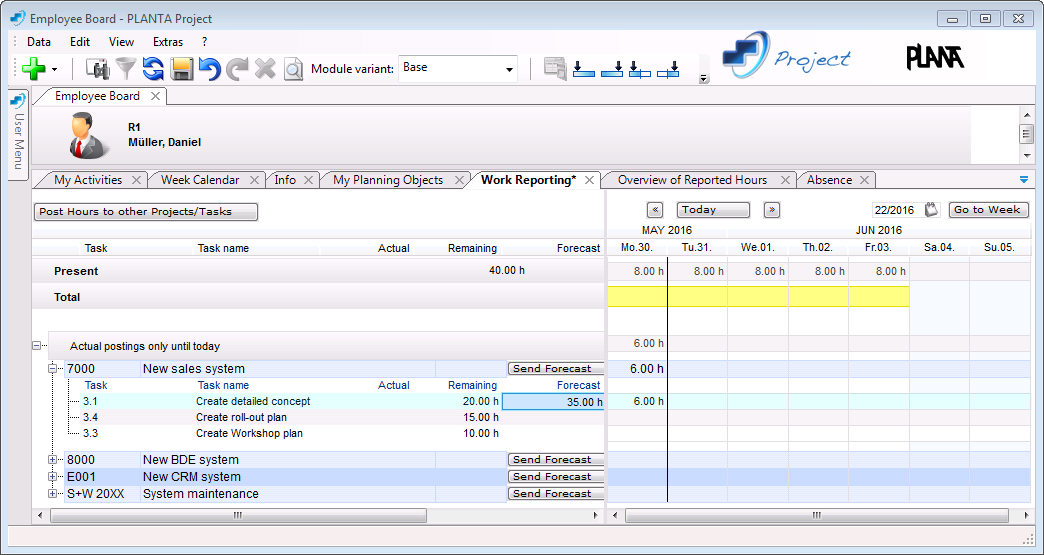
- In the Work Reporting module, in the record of task 3.1 in the Forecast field, Mr. Müller enters the presumed remaining effort in hours.
- He clicks on the Send Forecast button.
- The Send Info module including an already automatically created message is opened.
- The message contains the following data: task name, resource (sender), planned, actual, remaining and forecast values for effort.
- The project manager of the project is entered as recipient automatically.
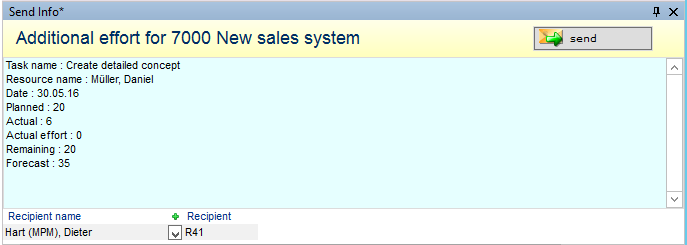
- Click on the Send button.
- The project manager will receive this message either in the form of a pop-up window or he will see it in the Dashboard of the project.
Other work reporting options
- Besides the option described above, employees can also report their hours worked in the Reporting Hours Worked module. This module is either opened
- from the My Activities module by right-clicking on the required activity and selecting the corresponding context menu command or
- by clicking on the black clock in the user menu. The first double click starts the time recording, the second double click ends it and starts the Reporting Hours Worked.
- by clicking on the Post to other Projects/Tasks button in the Work Reporting module. This option is used if the employee has worked on a task for which it was not planned initially.
- For detailed information on this topic, see Report Working Hours.
Information Exchange
Initial situation
- Mr. Müller knows that his colleague Julia Neumann is also working on this task, so he wants to inform her about the delay as well.
Procedure
- Therefore, Mr. Müller activates the Info tab or clicks on the info symbol in the toolbar.
- In the Send info to project team area, he expands the tree structure of project 7000 and clicks on the Send Info button in the record of Julia Neumann.
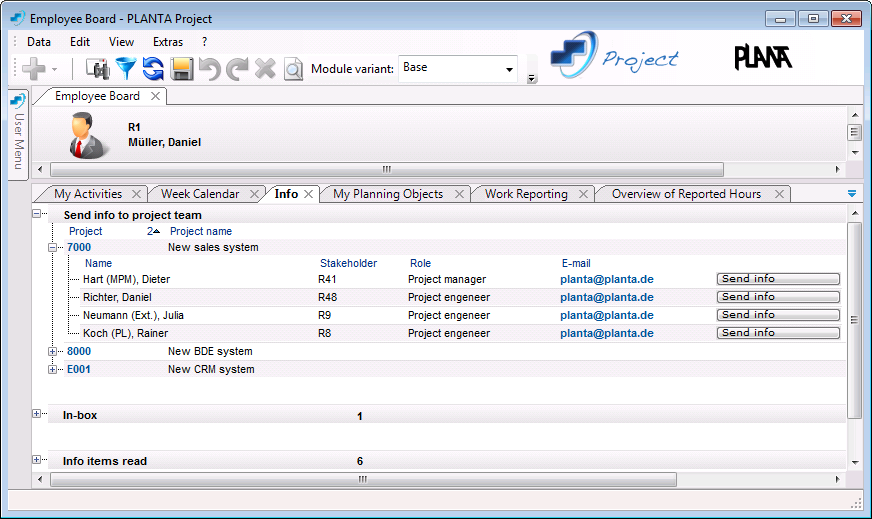
- This way, he switches to the Send Info module.
- In the text field of the module, he enters the information and clicks on the Send button.

Details
- Employee Julia Neumann will receive this message in the form of either a pop-up window or an e-mail, depending on the reception settings or she can obtain this info in the Dashboard or Info module.
Week Calendar
Task
- Mr. Müller wants to get information about his schedule for the entire week.
Procedure
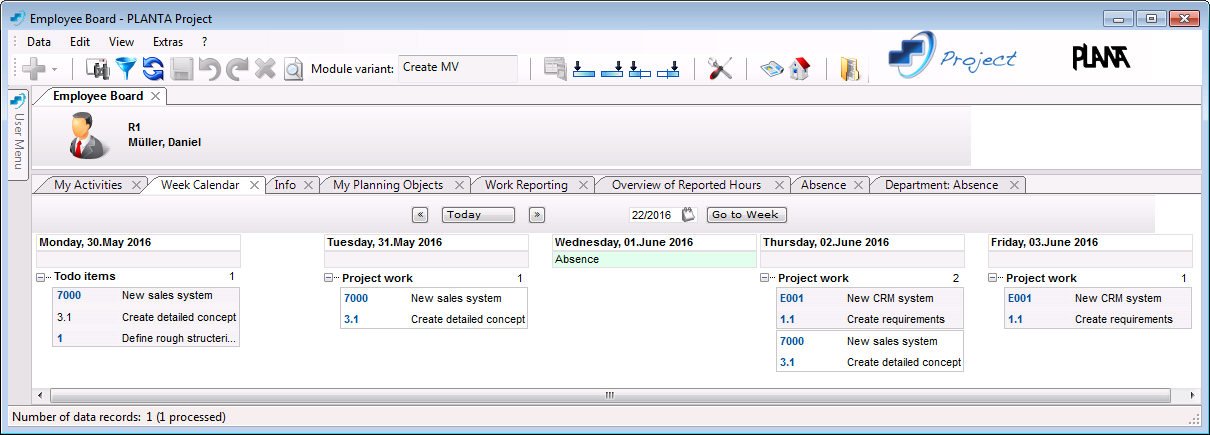
- Therefore, he clicks on the Week Calendar tab.
- In this module, he can view all of his/her open activities per weekday for the current week.
- If he wants to view the schedule for another week, he can switch to the required week via the button above the weekday name.
- Every activity is displayed in its own box below the corresponding day.
- On the ID numbers of activities, there are links which lead to the corresponding editing modules (e.g. the Task module for tasks), where you can enter the completion status or edit other data, if necessary.
- Furthermore, in the field directly below the weekday name, Mr. Müller can see by the color of the field whether he is on vacation or is abscent for another reason (yellow = vacation, green = absence).
Plan Vacation and Absence
Initial situation
- Mr. Müller wants to go on vacation for four days between August 15th and 18th. However, he does not want to go on vacation before the afternoon of August 19th, since he has an important phone conference in the morning. Furthermore, he has a training on March 19th. Before he asks for approval of the vacation by his project manager, he wants to know whether other colleagues have already planned their vacation in this period.
Procedure
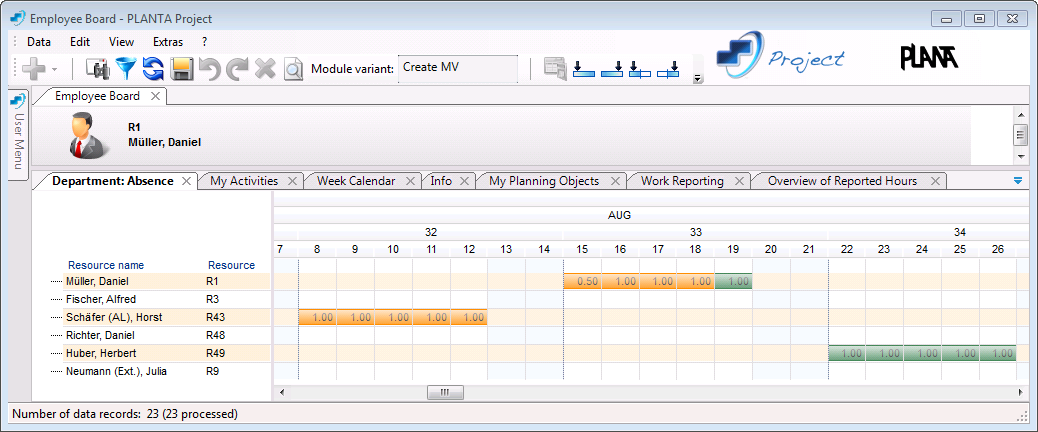
- For this purpose, he activates the Absence of the Department tab.
- Here, all employees of his department are listed and in the corresponding employee record below the scale, the already planned absence or vacation times are displayed in the form of a yellow or green boxes.
- Mr. Müller sees that no entries are available in the period planned for his vacation.
- After that, he asks the project manager to approve his vacation.

Initial situation
- Subsequently, Mr. Müller wants to enter his vacation in PLANTA project, so that other colleagues can see it as well and consider it in their own planning.
Procedure
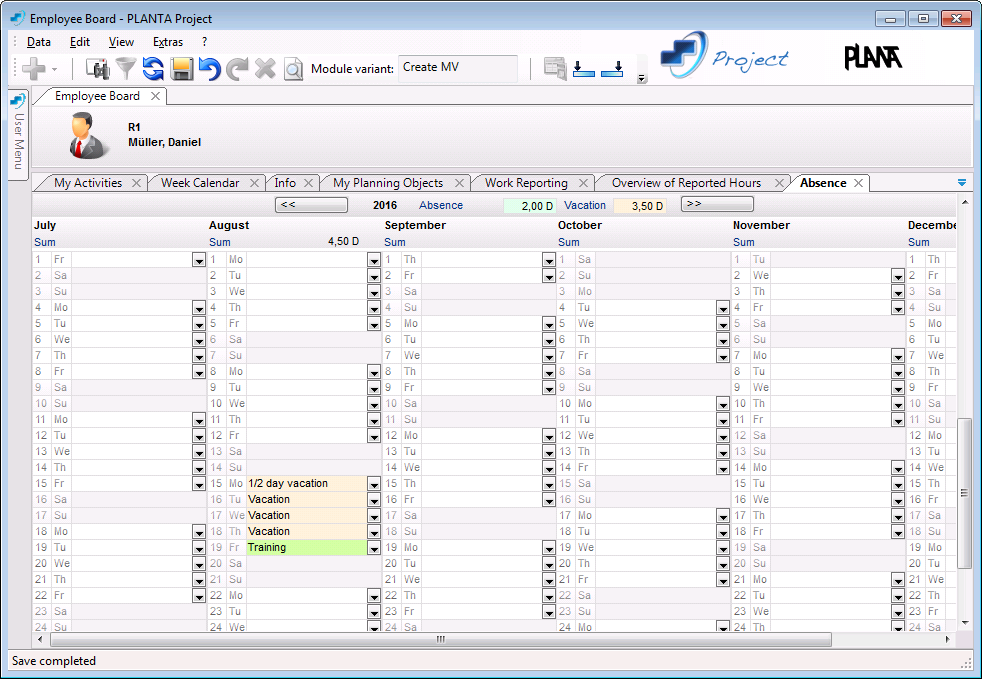
- For this purpose, he activates the Absence tab.
- Here, the entire year calendar is displayed.
- On each day field, there is a listbox with absence types and absence reasons.
- For August 15th, Mr. Müller selects the 1/2 day of vacation entry and for the three following days, he selects the Vacation entry and for August 19th the Training entry from the listbox.
- As a result, each one of these fields is colored accordingly.
- In the record above the calendar, the entire number of entered vacation and absence days is output.
Details
 CurrentEN Web>UserDocumentation>UserWorkflowsTutorials>ProjectTeamMemberWorkflowTutorial>ProjectTeamMemberWorkflowTutorialFromDB3957
