Project Workflow (Tutorial) DB 39.5.14
Please note
- The following workflow applies to database version 39.5.14.
- The following table contains links to the other versions:
Introduction
Objective
- This tutorial is intended to show first-time users how to use the program and its features on the basis of typical use cases.
Please note
- All exercises are based on the PLANTA demo data. This data must be installed beforehand.
- The master data such as the calendar, resources, users, hourly rates, etc. has already been set up in the demo data. This tutorial does not cover how the master data is defined. (For this, see Master Data Entry). Instead, it is about how to plan a new project in addition to the already existing ones, and to show the effects of this.
- The screenshots used are merely examples of functions. The screenshot layout may deviate from the actual program layout.
Project Management with PLANTA
Information
- The following exercise examples are typical use cases of project management as it is practiced in real situations.
- The following use cases were created for the four most frequently used PM roles:
- Multi-project manager (user R41)
- Project manager (user R8)
- Resource manager (user R43)
- Project staff (user R1)
Details
- PLANTA project additionally enables you to plan and control projects on a process-oriented basis. For further info, see the Process Model Workflow Tutorial.
Start Program
Task
- As every morning, the multi-project manager (Georg Hart) wants to get an overview of his projects and the adherence to the project end dates.
Procedure
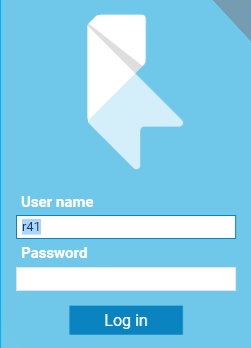
- Open the PLANTA project client.
- In the upper input field, enter R41 for the multi-project manager.
- Demo users do not have passwords so that there is no input necessary in the second field.
- Press Log in.
Details
- Further information about the interface can be found here.
Create New Project (R41)
Task
- A sales manager informs the multi-project manager (Georg Hart) about a new IT project with a required duration of 6 months.
- The multi-project manager has to create the project PR-01 and then pass it on to the intended project manager for project planning.
Procedure
- Click on the Multi-Project Management Project planning New Project link in the user menu or press the New Project button in the Projects module.
- Enter the Project name for the new project in the module header in the field next to the ID, e.g.: PR-01.
- Here, the Please enter a name dialog is output by default.
- Define further project data, e.g.:
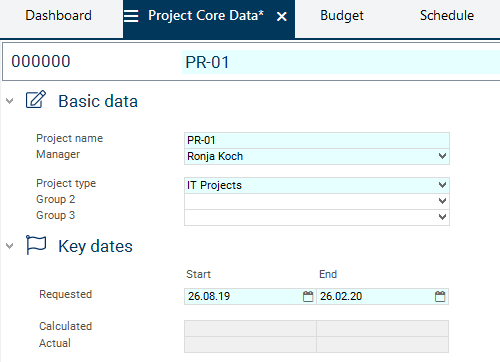
- Other entries may be added at a later point if required.
- Save by clicking on the Save button in the toolbar or by pressing the key combination CTRL + S.
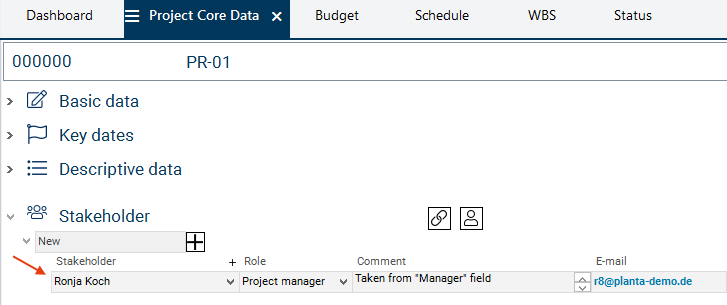
- Since the creator of a project is automatically set as project manager and as stakeholder of the project at the same time, the following query is displayed when another manager is selected: Would you like to delete the current stakeholder assignment of the manager or would you like to assign the new manager additionally?
- Confirm this message with Yes.
- As a result, the new manager is set as a stakeholder in the Stakeholder area and the multi-project manager is deleted as a stakeholder.
Detailed Planning by Project Manager (R8)
Task
- In theory, the multi-project manager could carry out detailed planning for the project now. However, he wants to delegate this to the experienced project manager (Ronja Koch).
- He asks the project manager to use his standard plan prepared for IT projects.
- The project manager launches the program and immediately starts to plan the project.
Procedure
- Open a new client and log on with user R8.
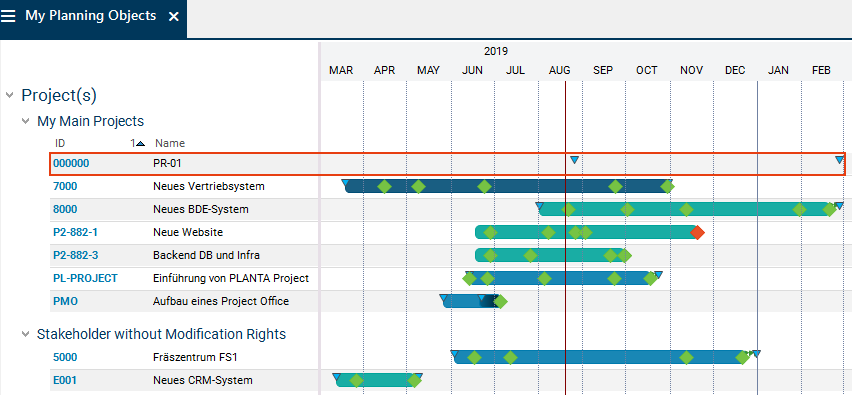
- The My Planning Objects module is opened automatically.
- In this module, an overview of all planning objects of the project manager is displayed.
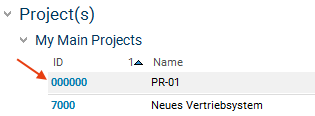
- The newly created project PR-01 is displayed. Since the project has not yet been calculated and divided into tasks, the duration is not visualized by a bar in the right window like in other projects, but only by two blue triangles which display the requested project dates.
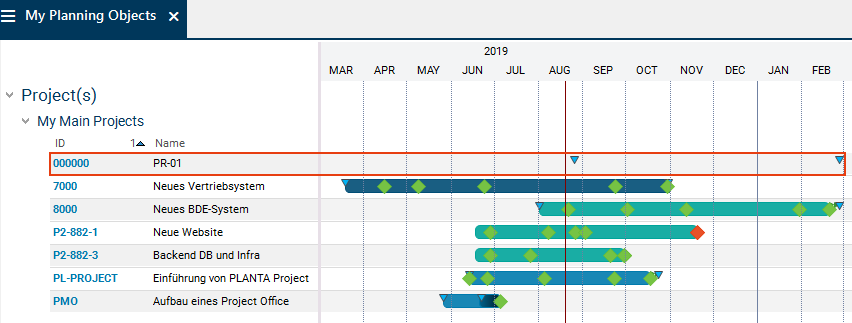
- Click on the ID of the project PR-01.
- This takes you to the Project panel that contains further editing options redarding the project.
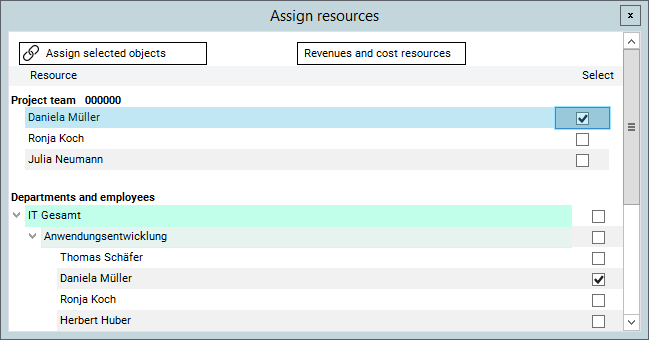
Assemble Project Team
Task
- The project manager wants to define which employees of the company are going to be involved in her project.
Procedure
- The Project panel opens and the Project Core Data module is automatically activated.
- Press the
 Assign stakeholder button in the Stakeholder area.
- The dialog To which category do you want to assign stakeholders? appears.
- Press the Core team button.
- The Assign Stakeholders to Planning Object module with the selected category opens.
- Select the required stakeholders by activating their respective checkboxes (see the picture below) and press the Assign selected objects button.
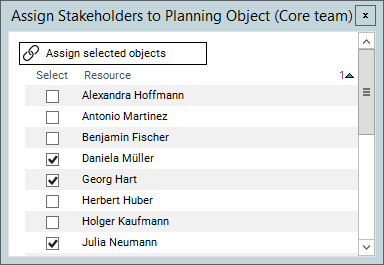
- The stakeholders selected will be assigned to the chosen team category (in this case, core team).
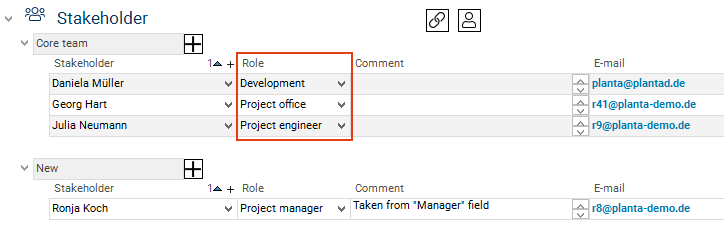
- Define the stakeholders' roles as in the picture below. Define further parameters if needed.
- The multi-project manager (Georg Hart) should also be assigned to the core team as a stakeholder since he wants to be kept informed about the project.
Create Schedule
Task
- The project manager checks whether the requested project end date is realistic. For this purpose, she creates a new schedule by copying the IT standard plan to the new project.
Procedure
- Open the Schedule module in the Project panel by clicking on the tab with the same name.
- When opening the Schedule module, the following confirmation prompt is displayed: Is a schedule to be copied in?
- Confirm the message with Yes.
- At the bottom of the panel, the Copy Schedule module is opened.
- If the confirmation prompt is negated accidentally, the Copy Schedule module can be opened by right-clicking on the project header and selecting the command of the same name.
- Select the A1-EN Standard plan IT project from the listbox.
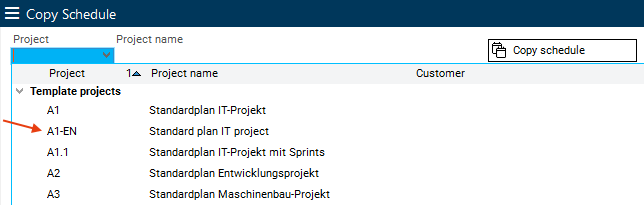
- Start copying by clicking on the Copy schedule button.
- The schedule that was copied into the project is displayed and can be edited.
- The project manager can continue with project planning.
Please note
- In this tutorial, the schedule is a copy of the standard plan.
- As the tasks are already structured in the standard plan template, by copying them the structure is transferred to the new schedule.
- If you create a schedule by creating individual tasks, they are not hierarchically structured. Read about how to structure the tasks in a schedule here.
Edit (Adjust) Schedule
Delete Tasks
Task
- The project manager realizes that not all tasks of the copied schedule are necessary for the newly created project PR-01.
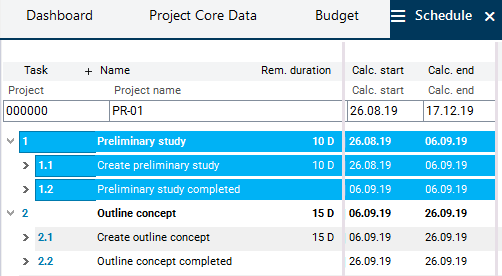
- The Preliminary study task can be deleted. The project manager therefore deletes all tasks that relate to the Preliminary study.
Procedure
- In the Schedule module, mark the Preliminary study task (by pressing CTRL and clicking on the task line). The subordinate tasks are also marked.
- Press the
 Delete button in the toolbar.
- A prompt for confirmation is displayed before deletion.
- Confirm the message with Yes. The marked tasks are deleted.
- Afterwards, recalculate the project plan by pressing the
 Calculate schedule button in the toolbar.
Adjust Task Duration
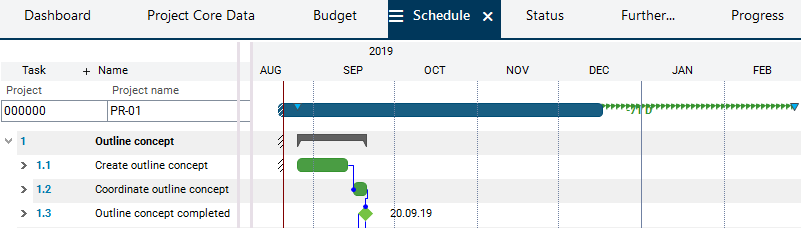
Task
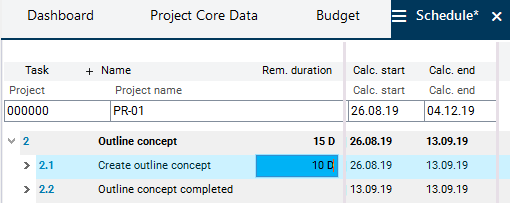
- The project manager realizes that the Create outline concept task has to be completed earlier in this specific project than determined by the project template.
- Consequently, she wants to limit the duration of the task to 10 days.
Procedure
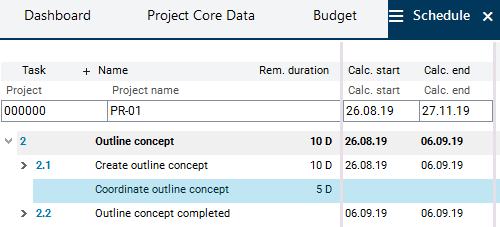
- In the Schedule module, enter the intended duration (e.g. 10 for 10 days) in the Rem. duration field in the Create outline concept record.
- Press the Calculate schedule button in the toolbar.
- The remaining duration of the Outline concept summary task is recalculated to reflect the shortened duration of the Create outline concept task.
Create Tasks
Task
- Two more tasks are to be added to the project plan.
- The project manager wants to insert the task Coordinate outline concept below the record of the Create outline concept task.
- The additional milestone Coordinate IT concept is to be added after Create IT concept.
Procedure
- In the Schedule module, right-click on the Create outline concept task and select Insert Task from the context menu.
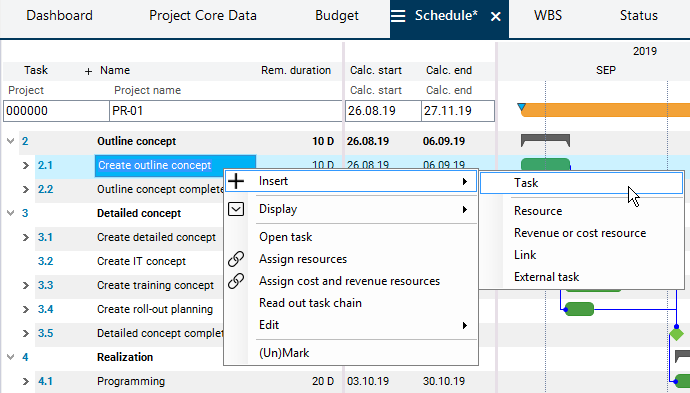
- Enter the name (here: Coordinate outline concept) in the task line and the planned duration (e.g. 5 for 5 days) in the Rem. duration field.
- Right-click on the Create IT concept task. Select Insert Task from the context menu.
- Enter the name Coordinate IT concept.
- Scroll to the Milestone column in the middle window.
- Define the task as a milestone via listbox selection.
- Do not assign a duration to any tasks that are defined as milestones or master milestones in PLANTA project.
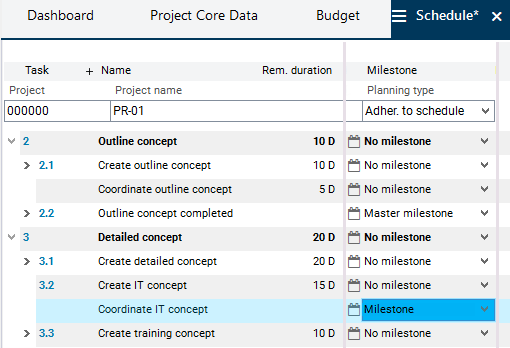
- Save.
- Due to the deletion of previous tasks, the first remaining task Outline concept begins with code "2". The newly added tasks Coordinate outline concept and Coordinate IT concept have not been assigned any codes yet.
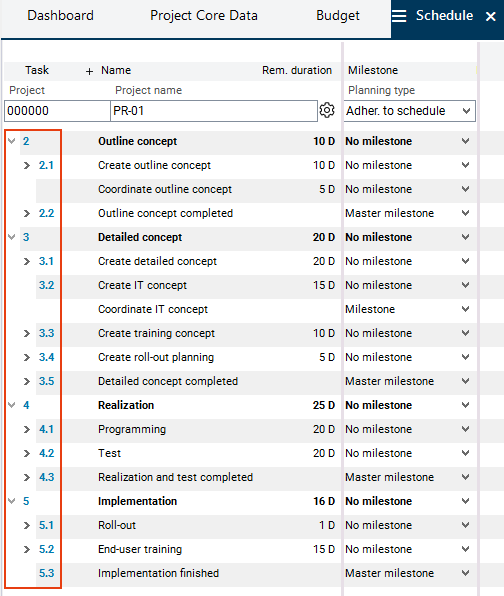
- Press the
 Form WBS code button in the project line to update the WBS codes for all tasks of the project and to form codes for new tasks.
- Result:
Connect Tasks by Links
Task
- The newly created Coordinate outline concept task and the Coordinate IT concept milestone are to be included in the project by links.
- This can be carried out graphically in the barchart.
Information
- Links are dependencies between tasks that (can) have an effect on the calculated dates.
- There can be multiple links between two tasks. In the calculation of the schedule, the most unfavorable relationship takes effect, i.e. the link that causes the latest start date.
Procedure: By using links, connect the
Coordinate outline concept task to the
Create outline concept and
Outline concept completed tasks.
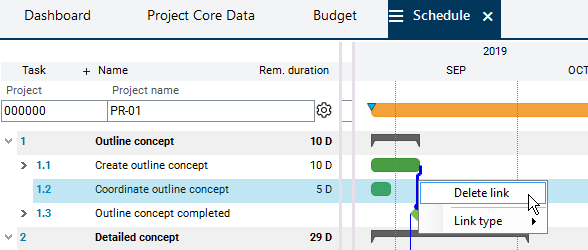
- Step 1: Delete the existing link between the Create outline concept and Outline concept completed tasks.
- For this purpose, right-click on the link and select the Delete link command from the context menu.
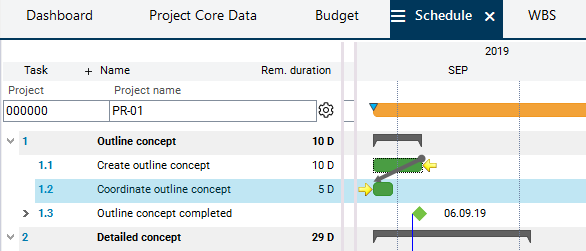
- Step 2: Position the cursor on the end of the bar of the Create outline concept task. The mouse pointer becomes a cross. Drag the task to the beginning of the bar of the Coordinate outline concept task by holding the left mouse button. A connection line between the two bars appears. As soon as the target bar is reached, the start position on the source bar and the target position on the target bar is marked by yellow arrows. Release the mouse button.
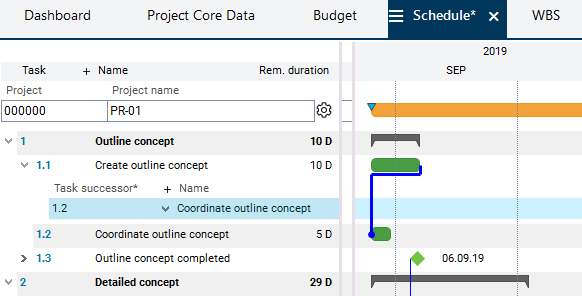
- Step 3: In the same way, link the bar (end of the bar) of the Coordinate outline concept task with the bar (beginning of the bar) of the Outline concept completed milestone.

- When clicking on a bar, incoming links are visualized in red and outgoing ones are visualized in green.
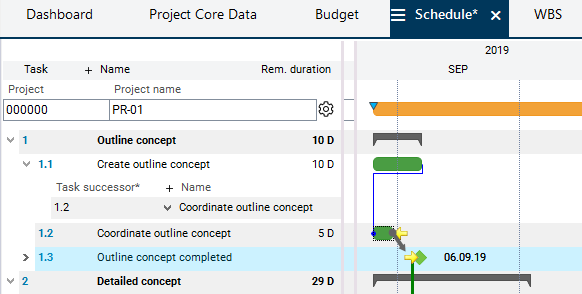
- Step 4: Run the calculation with the Calculate schedule button in the toolbar.
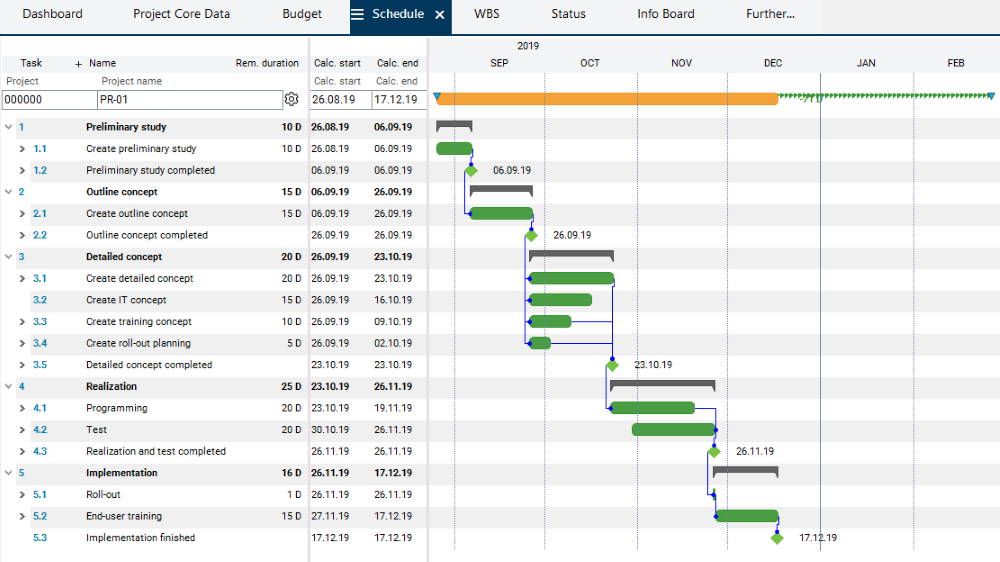
- Result: The beginning of the Create outline concept task has been postponed until after the end of the Create outline concept task. The duration of the Outline concept summary task has changed accordingly.
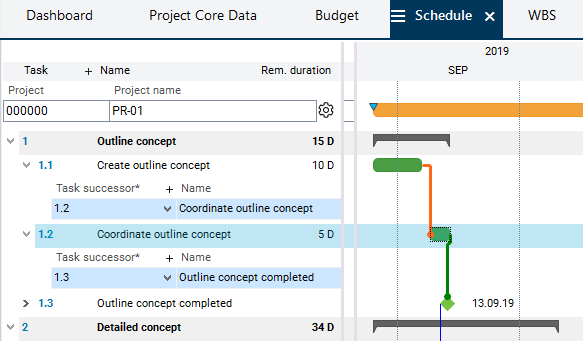
- In the same way, link the new Coordinate outline concept milestone with the Create IT concept and Create training concept tasks and press the Calculate schedule button in the toolbar.
Note
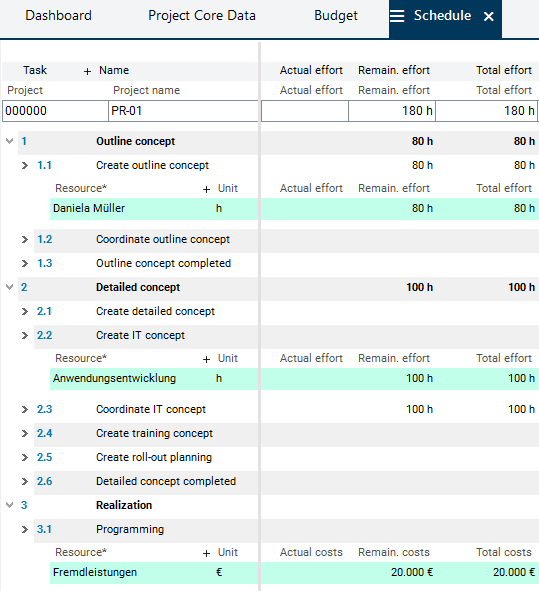
Resource Planning
Task
- The project manager starts thinking about the effort of her new project.
- From experience, she estimates the effort and plans the required resources:
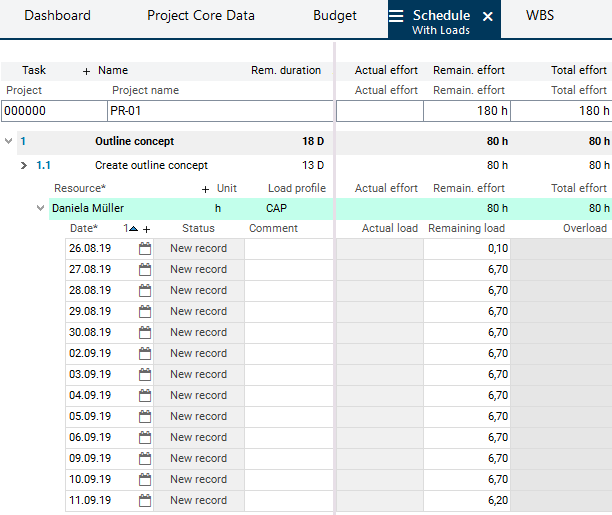
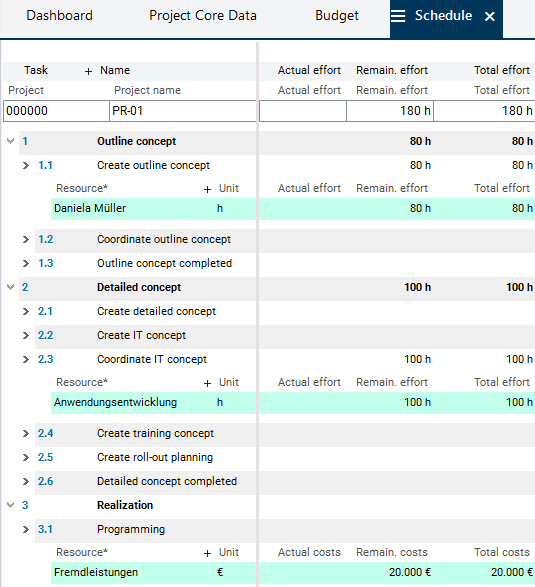
- For the Create outline concept task: 80 h effort for employee Daniela Mueller.
- For the Create IT concept task: 100 h effort, employee not defined yet, however, it will be an employee of the IT department; the Anwendungsentwicklung department resource ("Application Development") is therefore initially planned for the task.
- The programming effort is planned as EUR 20,000. Resource Fremdleistungen ("External Services") is used for this.
Procedure
- For the planning of employee Daniela Mueller:
- Right-click on the Create outline concept task.
- Select Assign resources from the context menu.
- Activate the Select checkbox in the line with Daniela Muellers name in the dialog module and click on the Assign selected objects button.
- In the schedule under the Create outline concept, a resource record with the resource Daniela Mueller is created.
- Assign the Anwendungsentwicklung department to the Create DV concept task in the same way and enter the Remaining effort of 100 h.
- For scheduling of external services:
- Right-click on the Programming task.
- Select Assign cost and revenue resources from the context menu.
- Activate the Select checkbox in the line named Fremdleistungen ("External Services") and click on the Assign selected objects button.
- The Fremdleistungen resource is assigned to the Create outline concept task. Enter the estimated effort of 20,000 (EUR) in the Remaining costs field.
- Click on the Calculate schedule button in the toolbar. Result: The Total effort or Total costs column is also filled with the appropriate values since it is always calculated by the program and represents the sum of Actual and Remaining values.
Task
- The project manager wants to know whether one of the staff resources has to do overtime as a result of her resource assignments. She checks the result of the planning.
Procedure
- In the middle window, scroll to the right until the Overload column appears.
- If a resource is overloaded, the overload is displayed in the Overload column in red font. If there are no entries, the resource can perform the work without overload.

- Right-click on the resource name record and select the Display Utilization context menu command to display further information on the capacity utilization of this particular resource in all projects. The Utilization with Cause module appears.
Task
- The project manager wants to reduce the resources' overload.
- Overload can be reduced by using any free capacity of the resources (Adherence to capacity). In this case, the task is postponed until sufficient free capacity is available. Pay attention to the project end date: It can be overrun.
Procedure
- In the Schedule module, on the project level in window 2 in the Planning type field, select the Adher. to capacity type from the listbox.
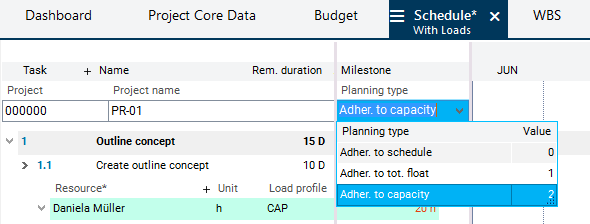
- Press the Calculate schedule button in the toolbar.
- Result: The overload of the resource has disappeared, the duration of the corresponding Create outline concept task has been extended.
- Alternatively, select the planning type Adher. to tot. float ('adherence to total float'). In this case, only free capacity within the float is taken into account to reduce any overload. It does not postpone the project end date.
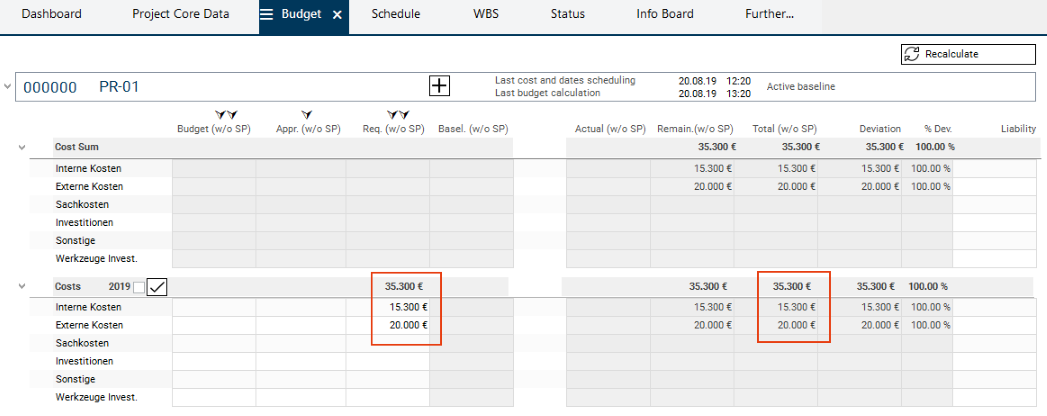
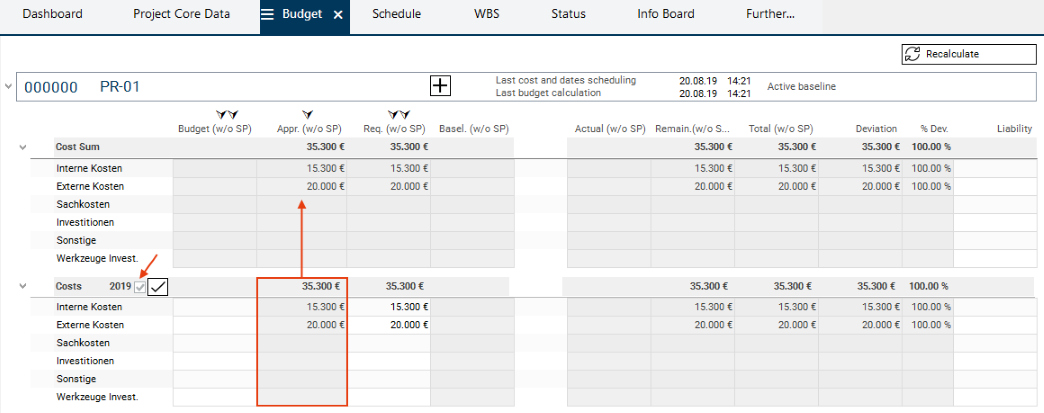
Request Budget
Task
- The project manager wants to view the costs calculated by the program in the course of the resource planning and request the project budget on this basis.
Procedure
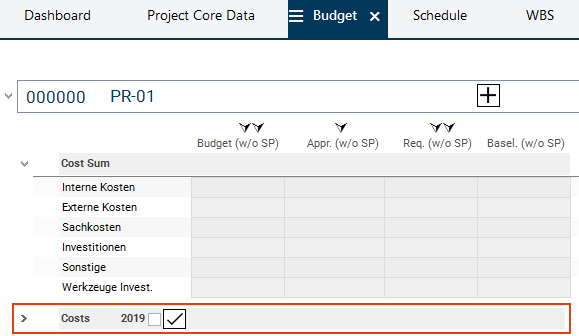
- Activate the Budget tab in the tab bar.
- In the Cost area, the costs calculated on basis of the resources planned for the project and their conversion factors are displayed on two levels:
- in the yearly tranche of the current year,
- on project level (here, the values of all yearly tranches are summarized if multiple tranches exist).
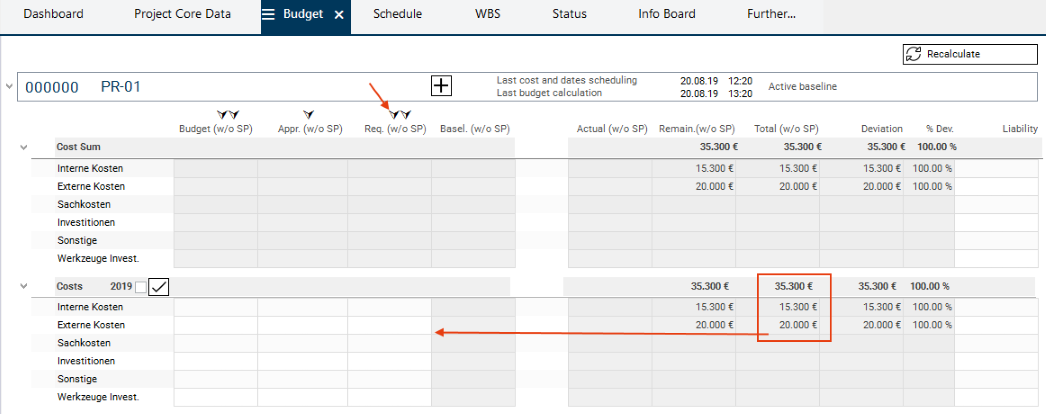
- Expand the yearly tranche.
- Copy costs calculated on the yearly tranche level from the Total (w/o SP) column (total costs) to the Req. (w/o SP) column (requested budget) by clicking on the left arrow above the Req. (w/o SP) column.
- Since the current project has a run time of less than a year, the budget is not divided into multiple yearly tranches. The entire budget is requested for the entire year.
- Save.
Request Approval for Project Execution
Task
- The project manager informs the multi-project manager that project planning is completed. She asks the multi-project manager to approve the project for execution as the planned start date for the project is in a few days.
Procedure
- In the Project panel, switch to the Project Core Data module.
- In the Stakeholder area, right-click on the record of the multi-project manager Georg Hart and select the Send info context menu command.
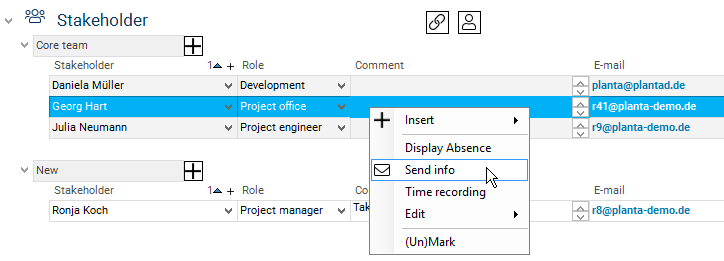
- The message window in which a message can be written is opened.
- In the upper field, the dialog -Please enter a subject- appears. Replace it with a suitable subject and enter the text in the field below it.
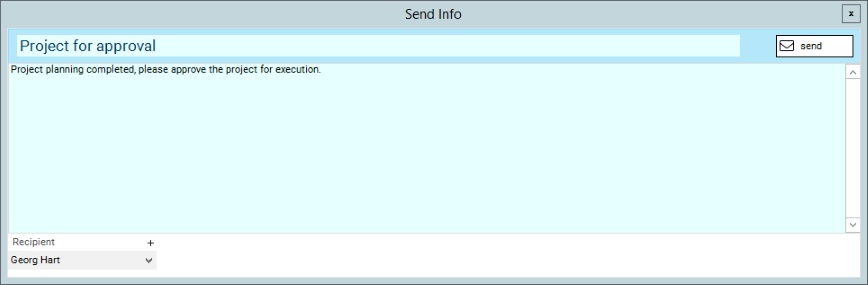
- Click on the Send button.
- Result: The multi-project manager receives the message via email.
Approve Project for Execution (R41)
Task
- The multi-project manager, Georg Hart, checks the effort and costs planned by the project manager and approves the project for execution.
Procedure
- Log on again with R41.
- In the Projects module, click on the link on the ID of the PR-01 project in order to switch to the Project panel.
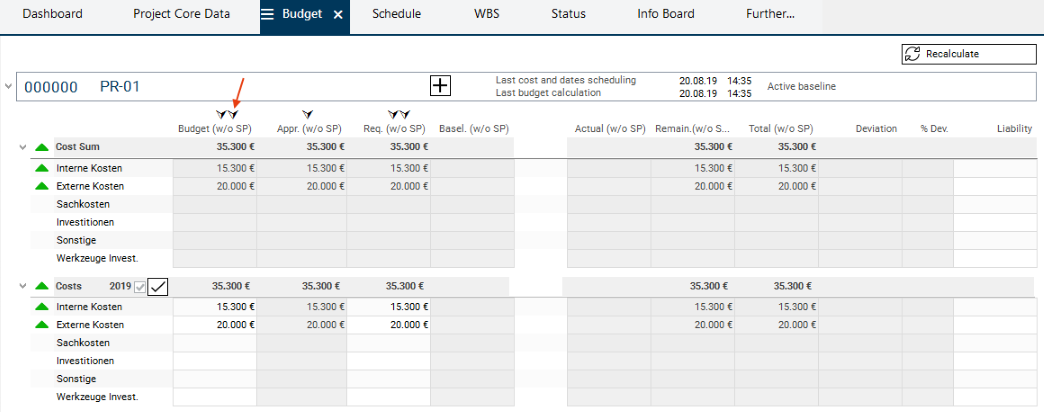
- Activate the Budget tab.
- The multi-project manager sees the budget requested by the project manager for the current project in the Req. (w/o SP) column (requested budget) in the yearly tranche of the current year. He wants to approve it.
- For this purpose, he clicks on the arrow above the Appr. (w/o SP) column (approved budget).
- The values of the Req. (w/o SP) column (requested budget) in the yearly tranche of the current year are automatically transferred to the Appr. (w/o SP) column (approved budget) of the yearly tranche of the current year.

- The multi-project manager clicks on the checkbox next to the Costs heading and subsequently on the Recalculate button.
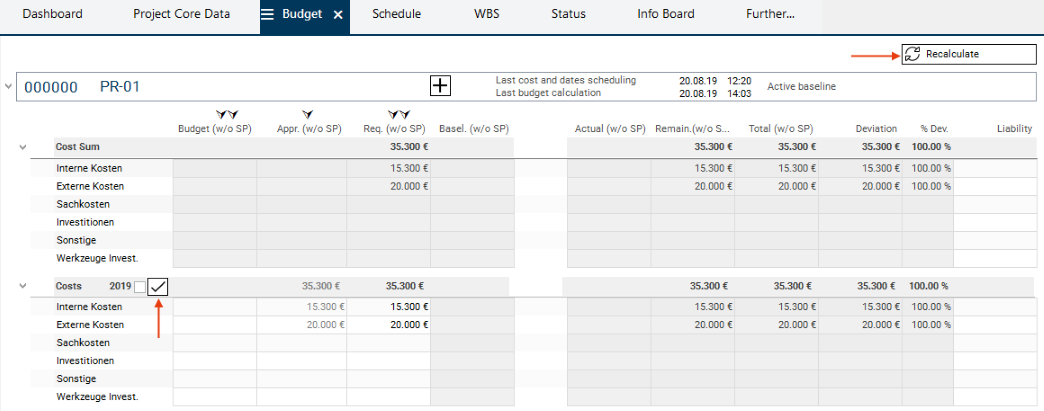
- As a result, the budget in the Appr. (w/o SP) column (approved budget) is approved.
- The checkbox on the left is ticked.
- The column is grayed out, which means that the values of this column cannot be edited.
- The values of the yearly tranche are summarized to the project level.
- Afterwards, the multi-project manager copies the values from the Appr. (w/o SP) column (approved budget) to the Budget (w/o SP) column by clicking on the right arrow above the Budget (w/o SP) column. Subsequently, he saves and clicks on the Recalculate button.
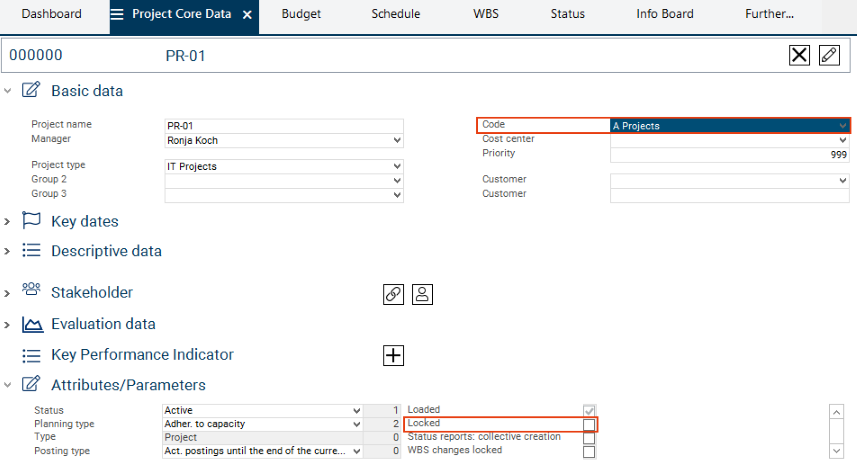
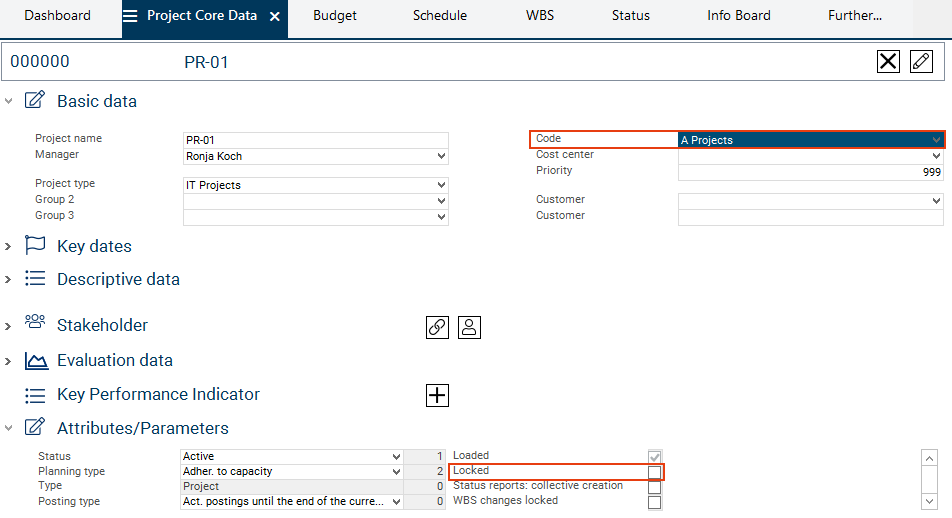
- Next, the multi-project manager switches to the Project Core Data module (activate the corresponding tab) in order to approve the project for implementation:
- Replace the E - New Projects Code by another one, e.g. A Projects.
- Deactivate the Locked checkbox in the Attributes/Parameters area.
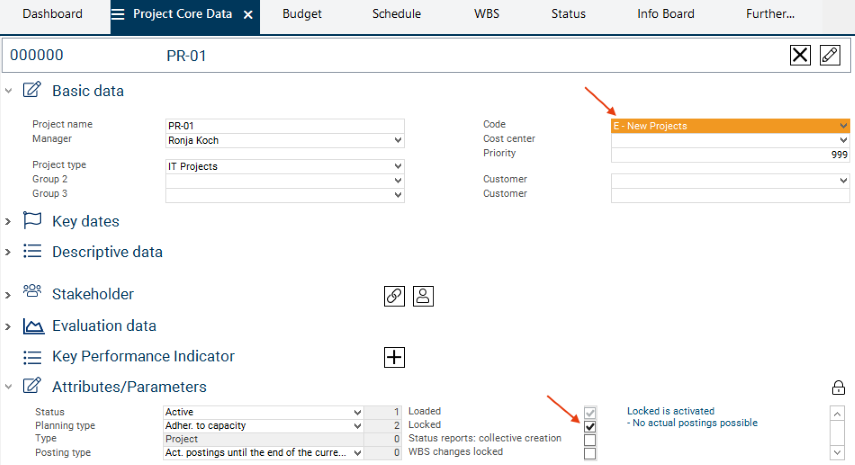
- Save.
- In doing so, the project is approved and worked hours can be reported to the project by the employees.
Freeze Planning Status
Task
- The multi-project manager wants to define the current planning status of the new IT project, so that any changes made over the course of the project can be controlled.
Details
- The current planning status of the project is frozen in a status report. The first status report is usually a baseline report.
Procedure
- Switch to the Status tab in the Project panel.
- In this module, the current status of the project and the existing status reports are displayed.
- It is a preview module in which new status reports can be created.
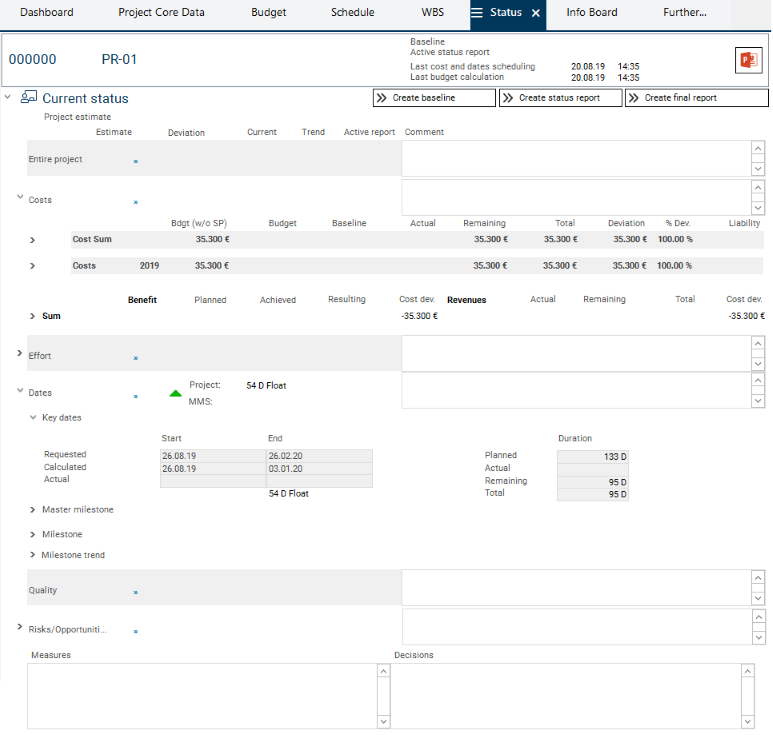
- Click on the Refresh button on the bottom left of the module so that the current project data is displayed in the module.
- Make necessary changes to the Current status area (only estimates and comments possible).
- Click on the Create baseline button.
- If no baseline report exists, the following message is displayed: Do you really want to create the baseline?
- Confirm the message with Yes.
- Afterwards, the current status of the project is frozen and the baseline report is created.
- The created baseline report is displayed in the Status reports area with the "Baseline" Report status.

Excursion: Compare Planning States
Information
- During the project progress, further planning states can be frozen in status reports. For project controlling, they can then be compared to the current planning status.
Procedure
- In the Status module, press the
 Configure trend analysis button to open the Configure Trend Analysis module.
- Activate the Milestone trend analysis checkbox in the Configure Trend Analysis module for the status reports that are to be compared with the current project status.
- Activate the Deviations tab via Further... Deviations.
- When opening the Deviations module, the current data and the data from the most recent of the selected status reports are displayed. ( If status reports have already been compared for this project, data of the last compared status report is loaded by default when you open the Deviations module.)
- At the bottom of the module, in the Report selection area, further status reports are offered for selection if they were preselected in the Configure Trend Analysis module.
- Click on the number of the required status report. Data of this report is displayed alongside the current project data and can be compared.
Replan Department to Staff Resources (R43)
Task
- The department manager of the Application Development department (Thomas Schaefer) wants to distribute to his employees the 100 hours for project PR-01 reserved for his department by the project manager.
Procedure
- Log on with user R43.
- Click on the Resource Planning tab in the Department Board panel.
- When the module is opened, department and individual resources of the department are loaded automatically.
- In the left window, the projects and tasks are listed that the application development department or individual employees of the department are assigned to as resources.
- For project PR-01's Create IT concept task the department's capacity availability is indicated as 100 h.
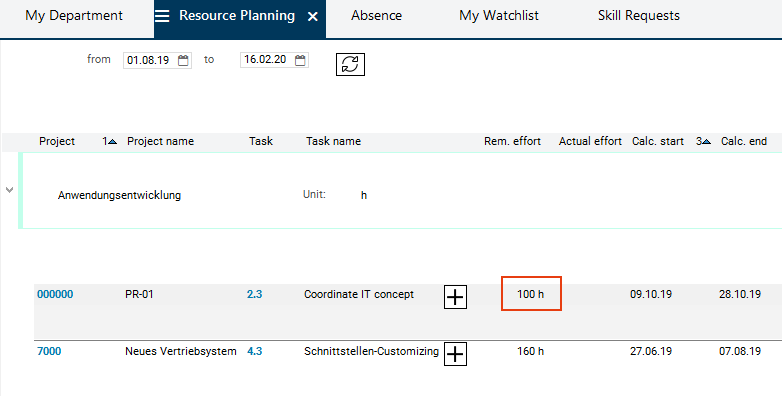
- Right-click on the Create IT concept task and select Insert resource from the context menu or
- click on the plus icon next to the task name in order to insert an empty record for selecting a resource.
- Select a resource fom the listbox in the Resource name field, e.g. Daniela Mueller.
- All employees of the Application Development department are displayed in the listbox.
- Enter the effort which is to be distributed, e.g. 10 hours, in the value to be distributed field.
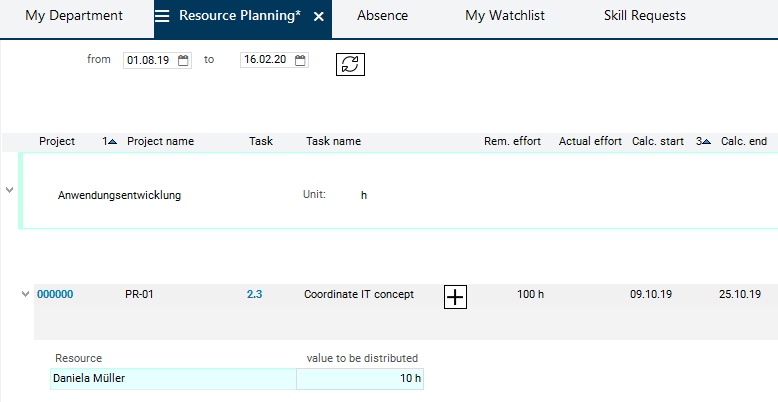
- Press the Distribute effort button at the bottom of the module.
- Confirm the displayed Distribute resource effort? message with Yes.
- Replanning is carried out.
- Result:
- The department planning volume has been reduced to 90 hours.
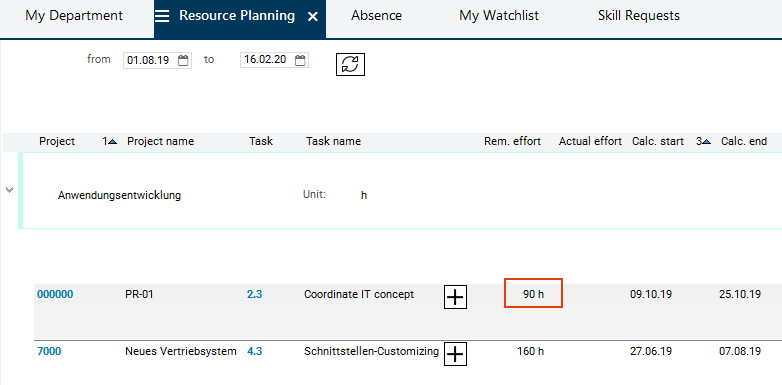
- 10 hours have now been distributed to the employee Daniela Mueller.
Work Reporting by the Project Team Member (R1)
Task
- Project team member Daniela Mueller wants to find out about her scheduling and todo items. Additionally, she wants to record the hours she spent working on the project.
Procedure
- Start a new client.
- Log on with user R1 (project team member).
- Daniela Mueller's Employee Board opens automatically.
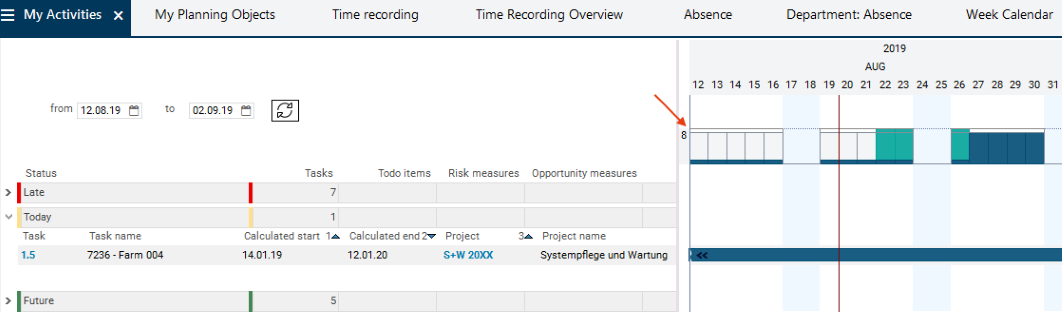
- In the My Activities module, the project team member can see in which projects she is planned in and which tasks and items are to be carried out.
- The utilization diagram below the time scale displays her utilization levels in the selected time frame.
Details
- The period filter is preset by default so that all todo items from the past to the first day of the week after next week are displayed. In order to have a look at individual future tasks, filter criteria have to be changed.
Record Project Hours Worked
Task
- At the end of the week, the project team member Daniela Mueller wants to record the hours she worked for the Create outline concept task.
Procedure
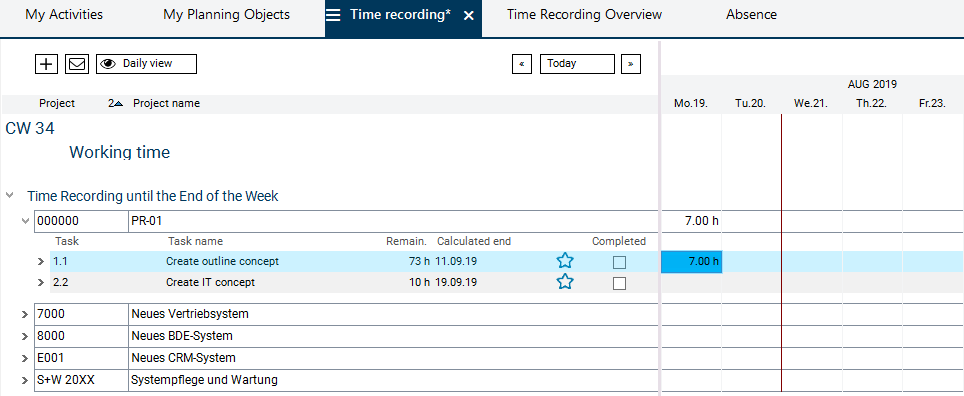
- Activate the Time Recording tab.
- In the left window, all projects for which the employee is scheduled are displayed.
- Expand the tree structure of project PR-01.
- All tasks which Daniela Mueller is supposed to work on are displayed.
- In the Remaining field, the employee sees the number of hours she is expected to spend working on the respective task.
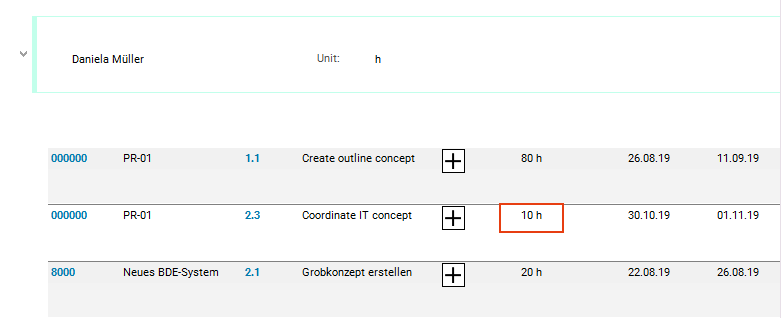
- Click in the field below the required date in the line of the Create outline concept task in the right window.
- Daniela Mueller enters the required amount of time she already worked on the task (actual hours).
- As a result, the planned value displayed in the Remaining field is reduced automatically so that you can quickly see how many of the planned hours still remain for the completion of the work.
- Save.
- Enter hours for all required days in the same way.
- Expand the task to see the existing load records for all days of the selected week.
- In the Comment field you can write a comment to the load record.

Remaining Effort Prognosis
Task
- After the project team member has completed the first version of the outline concept and has identified a couple of problems, she fears that the effort for completion may now be higher.
- She wants to inform the project manager about this additional effort.
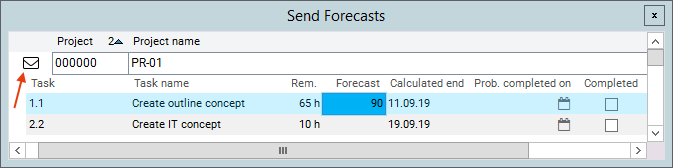
- In the Time recording module, Daniela Mueller clicks on the
 Send forecast button at the top of the module.
- The Send Forecasts module is opened.
- In the Forecast field in the respective record of project PR-01, she enters the estimated remaining effort of 90 h and saves.
- She clicks on the
 Send forecast button in the project line.
- The Send Info module including an automatically created message is opened.
- The message contains the following data: resource (sender), actual, remaining and forecast values for effort, and the calculated end date.
- The project manager of the project (in this case, Ronja Koch) is automatically entered as recipient.
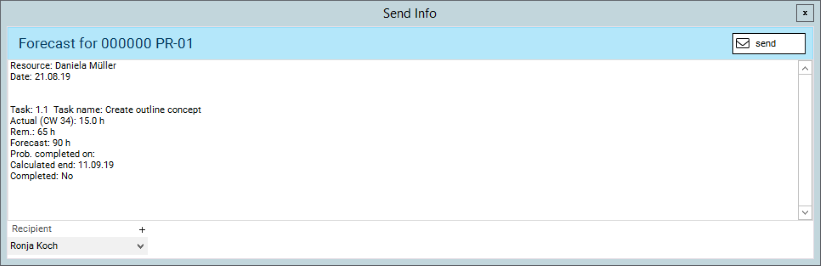
- Click on the Send button.
- The project manager Ronja Koch will receive this message via email.
Controlling and Replanning by Project Manager (R8)
Copy Actual Hours and Forecasts
Task
- At the beginning of every week, the project manager checks the project progress.
Procedure
- Start a new client.
- Log on with user R8.
- The Projects module is opened.
- Open the Project panel of project PR-01 by clicking on the project's ID number.
- The panel of project PR-01 is opened.
- Open the Progress module via the Project panel Further... Progress.
- Press the Calculate schedule button in the toolbar so that the posted actual hours are displayed.
- The entered actual and forecast effort of the project team member Daniela Mueller is displayed.
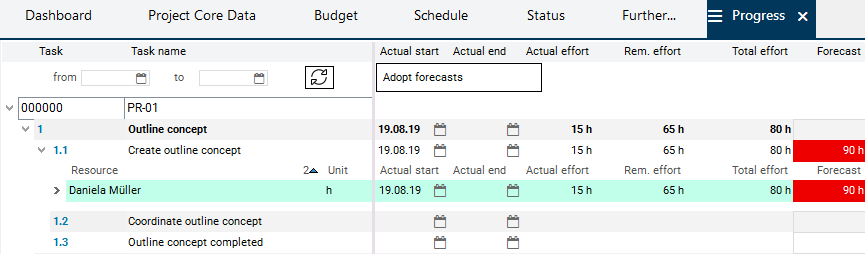
- Click on the Adopt forecasts button.
- Confirm the message No data are marked. All forecasts will be adopted. with OK.
- To avoid adopting all forecasts at once, mark only the records of the forecasts which you want to adopt before clicking the Adopt forecasts button.
- Result: Daniela Mueller's forecast has been transferred to the Rem. effort field and the Forecast field has been emptied.
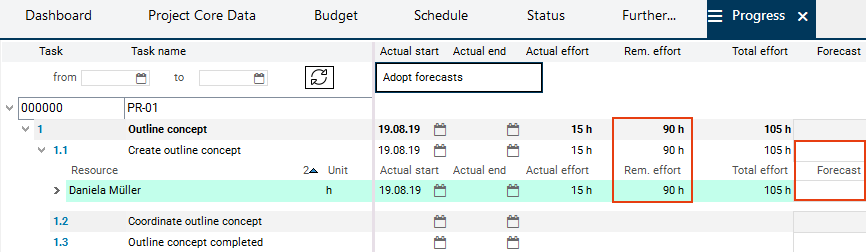
- Press the Calculate schedule button in the toolbar.
- Change to the Budget module.
- Press the Recalculate button.
- The cost details show additional costs on the basis of additional effort.
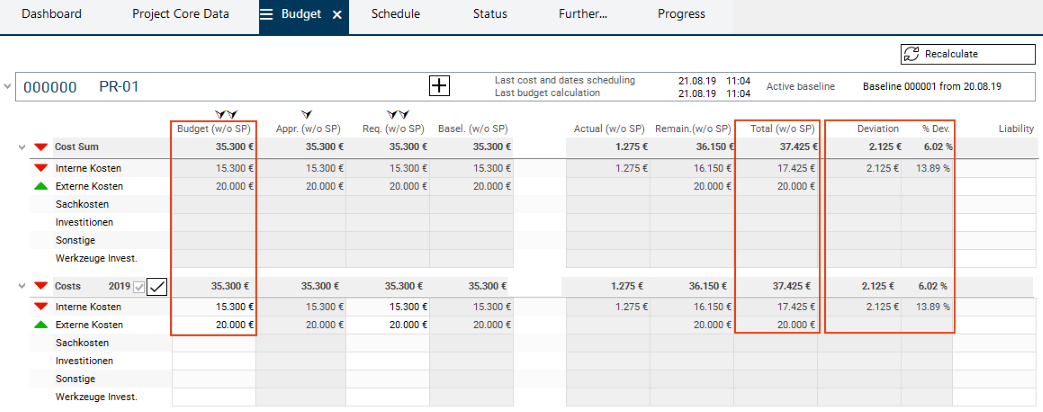
- However, the end date is not under threat.
Create Project Status Report
Task
- The monthly project status report is to be created, edited and released by the project manager.
Procedure
- Switch to the Status tab in the Project panel.
- Click on the Refresh button on the bottom left of the module so that the current project data is displayed in the module.
- Make necessary changes to the Current status area (only estimates and comments possible).
- Click on the Create status report button.
- The following message is displayed: Have you updated your estimates and comments?
- If you do not want to make changes, confirm the message with Yes.
- The status report is created and automatically opens in the Status Report module.
- The created status report is displayed in the Status module, Status reports area.

- In the Status Report module, press the Release button in order to release the status report.
- Once released, the status report can no longer be modified.

- Confirm the message with Yes.
- Press the
 Refresh/Reset button in the toolbar.
- In the Status module, Status reports area, the status report is now displayed with the "Last released" Report status.

Management Analyses (R41)
Project Overviews
Task
- The multi-project manager (Georg Hart) wants to find out which projects are under threat.
Procedure
- Start a new client.
- Log on with user R41.
- In the Projects module, the multi-project manager checks the project buffer (green arrows) or the delay (red bar) which are both displayed behind every project bar.
- The thumb symbols inform about the project manager's personal evaluation regarding the project status.
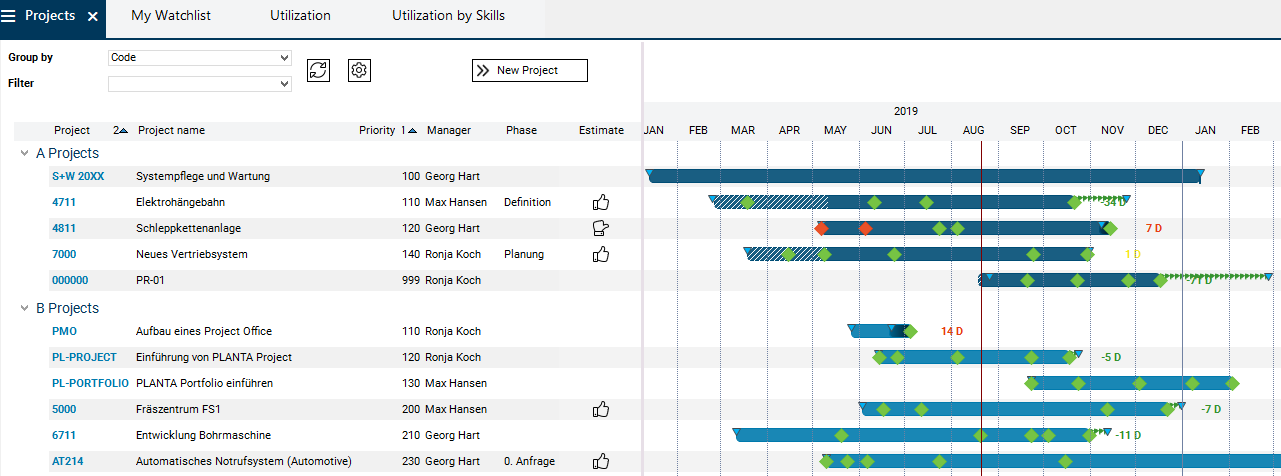
Task
- For project 4811, the multi-project manager notices a project delay. He wants to have a closer look at the project.
Procedure
- Click on the ID number of the project or on the Edit project context menu command in order to change to the Project panel.
- Here, the multi-project manager can check the data or evaluations of the project via various modules, e.g. Project Core Data or Info Board.
 .
.  CurrentEN Web>UserDocumentation>UserWorkflowsTutorials>ProjectWorkflowTutorial>ProjectWorkflowTutorialFromDB39514
