The PLANTA pulse documentation on wiki.planta.de is not being updated anymore. The current documentation can be found in the new PLANTA Online Help .
.
Board Functions
Information- Boards are container elements used to collect and manage cards in PLANTA pulse.
- Boards are opened by clicking on a board card
 |
Details |
Create Boards
Information- There are three/four different options to create boards in PLANTA pulse:
| How? | Who? | Within a project? | |
|---|---|---|---|
| 1 | Create New Board in the panel Boards | All users | No |
| 2 | Create New Board in the panel Projects | Project admin of the project Global admins |
Yes |
| 3 | Convert note into board via menu item | All users | Project admins: Yes Not a project admin: No |
| 4 | Create board from Board Template PREMIUM | Board admins on the board template | Yes |
- Switch to the panel Boards and click Create New Board in the area My Boards No Project.
- Enter a title for the new board.
- If needed, change the visibility mode of the board. To do so, click Change and select the mode.
- The visibility mode can later also be changed in the board bar.
- By default, new boards are created as private boards.
- Click Create.
- Switch to the panel Projects and open a project.
- Click on the placeholder board card Create New Board within a board group.
- Enter a title for the new board.
- If needed, change the visibility mode of the board. To do so, click Change and select the mode.
- The visibility mode can later also be changed in the board bar.
- By default, new boards are created as private boards.
- Click Create.
- The new board opens.
- The members of the project are automatically added as board members to the board.
- Open the notes via the menu item .
- In the window My Notes, select a note to be converted.
- Click on the button %CONVERT%.
- In the listbox Convert Note into, select the option Board.
- In the other listbox, select the project in which the board should be created.
- Users without global admin rights and without project admin permission can select the option No Category to create a board outside of a project.
- Via the checkbox Open Board/Card after Creation, select whether the new board should be opened directly.
- Click OK.
- The note is created as a new board, the note itself is deleted.
- The title of the note becomes the board title and the description of the note becomes the description of the board.
- Open the board template from which a board is to be created.
- In the board template bar, click Create Board from Template.
- Enter a title for the board.
- Select whether cards and members of the board template are to be copied to the board.
- Comments on cards are never copied to the board.
- If both cards and members are copied, the assignments of members to cards are also copied to the board.
- If needed, change the visibility mode of the board. To do so, click Change and select the mode.
- The visibility mode can later also be changed in the board bar.
- By default, new boards are created as private boards.
- Click Create.
- The new board opens.
- The board is created within the same project as the board template.
Import Boards
Information- Boards and all their cards, lists and members can be exported and imported via a .json file.
- To import a board, it needs to have been exported before.
- Click Create New Board in the space where you want to create the board.
- In the dialog box, click Import Board.
- Via Copy/Paste, insert the contents of the previously exported .json file.
- Click Import.
- Select the members to be imported.
- Click OK.
- The imported board is opened.
| See also: Export board |
Board Permissions
Information- There are three different board permissions: Admin, Normal and Comment Only.
| Permission | Label on the avatar | Example | Description |
|---|---|---|---|
| Admin | A |  |
Members with this permission are called board admins. They can view and edit cards, manage members, change their permissions and change board settings. |
| Normal | None |  |
Members with this permission can view and edit cards, but they cannot change board settings. |
| Comment Only | C |  |
Members with this permission can view cards and write comments. |


| Action | Admin | Normal | Comment Only |
|---|---|---|---|
| Change and save board view | X | - | - |
| Change board design | X | - | - |
| Create custom fields | X | - | - |
| Add custom fields to cards | X | - | - |
| Create iCalendar Feed | X | - | - |
| Copy board | X | X | - |
| Export board | X | - | - |
| Archive board | X | - | - |
| Delete board | X | - | - |
| Access board archive and restore elements | X | X | X |
| Configure chat channel | X | - | - |
| Hide/Display card keys | X | - | - |
| Manage members | X | - | - |
| Add members to cards | X | X | - |
| Edit labels | X | - | - |
| Add labels to cards | X | X | - |
| Create lists | X | X | - |
| Copy lists | X | X | - |
| Move lists on board | X | X | - |
| Move lists off board | X | - | - |
| Archive lists | X | X | - |
| Copy lists | X | X | - |
| Edit WIP limit | X | - | - |
| Create cards | X | X | - |
| Edit card contents | X | X | - |
| Write comments | X | X | X |
| Copy cards | X | X | - |
| Move cards on board | X | X | - |
| Move cards off board | X | - | - |
| Archive cards | X | X | - |
| Delete cards | X | X | - |
- The creator of the board receives the admin permission for the board automatically.
- There always needs to be at least one board admin per board. For this reason, the last board admin cannot leave the board without giving the admin permission to another board member first.
- Global admins can also configure board admins in the panel Administration.
- When a board is created within a project in the panel Projects, the permissions of the project permisson groups are applied on the board as well.
- In the sidebar, click on the avatar of the member.
- Click on the option Change Permission.
- Select the permission by clicking on the entry in the dialog box.
- The permission is ticked.
| See also: Permissions in PLANTA pulse |
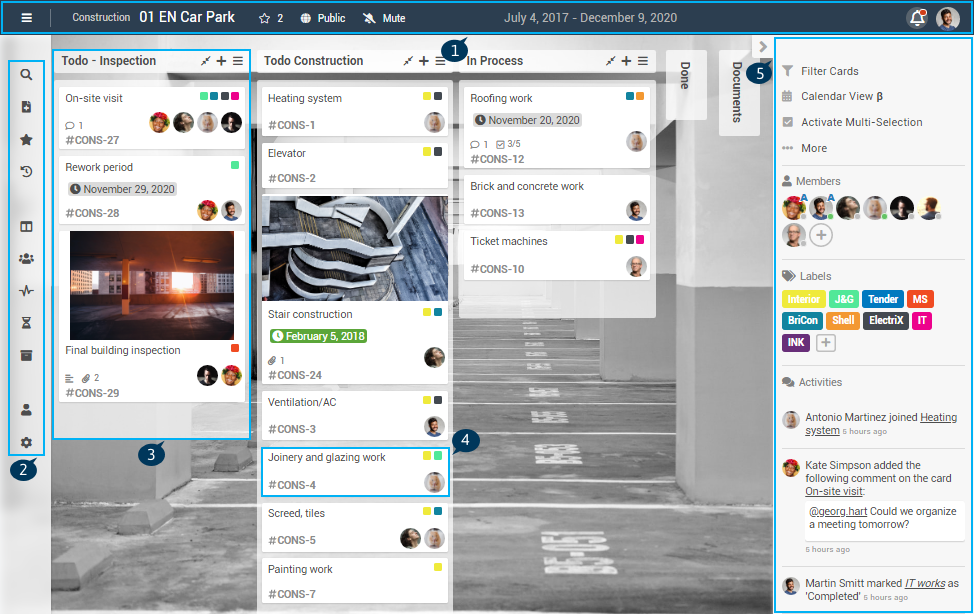
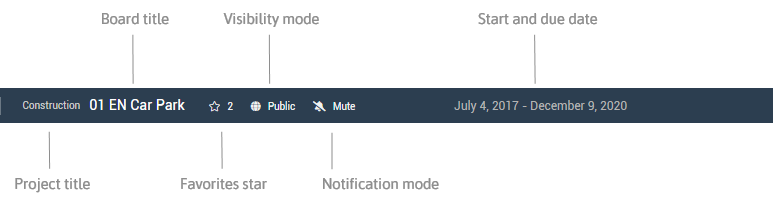
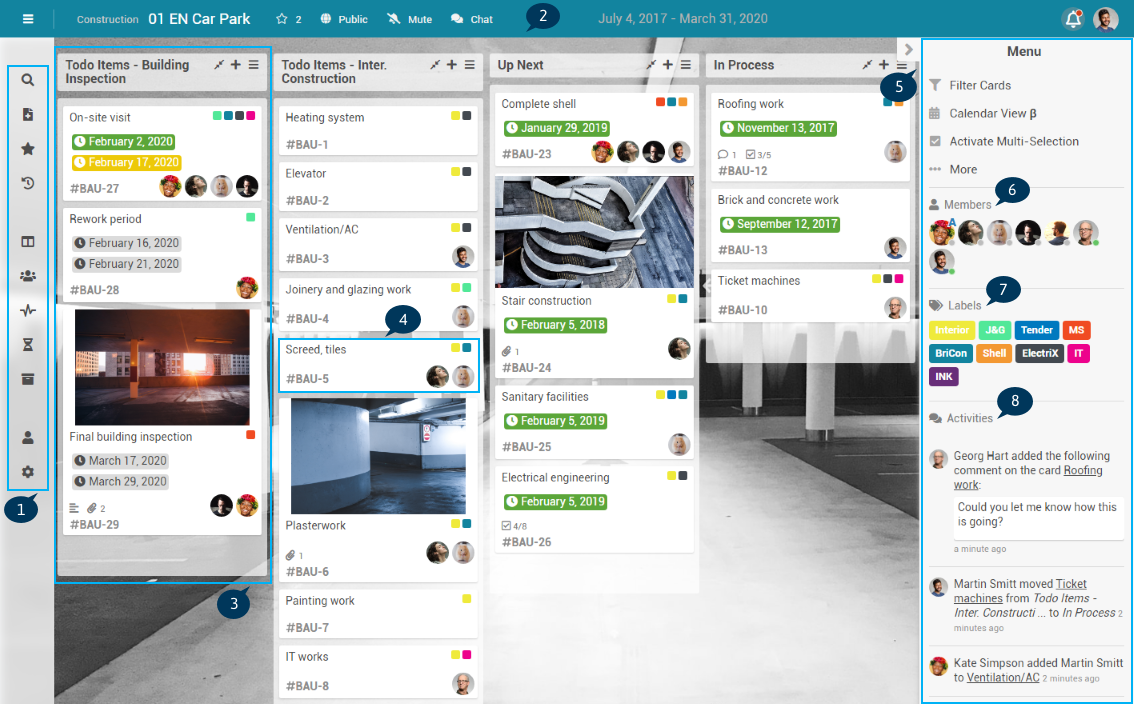
Board Bar
Information- In the upper area of a board, the board bar can be found within the home bar.

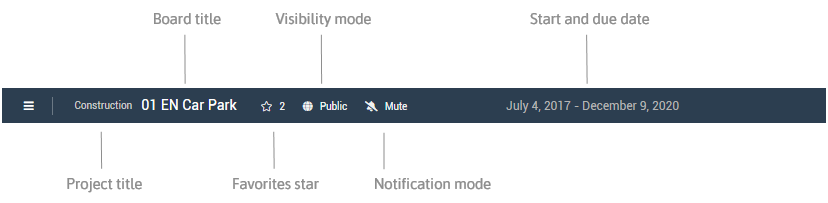
Project Title
Open board Board bar Information- If the board belongs to a project, the project title is displayed in the board bar.
- Via the link on the project title, the project can be opened in the panel Projects.
Board Title
Open board Board bar Information- By clicking on the board title, the title and the description of a board can be edited.
- Furthermore, start and due dates for the board can be defined.
- In the board bar, click on the board title.
- In the dialog box, edit/add the title and/or description of the board.
- If needed, select start and due dates in the calendar and click Save.
- Click Save.
- The description of a board is displayed on the board card in the panel Boards.
- The settings described above can only be configured by board admins.
Favorites Star
Open board Board bar Information- A board can be added to the favorites.
- In the board bar, click on or click on the star on a board card in the panel Boards.
- When a board has been added to the favorites, the favorites star changes to: .
- Favorite boards are displayed in the menu on the left.
- The number next to the star in the board bar (e.g. 2) indicates how many users have added the board to their favorites.
- By clicking on the favorites star again, the board is removed from the favorites.
Visibility Mode
Open board Board bar Information- Boards can be defined as Private or Public.
- Click Private or Public and select a mode.
- A private board is only visible and editable for assigned members.
- A public board is visible for every logged-in user in the area Public Boards.
- It can only be edited by board members.
- Users can join public boards themselves, if needed.
- The visibility of boards can only be changed by board admins.
- By default, new boards are created as Private boards.
Notification Mode
Open board Board bar Information- Every board member can configure individually about which changes on the board he/she wants to be notified via e-mail.
- The e-mail notifications are sent to the e-mail address saved in the User Settings.
- In the board bar, click on All or Own Cards or Mute to select a mode.
- All: The member receives notifications for any changes on this board.
- Own Cards: The member receives notifications for changes on any cards he/she created or is assigned to.
- Mute: The member wont receive any notifications about changes on this board.
- By default, notifications are deactivated.
| See also: Notification Settings |
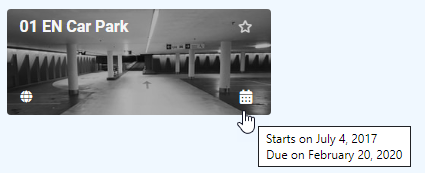
Start and Due Date
Open board Board bar Information- By clicking on the board title, start and due dates can be added for the board.
- In the board bar, click on the board title.
- In the dialog box, select start and due dates in the calendar and click Save.
- Click Save.
- The start and due dates of the board are displayed in the board bar.
Chat
Open board Board bar Information- When the option is activated in the board menu, the button Chat is displayed in the board bar.
- Board members can then access the board chat via the button.
| See also: Configure chat |
Sidebar
Open board If needed, expand sidebar via Information- The sidebar is displayed at the right side of the board and contains:
- Options for filtering/multi-selection of cards and settings for the board view
- The board menu, which can be opened via the menu item ... More and which also opens within the sidebar
- Information on the members, labels and activities of the board
- By default, the sidebar is collapsed. It can be expanded/collapsed by clicking or .
- Via the User Settings, users can configure whether the sidebar should be open or hidden by default.
Filter
Open board Sidebar Filter Information- The cards of a board can be filtered by the following criteria:
- Search terms
- Labels
- Members
- Status
- Dates
- In the sidebar, click Filter Cards.
- Search on Cards
- In the field Search on Cards, enter a search term.
- You can also search for a card key.
- If several terms are entered, cards are displayed which contain all terms in the provided order.
- The following fields are searched:
- Card key
- Title
- Description
- Comments
- Checklists
- File names of attachments
- The cards which contain the search term (or the card key) are displayed.
- In the field Search on Cards, enter a search term.
- Labels
- Click on the label(s) by which you want to filter.
- Cards to which the selected labels have been assigned are displayed.
- To filter for cards without labels, click Without Label.
- Members
- Without Member
- Cards no members have been assigned to are displayed.
- Me
- Cards the currently logged-in user has been assigned to are displayed.
- You can also filter for own cards by pressing the key Q.
- Assigned to
- By clicking on a member, you can filter for cards to which this member has been assigned.
- Without Member
- Created by
- By clicking on a member, you can filter for cards which have been created by this member.
- Status
- Cards on which the checkbox Completed has not been (Open) or has already been activated (Completed) are displayed.
- Due
- Cards with a due date that fits the selection are displayed.
- Start
- Cards with a start date that fits the selection are displayed.
- Updated
- Cards which have been created in the selected time span are displayed.
- Added on
- Cards which have been created in the selected time span are displayed.
- Filter criteria can be combined.
- When several criteria out of different sections are selected, the cards need to match all criteria.
- When the filter is active, the button Clear Filter is displayed at the bottom of the sidebar, which can be used to clear the current filter criteria.
- Via the button Select All Displayed Cards, the multi-selection can be opened to edit the filtered cards together.
- Via the in the upper left of the sidebar, the standard view of the sidebar can be accessed.
- Filters can be cleared by clicking the X in Filter is on or by pressing the key X.
- Alternatively, a filter can be removed by clicking on the filter itself again.
- Linked boards and cards are not filtered.
Calendar View/Board View BETA
Open board Sidebar Calendar View/Board View Information- Via Calendar View, the cards of a board can be displayed in a calendar.
- All cards of the board with a start and/or due date are displayed in a monthly view.
- In the Calendar View, the current month is displayed by default.
- Via the arrows in the upper right, the month or the year can be switched.
- When clicking on Today, the current month is displayed again.
- When clicking on a card in the calendar, the detail view of the card opens on the left.
- Via Board View, the standard Board View can be opened again.
- The Calendar View needs to be activated in the panel Administration first.
| See also: Change Board View |
Multi-Selection
Open board Sidebar Multi-Selection Information- Via the multi-selection, several cards on a board can be edited at once.
- It can be used to edit the labels and members of several cards at once.
- The selected cards can also be copied, moved, archived or deleted together.
- In the sidebar, click Activate Multi-Selection.
- Checkboxes are displayed to the left of the individual cards. Activate those to select the cards.
- In the upper area of the sidebar, the labels are displayed. By clicking on the labels, they can be assigned to the selected cards.
- If the labels are already assigned to some of the selected cards, a prompt appears to select whether the labels should be assigned to or removed from the cards.
- In the middle area, the board members are displayed, which can be assigned to the selected cards by clicking on them.
- If the members are already assigned to some of the selected cards, a prompt appears to select whether the members should be assigned to or removed from the cards.
- In the lower area of the sidebar, four buttons (Copy/Move/Archive/Delete Selection) are displayed.
- Copy/Move Selection
- Via the listboxes, select the board, swimlane and list to which the selected cards should be copied or moved.
- By default, cards are copied to the current board. When the cards should be copied to another board, select the board in the listbox.
- Archive Selection
- The selected cards are moved to the archive and can be accessed and restored, if needed, via the board menu Board Archive.
- Delete Selection
- When clicking Delete Selection, a dialog box appears informing the user that deleted cards cannot be restored anymore and related data will be deleted as well.
- If the selected cards are to be deleted, click Delete.
- Via the in the upper left of the sidebar, the standard view of the sidebar can be accessed.
- The multi-selection can be deactivated by clicking the X in Multi-Selection is active.
Board Menu
Information- Via the menu item ... More in the sidebar, the board menu with further options can be opened.
Change Board View
Open board Sidebar ...More Change Board View Information- Cards can be sorted vertically in lists and horizontally in swimlanes.
- In the board menu, select the option Change Board View.
- Select the List View or the Swimlane View.
- By clicking Save, the current view can be saved for everyone.
- This option also saves collapsed lists or swimlanes.
- If the view is not saved, the changes are discarded when the board is reopened.
- The board view can only be saved by board admins.
| See also: Lists & Swimlanes |
Change Background Image
Open board Sidebar ...More Change Background Image Information- The design of boards can be customized, e.g. with individual background images.
- In the board menu, select the option Change Board View.
- There are several ways of adding a background image:
- Via URL
- Add the URL in the field Set Background via URL and click Apply.
- By uploading an image
- Click Browse Files and select an image.
- By picking an image from the platform Unsplash.
- To do so, click on one of the displayed images or enter a search term first.
- Via URL
- The selected background image is also displayed in the panel Boards and in the panel Projects on the board card.
- This menu item is only available for board admins.
Change Board Color
Open board Sidebar ...More Change Board Color Information- The design of boards can be customized, e.g. with colors.
- In the board menu, select the option Change Board Color.
- Select a color.
- This menu item is only available for board admins.
Change Board Theme
Open board Sidebar ...More Change Board Theme Information- The design of boards can be customized, e.g. with board themes, i.e. different colors for card or list backgrounds and/or titles.
- In the board menu, select the option Change Board Theme.
- The following themes are available:
- Standard
- Transparent White
- Transparent Grey
- White Headings
- This menu item is only available for board admins.
Custom Fields
Open board Sidebar ...More Custom Fields Information- Custom fields can be used to add further individual fields to cards.
- In the board menu, select the option Custom Fields.
- This menu item is only available for board admins.
- Click Create Field.
- Enter a title for the field.
- In the listbox Type, select the field type (Text, Number, Checkbox, Date, Listbox, Link, Card Color, Votings).
- By activating the checkbox Display in Detail View of Cards, the new field is automatically displayed in the detail view of every card and does not need to be added manually via the card menu.
- This checkbox needs to be activated if not only the board admin but all other board members are to edit the field on all cards. If the checkbox is not activated, the custom field needs to be added manually to the cards by the board admin.
- By activating the checkbox Display in Preview of Cards, the new field is displayed automatically in the preview as soon as a value has been selected for the field in the detail view of the card.
- Click Save.
- Via the button to the right of the field, the title and display mode of the field can be changed or the field can be deleted.
- If the option that the field should always be displayed has not been selected, the new field can be added to a card via the card menu Custom Fields.
- Custom fields can only be created, edited and deleted by board admins.
- Once a field has been created for a board and added to cards, the other board members can use it (add values, vote, etc.).
- A custom field of the type Card Color can only be created once per board.
- The type of a field cannot be changed after the field has been created.
- When a field is deleted, it is removed from all cards.
| Field Type | Symbol | Details |
|---|---|---|
| Text | Information
|
|
| Number | Information
|
|
| Checkbox | Information
|
|
| Date | Information
|
|
| Listbox | Information
|
|
| Link | Information
|
|
| Card Color | Information
|
|
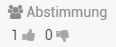
| Votings | Information
|

 appears. By clicking on it, you can see who voted.
| See also: Custom fields on cards |
Board iCalendar Feed
Open board Sidebar ...More Board iCalendar Feed Information- Via the iCalendar Feed, the dates of the cards of a board (start and due date) can be exported into a calendar, e.g. Microsoft Outlook.
- In the board menu, select the option Board iCalendar Feed.
- Click Create.
- Only board admins can create an iCalendar Feed.
- In the board menu, select the option Board iCalendar Feed.
- Click Copy URL.
- The iCalendar Feed needs to have been created first by the board admin (see above).
- In the Outlook calendar, click Add Calendar and select From Internet.
- In the dialog box, paste the copied URL and confirm with OK.
- A new calendar with the dates from the boards is created.
- For every start and due date, an entry with the title of the card is created.
- In PLANTA pulse there are two ways of using iCalendar Feeds. Either
- for the dates of all cards of a board or
- for the dates of all cards to which a user has been assigned.
| See also: iCalendar Feed for all cards |
Copy Board
Open board Sidebar ...More Copy Board Information- By copying a board, a new board with the contents of the original board can be created.
- In the board menu, select the option Copy Board.
- Enter a title for the board copy.
- Select whether members, cards and card comments of the board should be kept. PREMIUM
- Copy.
- The board copy is opened automatically.
- The board is created in the same project as the original board.
Export Boards
Open board Sidebar ...More Export Board Information- Boards and all their cards, lists and members can be exported via a .json file.
- In the board menu, select the option Export Board.
- A .json file of the board is created and downloaded.
- Using this file, the board can be imported somewhere else.
- This menu item is only available for board admins.
| See also: Import boards |
Archive Boards
Open board Sidebar ...More Archive Board Information- A board can be archived so that it will not be displayed in PLANTA pulse anymore, but the related data and information will not be lost.
- In the board menu, select the option Archive Board.
- Archive.
- Via the menu Archive, archived boards can be accessed and restored, if needed.
- Archived boards can be restored by all board admins of the board.
- This menu item is only available for board admins.
Delete Boards
Open board Sidebar ...More Delete Board Information- A board can be deleted, which will also delete all related objects (e.g. lists, cards) and information.
- In the board menu, select the option Delete Board.
- In the dialog box, click Delete.
- If a board in PLANTA pulse is only to be hidden instead of deleted, so that the related data will be kept, it can also be archived.
- This menu item is only available for board admins.
- A deleted board and all related data cannot be restored anymore.
- Boards with cards on which working hours were recorded and boards which are synchronized with PLANTA project cannot be deleted but only archived via the board menu.
- Boards with global admin rights can delete boards with cards on which hours worked have been recorded and boards which are synchronized with PLANTA project in the panel Administration.
Board Archive
Open board Sidebar ...More Board Archive Information- Archived cards, lists and swimlanes can be accessed in the Board Archive and can be restored or deleted if necessary.
- In the board menu, select the option Board Archive.
- Switch to the tab of the object to be edited (Cards, Lists or Swimlanes).
- By clicking on the links, the objects can be restored or deleted.
- Restored objects are automatically added to the board again.
- They appear at the position from which they were deleted.
- Archived boards can be accessed in the menu Archive.
- If lists and swimlanes are archived, the related cards are archived as well. They are, however, not listed separately in the tab Cards.
Configure Chat Channel
Open board Sidebar ...More Configure Chat Channel Information- Every board can be connected to a chat.
- In the board menu, select the option Configure Chat Channel.
- Enter the URL for the chat (room).
- Click Save.
- When a board is connected to a chat, the chat can be opened via the button in the board bar.
- The chat application currently still needs to be installed separately.
- This menu item is only available for board admins.
Hide/Display Card Keys
Open board Sidebar ...More Hide/Display Card Keys Information- The card keys on the individual cards of the board can be hidden, if needed.
- In the board menu, select the option Hide Card Keys or Display Card Keys.
- This menu item is only available for board admins.
Disable/Activate Time Recording
Open board Sidebar ...More Disable/Activate Time Recording Information- The option Disable/Activate Time Recording can be used to disable or activate time recording on the board.
- By default, time recording is activated.
- If the setting is changed, no hours worked can be recorded on the cards of the board anymore.
- This menu item is only available for board admins.
- If PLANTA Hybrid is used and the setting Enable Time Recording on Cards of Unsynchronized Boards in the panel Administration is deactivated, time recording is always disabled on unsynchronized boards and this menu item is not displayed.
Save as Board Template PREMIUM
Open board Sidebar ...More Save as Board Template Information- Existing boards can be saved as board templates which can then be used as a copy template for other boards.
- Open the board menu in the sidebar and select the option Save as Board Template.
- Enter a title for the board template.
- In the listbox Template Group, select the group into which the template is to be added in the panel Projects.
- Select whether cards and members of the board are to be copied to the board template.
- Comments on cards are never copied to the board template.
- Click Save.
- The new board template opens.
- Board templates can only be created within a project.
- If a board is not part of a project, the option Save as Board Template is missing from the board menu.
- When a board is saved as a board template, the original board remains unchanged, i.e. no conversion takes place.
| See also: Board Templates |
Members
Open board Sidebar Information- In the area Members, all members of the board are displayed with their avatar.
- Members with admin permission can add members to the board, to which tasks represented by cards can be assigned.
- Users can join public boards themselves, if needed.
- Members with admin permission can remove members from the board.
- Members can be assigned to cards via Drag&Drop. Further Information
- When a board was created within a project, the members of the project are added to the board automatically. Further Information
- When a member is added to the board later, he/she will, however, not automatically become a member of a project permission group.
- Furthermore, new members of the project which are added to the project after a board has already been created will not be added to the board automatically, but will have to be added manually, if needed.
- In the panel Boards, in the area Public Boards, click on the board.
- If needed, open the sidebar to the right and click
 .
.
- In the sidebar, click on and in the field, enter the name of a user and select it.
- The user is added as a member to the board (with avatar) and is notified about the invitation.
- The user is notified about the board invitation via the channels he/she defined in the Notification Settings and in the panel Boards (via an invitation card).
- If the user does not exist in PLANTA pulse yet, enter the e-mail address and click Invite via E-Mail.
- The person receives a board invitation via e-mail.
- Once the person has registered as a user in PLANTA pulse, he/she can join the board.
- In the sidebar, click on the avatar of the member.
- Click Remove from Board.
- If the member is really to be removed, click Remove Member in the dialog box.
- The member is removed from the board, the avatar of the user is not displayed in the area Members anymore.
- The member is also removed from all cards he/she was assigned to on the board.
- In the sidebar, click on the own avatar.
- Click Leave Board.
- The member is removed from the board, the avatar of the user is not displayed in the area Members anymore.
- The member is also removed from all cards he/she was assigned to on the board.
- The following options are available when clicking on a member avatar:
- Filter Cards
- All cards to which the member was assigned are displayed.
- Change Permission
- Members with admin permission can configure the reading and writing permissions (Admin, Normal, Comment Only) of board members.
- Leave Board or Remove from Board
- Members can leave a board or members with admin permission can remove other members from the board.
- Filter Cards
- The color indicators (green, yellow, grey, red) on the user avatars display the following:
- Green: The user is online in PLANTA pulse and active on the board.
- Yellow: The user is online in PLANTA pulse but not active on the board.
- Grey: The user is offline.
- Red: The user has been invited to the board but has not accepted the invitation yet.
- The board permissions are displayed with letters at the avatars.
- If new members have been added to a board in PLANTA pulse which is synchronized with PLANTA project, they are automatically copied to PLANTA project as well and are automatically assigned to the respective task as resource assignments, provided that
- a user exists in PLANTA project which has the same e-mail address as the new board member in PLANTA pulse and
- this user exists in PLANTA project as a resource the ID of which equates to that of the user.
Labels
Open board Sidebar Information- In this area, labels are displayed as colored squares and can be assigned to a card via Drag&Drop from the sidebar. Further Information
- Labels an be used to categorize the cards on a board.
- By default, six different color labels are displayed.
- New labels can be added to the existing six.
- You can either add a new color label only, or a color label with text.
- Only board admins can create new labels.
- You can also add a description to labels which will then be displayed as a tooltip at the label.
- That way, the labels of a board can be individualized.
- In the sidebar, in the area Labels click on .
- To add another color label
- Select a color.
- The selected color is ticked.
- Click Create.
- To add a label with text
- Add the text in the field Title.
- If needed, add a description in the corresponding field.
- If a description is added, it is displayed as a tooltip at the label.
- Select a color.
- Click Create.
- The new label is added to the area Labels.
- In the sidebar, in the area Labels, click on a label.
- Select a title, description and/or color.
- Click Save.
- In the sidebar, in the area Labels, click on a label.
- Click Delete.
- The label is now not available on the board anymore and is removed from all cards.
- The colors which are available for labels can be edited by global admins in the panel Administration.
- If the option Allow Custom Board Labels has been activated in the panel Administration, users can create labels with individual colors directly on the boards.
- On a board, in the area Labels, click on .
- Click New Color.
- Enter a title and a hexcode for the color.
- Click Create.
- The new label color is created only on the current board.
| See also: Labels on cards, Add custom colors |
Activities
Open board Sidebar Information- Board members are informed about all activities on a board, e.g. when
- Cards are added, moved, completed or deleted.
- Members join or leave.
- Comments and working hours are added to cards.
- Via the option Hide System Messages in the User Settings, the user can define which activities should be displayed in the sidebar.
| See also: Lists, Cards |


| I | Attachment | History | Size | Date | Comment |
|---|---|---|---|---|---|
| |
AbgestimmtEN.png | r2 r1 | 1.1 K | 2019-06-18 - 14:59 | |
| |
Abstimmung.PNG | r2 r1 | 0.9 K | 2019-06-18 - 14:59 | |
| |
Alle.png | r1 | 0.7 K | 2018-08-24 - 11:40 | |
| |
ArchivButton.png | r1 | 0.7 K | 2019-04-18 - 14:12 | |
| |
Aus.png | r1 | 0.8 K | 2018-08-24 - 11:41 | |
| |
BoardAnsichtMenuepunkt.PNG | r1 | 1.2 K | 2019-04-10 - 08:53 | |
| |
BoardAnsichtNummeriert.png | r1 | 843.2 K | 2019-04-10 - 07:29 | |
| |
BoardBeitretenEN.png | r1 | 0.7 K | 2019-05-13 - 13:14 | |
| |
BoardDatumEN.png | r1 | 35.3 K | 2019-09-27 - 12:18 | |
| |
BoardLeisteEN.png | r4 r3 r2 r1 | 12.7 K | 2020-08-04 - 08:26 | |
| |
BoardLeisteLinks.PNG | r2 r1 | 7.8 K | 2019-04-15 - 07:54 | |
| |
BoardLeisteRechts.PNG | r2 r1 | 5.9 K | 2019-04-15 - 07:58 | |
| |
BoardUebersicht.png | r6 r5 r4 r3 r2 | 386.3 K | 2020-08-19 - 15:27 | |
| |
BoardUebersicht17EN.png | r2 r1 | 753.4 K | 2019-07-29 - 12:50 | |
| |
ButtonFiltern.png | r1 | 0.5 K | 2019-04-15 - 09:15 | |
| |
ButtonMehrfachauswahl.png | r1 | 1.2 K | 2019-04-15 - 09:30 | |
| |
ButtonMenue.png | r1 | 0.3 K | 2020-08-03 - 09:25 | |
| |
ChatButton.png | r1 | 0.7 K | 2019-04-15 - 09:00 | |
| |
Checkbox_Auswahl.png | r1 | 0.2 K | 2018-06-20 - 12:14 | |
| |
DaumenHoch.png | r2 r1 | 0.4 K | 2019-06-18 - 14:59 | |
| |
DaumenRunter.png | r2 r1 | 0.4 K | 2019-06-18 - 14:59 | |
| |
Eigene.png | r1 | 0.8 K | 2018-08-24 - 11:40 | |
| |
FeldBearbeiten.png | r1 | 0.3 K | 2018-05-31 - 11:14 | |
| |
HomeButton.png | r1 | 0.7 K | 2019-04-29 - 12:54 | |
| |
IconAbstimmung.png | r2 r1 | 0.5 K | 2019-06-18 - 14:33 | |
| |
IconAdmin.png | r4 r3 r2 r1 | 2.9 K | 2020-08-26 - 10:35 | |
| |
IconAlleEN.png | r3 r2 r1 | 0.7 K | 2019-06-18 - 13:26 | |
| |
IconArchiv.png | r1 | 0.2 K | 2019-06-24 - 14:13 | |
| |
IconAusEN.png | r3 r2 r1 | 0.7 K | 2019-06-18 - 13:26 | |
| |
IconBoard.png | r1 | 0.2 K | 2019-11-13 - 10:59 | |
| |
IconChat.png | r1 | 0.7 K | 2019-06-18 - 12:36 | |
| |
IconCheckbox.png | r2 r1 | 0.3 K | 2019-06-18 - 14:33 | |
| |
IconCommentOnly.png | r2 r1 | 2.7 K | 2020-08-26 - 10:36 | |
| |
IconDatum.png | r2 r1 | 0.4 K | 2019-06-18 - 14:33 | |
| |
IconEigeneKartenEN.png | r3 r2 r1 | 1.0 K | 2019-06-18 - 13:26 | |
| |
IconFarbe.png | r2 r1 | 0.4 K | 2019-06-18 - 14:33 | |
| |
IconKalender.png | r1 | 0.4 K | 2019-11-13 - 10:59 | |
| |
IconLink.png | r2 r1 | 0.4 K | 2019-06-18 - 14:33 | |
| |
IconListbox.png | r2 r1 | 0.3 K | 2019-06-18 - 14:33 | |
| |
IconNormal.png | r1 | 2.8 K | 2020-08-26 - 10:36 | |
| |
IconOeffentlichEN.png | r1 | 0.9 K | 2019-06-18 - 13:23 | |
| |
IconPlus.png | r1 | 0.3 K | 2019-04-15 - 07:32 | |
| |
IconPlusKategorie.png | r1 | 0.2 K | 2019-04-15 - 07:33 | |
| |
IconPlusLabels.png | r1 | 0.4 K | 2019-04-15 - 10:13 | |
| |
IconPlusMitglieder.png | r1 | 0.7 K | 2019-04-15 - 09:42 | |
| |
IconPrivatEN.png | r1 | 0.7 K | 2019-06-18 - 13:23 | |
| |
IconStern.png | r1 | 0.5 K | 2019-06-18 - 13:18 | |
| |
IconSternGefuellt.png | r1 | 0.4 K | 2019-06-18 - 13:18 | |
| |
IconText.png | r2 r1 | 0.4 K | 2019-06-18 - 14:34 | |
| |
IconVerlinkt.png | r1 | 0.4 K | 2019-04-16 - 10:22 | |
| |
IconVerlinkt17.png | r1 | 0.4 K | 2019-06-18 - 12:36 | |
| |
IconZahl.png | r2 r1 | 0.5 K | 2019-06-18 - 14:34 | |
| |
ListenButton.png | r1 | 0.7 K | 2018-09-25 - 16:06 | |
| |
NeuesBoard.PNG | r1 | 38.6 K | 2019-04-09 - 11:37 | |
| |
Oeffentlich.PNG | r1 | 1.0 K | 2018-08-24 - 11:09 | |
| |
PSPCode.PNG | r1 | 134.4 K | 2018-05-24 - 13:26 | |
| |
PlantaSync.png | r2 r1 | 1.2 K | 2019-07-29 - 12:52 | |
| |
Privat.PNG | r1 | 0.7 K | 2018-08-24 - 11:10 | |
| |
Stern.PNG | r1 | 0.5 K | 2018-08-24 - 11:23 | |
| |
SternAnzahl17.png | r1 | 0.6 K | 2019-06-18 - 13:18 | |
| |
Stern_Anzahl.PNG | r1 | 0.6 K | 2018-08-24 - 11:24 | |
| |
Stern_gefllt_oN.png | r1 | 0.4 K | 2018-08-24 - 11:23 | |
| |
Stern_gefuellt.png | r1 | 0.5 K | 2018-08-24 - 11:24 | |
| |
Stern_gefuellt_oN.png | r1 | 0.4 K | 2018-08-24 - 11:25 | |
| |
SwimLanesButton.png | r1 | 1.1 K | 2018-09-25 - 16:07 | |
| |
boardmenubutton.png | r1 | 0.3 K | 2018-05-24 - 14:16 |
|