The documentation from version 39.5.17 of PLANTA project can be found in the new PLANTA Online Help .
.
TWiki> CurrentEN Web>UserDocumentation>UserWorkflowsTutorials>ProcessModelWorkflowTutorial>ProcessModelWorkflowTutorialUpToDB3950AndS39513
Working with Process Models (Tutorial) Up to DB 39.5.0 and S 39.5.13
Please note- The description in this topic applies to PLANTA project versions < DB 39.5.0 and < S 39.5.13.
- The following table contains links to the other versions:
| DB 39.5.15 | go to the tutorial |
| DB 39.5.14 | go to the tutorial |
| DB 39.5.13 | go to the tutorial |
| DB 39.5.7 - DB 39.5.12 | go to the tutorial |
| DB 39.5.0 - DB 39.5.6 | go to the tutorial |
| < DB 39.5.0 but S 39.5.13 | go to the tutorial |
| < DB 39.5.0 and < S 39.5.13 | go to the tutorial |
| go to further tutorials |
Introduction
Information- Beside the conventional way of project planning, PLANTA project offers the option of planning and controlling projects in a process-oriented way.
- This workflow is supposed to teach users how to work with process models in the PLANTA software.
- All exercises are based on the PLANTA demo data. This data must be installed beforehand.
- Master data such as process models, resources, users, etc. has already been set up in the demo data. This tutorial does not cover how the master data is defined (for this, see Master Data Entry). It is merely about describing procedures like the planning procedure or the creation of a new project according to one of the models available. A technical guide about how to create and control projects with the PLANTA software can be found in the Project Workflow as well as in the description of individual user modules in case of planning objects such as ideas, plans or requests.
- It is recommendable to have carried out the project workflow before the process model workflow.
- The screen shots used are merely examples of functions. The screen shot layout may deviate from the program.
Activate Process Models (R41)
Task- The multi-project manager, Mr.Hart, has just created the new project PR-01 and he has appointed Mr. Koch (R8) as project manager.
- To plan and control the new project, Mr. Hart would like to apply the DIN69901/1-5 (Short version) process model.
- Start the client.
- Log on with user R41.
- Create a new project.
- Enter PR-01 for the project name.
- Appoint Mr. Koch as a project manager (Manager).
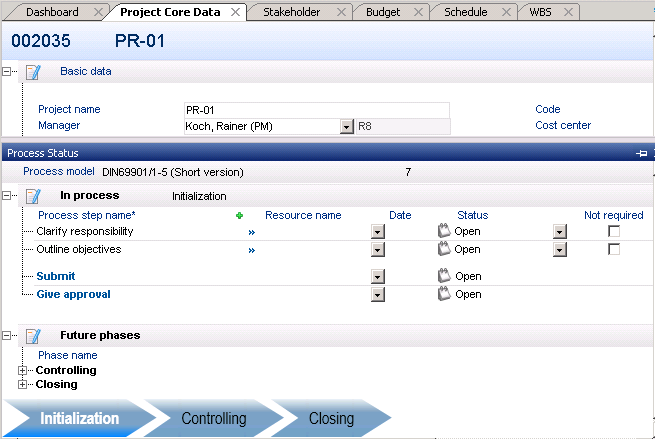
- Open the Project panel of the PR-01 project.
- Click on the Process status tab at the bottom of the panel in order to open the module of the same name.
- Select the DIN69901/1-5 (short version) process model from the Process model listbox.
- Activate the Activate model button.
- All phases of the model are loaded along with the process steps belonging to it.
- the first phase is opened under the In process category; the individual process steps are immediately visible.
- All other phases are displayed under the Future phases category, the individual process steps are invisible.
- The process bar at the bottom of the module is loaded.
- All phases of the model are loaded along with the process steps belonging to it.
Edit Phase (R41)
Create Process Steps Manually
Task- For the Initialization phase, Mr. Hart wants to create the additional Define consequences of non-realization process step.
- Furthermore, the Approval process step should get a subordinated approval process step, because Mr. Hart wants to delegate the monitoring of completed process steps to the project manager before the final approval.
- New process steps can be inserted manually in the existing model.
- Project-specific process steps: via the Insert--> Process step context menu or via the plus symbol next to the Process step name field heading.
- Approval steps: via the context menu Create subordinated approval step
- Process steps of the Submission class cannot be inserted manually.
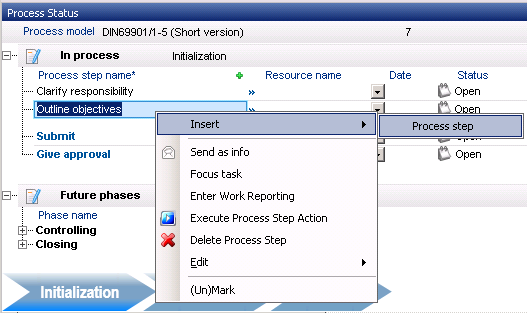
- Right-click on the Outline objectives process step in the Process Status module.
- Select the context menu command Insert Process step .
- Enter the name for the new process step in the line inserted in the Process step name field.
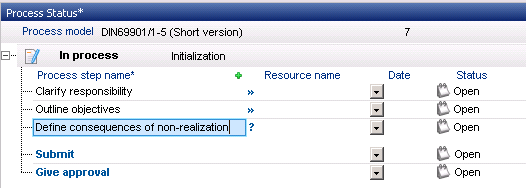
- Project-specific process steps that have been inserted manually are marked with ?.
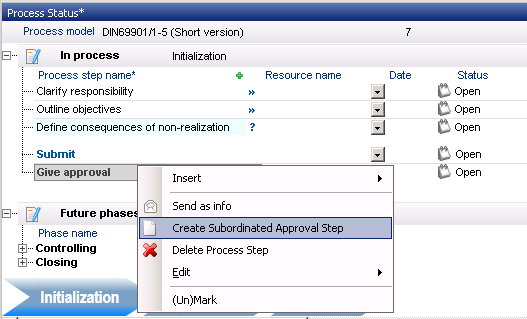
- Right-click on the Give approval process step.
- Select the Create Subordinated Approval Step context menu command.
- Save.
Note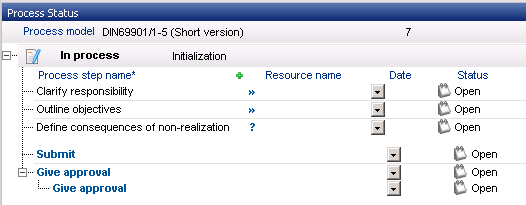
- The superordinate approval step can only be completed when the subordinated approval steps are completed.
- Subordinate approval steps can only be set to Completed manually in the Status field in the Process Step module, which is opened via the Edit process step context menu command in the My Tasks module.
Delete Process Steps
Task- After consideration, Mr. Hart thinks the subordinated approval step is not necessary anymore. He now wants to delete it.
- In the Process status module right-click on the subordinated approval step.
- Select the Delete Process Step context menu command.
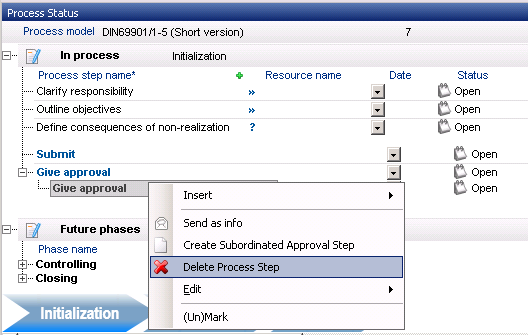
- The process step has been deleted.
- Save.
Note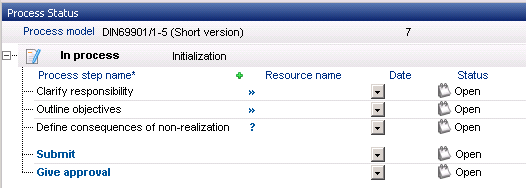
- Only manually inserted process steps can be deleted.
Deactivate Process Steps
Task- As Mr. Hart has already appointed the project manager for the project, the Clarify responsibility process step is no longer necessary.
- Mr. Hart wants to deactivate this step.
- In the Process Status module activate the Not required checkbox next to the Clarify responsibility process step.
- The status of this process step is automatically set to Completed.

- Save.
- The process step is thus deactivated.
- Process steps copied from the process model template cannot be deleted. They can only be marked as Not required.
Define Person Responsible for Process Steps
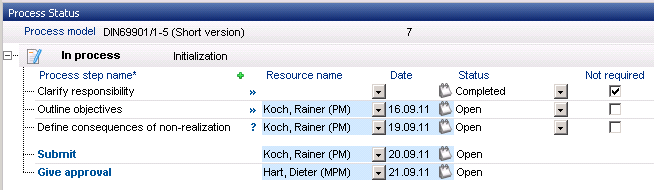
Task- Mr. Hart now wants to define completion dates as well as a person responsible for every project-specific, submission, and approval process step (usually this is a manager or another person with modification rights).
- Select a resource in the Resource name field in the process step line.
- Define the completion date in the Date field.
- Outline objectives process step:
- Person responsible: Koch, Rainer (PM)
- Date: 29.04.11
- Consquences of non-realization process step:
- Person responsible: Koch, Rainer (PM)
- Date: 02.05.11
- Submission process step:
- Person responsible: Koch, Rainer (PM)
- Date: 03.05.11
- Give approval process step:
- Person responsible: Hart, Dieter (MPM) ( The logged-on user can only define himself as the person responsible for approval if he is a multi-project manager.)
- Date: 05.05.11
- Save.
- Outline objectives process step:
Edit Process Steps (R8)
Execute Process Steps
Task- Project manager Mr. Koch (R8) wants to execute the process steps for which he was defined as person responsible.
- Start the client.
- Enter R8 as the project manager.
- Mr. Koch can now see the process steps he is supposed to edit in the My Tasks module of the Employee Board panel in the Process step name area.
- In the date scale (window 2), the completion dates of the assigned process steps can be viewed.
- To do so, move the cursor to the green circle next to the required process step. The completion date is displayed in a tooltip.
- In the date scale (window 2), the completion dates of the assigned process steps can be viewed.
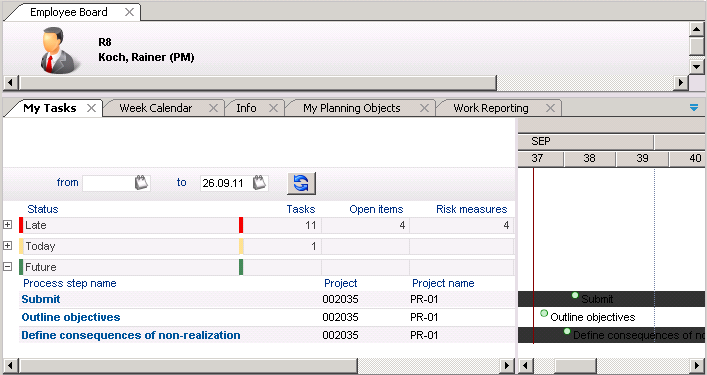
- First, Mr. Koch wants to edit the Outline objectives process step.
- Click on the link in the Process step name field.
- Via the Open project context menu command the project can be opened.
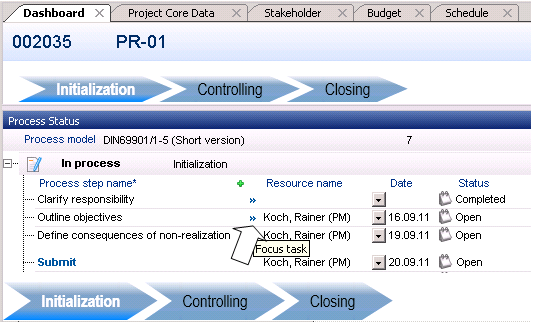
- The Project panel of the PR-01 project is opened with the Dashboard module.
- Open the Process Status module.
- Click on the Focus task button next to the Outline objectives process step. (Alternatively, the task can be focused by the Focus task context menu command.
- This function is only available if the corresponding process rules have been defined in the Process Model Templates module. This makes only sense for process steps that need a defined data entry in the system to be completed.
- Click on the link in the Process step name field.
- The linked module is opened and the field to be edited is focused.
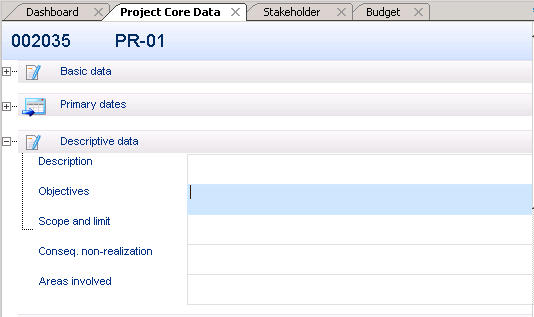
- Mr. Koch can now define the objectives of the project.
- Save.
- Mr. Koch has completed the Outline objectives process step and changes the process step status in the Status field in the Process Status module from Open to Completed.
- Save.
Notes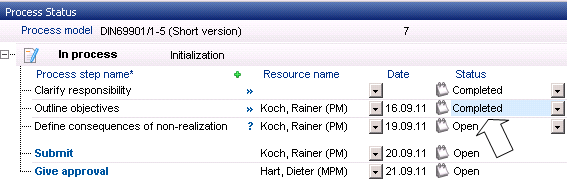
- The process step status can also be changed in the Status field of the Process Step module, which can be opened by clicking on the Edit process step context menu command in the My Tasks module.
- When a process step has the Completed status, it is no longer displayed in the employee board of the corresponding employee.
- Process steps are only really completed if the submission step is done in the Process Status module.
- The process step status of Submission and Approval classes cannot be changed manually. This happens automatically when the process step concerned is completed.
- Complete the Define consequences of non-realization process step in the same way.
Submit Phase
Task- In the Process Status module, Mr. Koch sees that all project-specific process steps of the Initialization phase have the status Completed. Now he wants to submit the process steps of the Initialization phase. To do this, he needs to complete the Submit process step.
- Click on the link on the Submit process step in the Process Status module.
- The query whether you want to write a comment is displayed.
- Confirm the messages with No.
- Subsequently, the status of the submission process step is automatically set to Completed and the submission is done.
- Upon submission, the program checks whether the process steps are really completed. The system sets the status of these process steps to Completed, if they have not been set manually yet.
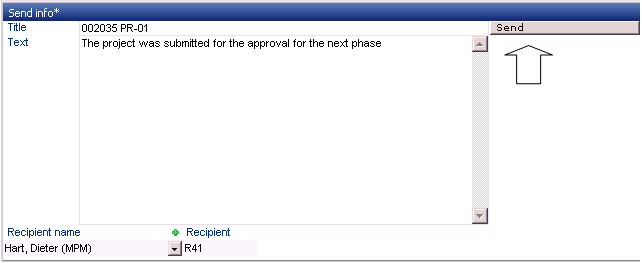
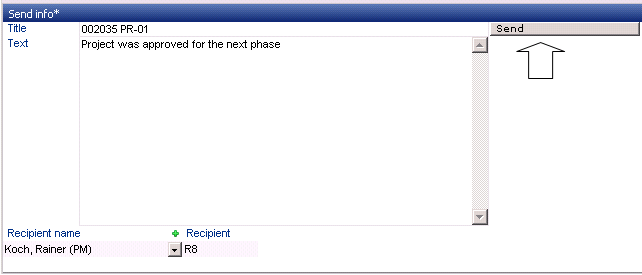
- After submission, the Send Info module is opened and an info can be sent.
- The info text is inserted automatically.
- R41 is set as recipient by default.
- Click on the Send button.
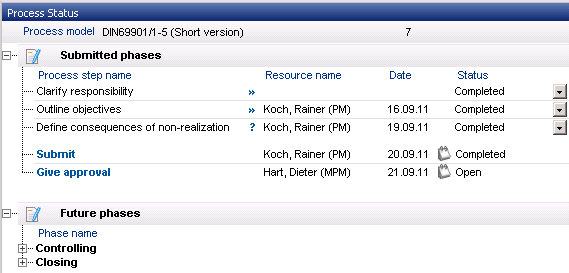
- After submission, completed process steps are listed in the Submitted phases category.
Approve Phase (R41)
Task- The multi-project manager has checked the completed process steps and wants to approve the Initialization phase.
- Log on with user R41.
- Open the project and click on the approval step in the Process Status module.
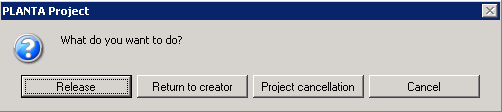
A message is displayed: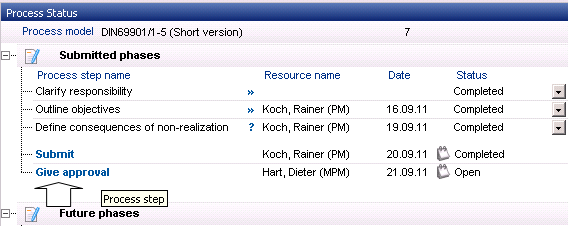
- Click on the Release button.
- By doing this, the process step status is automatically set to Accepted.
- The Send Info module is opened and a message can be sent.
- The info text is inserted automatically.
- R8 is set as recipient by default.
- Click on the Send button.
.
- The completed phase including its process steps is moved to the Completed phases category.
- In the process bar, the name of the completed phase is marked grey and the name of the new phase is highlighted white.
- The process steps of the next phase can be seen in the In process category.
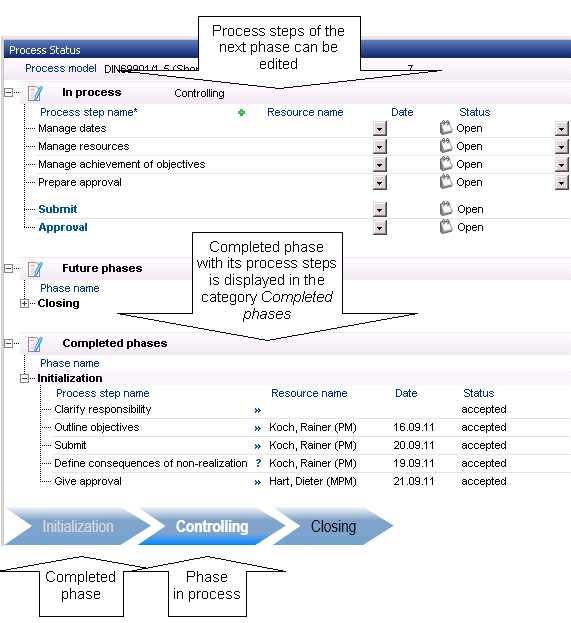
- So, the progress from one phase to the next is completed.


| I | Attachment | History | Size | Date | Comment |
|---|---|---|---|---|---|
| |
Prozessmodell1.png | r2 r1 | 22.5 K | 2011-04-28 - 19:52 | |
| |
Prozessmodell2.png | r2 r1 | 11.8 K | 2011-04-28 - 18:32 | |
| |
Prozessmodell3.png | r2 r1 | 26.0 K | 2011-04-28 - 18:33 | |
| |
Prozessschritt10.png | r2 r1 | 7.0 K | 2011-04-28 - 19:09 | |
| |
Prozessschritt11.png | r2 r1 | 10.2 K | 2011-04-28 - 19:09 | |
| |
Prozessschritt12.png | r2 r1 | 11.0 K | 2011-04-28 - 19:27 | |
| |
Prozessschritt13.png | r1 | 3.5 K | 2010-11-12 - 12:25 | |
| |
Prozessschritt14.png | r2 r1 | 6.9 K | 2011-04-28 - 19:27 | |
| |
Prozessschritt15.png | r2 r1 | 31.1 K | 2011-04-28 - 19:39 | |
| |
Prozessschritt16.png | r2 r1 | 18.8 K | 2011-04-28 - 20:08 | |
| |
Prozessschritt17.png | r1 | 8.4 K | 2010-11-12 - 12:18 | |
| |
Prozessschritt18.png | r2 r1 | 17.8 K | 2011-04-28 - 20:08 | |
| |
Prozessschritt19.png | r1 | 8.6 K | 2010-11-12 - 12:19 | |
| |
Prozessschritt2.png | r2 r1 | 11.6 K | 2011-04-28 - 18:57 | |
| |
Prozessschritt20.png | r2 r1 | 18.6 K | 2011-04-28 - 20:09 | |
| |
Prozessschritt21.png | r1 | 8.1 K | 2010-11-12 - 12:20 | |
| |
Prozessschritt22.png | r1 | 9.9 K | 2010-11-12 - 12:21 | |
| |
Prozessschritt6.png | r3 r2 r1 | 27.3 K | 2011-05-03 - 13:07 | |
| |
Prozessschritt7.png | r2 r1 | 9.2 K | 2011-04-28 - 18:52 | |
| |
Prozessschritt9.png | r2 r1 | 11.3 K | 2011-04-28 - 19:02 |
|