The documentation from version 39.5.17 of PLANTA project can be found in the new PLANTA Online Help .
.
Interface Workflow Export New from S 39.5.4
Information- The following workflow provides basic knowledge of interface creation in PLANTA project by means of the functions delivered.
- As an example, 2 export interfaces are created:
- without pool: all active projects
- with pool: loads
- Basic customizing knowledge (creating modules)
Export without Pool
Create Source Module
Objective- To create a module that provides project data.
- Login as customizer.
- In the user menu, open Customizer Module Customizer Modules
- Create a new module.
- Assign the
ppms.interface.MtsModulePython module subclass to the module. - Create a data area and fill it with fields from DT461. In this example, the following fields are used:
- Adapt the fields as follows:
- For the Status field, set the Filter from and Filter to parameters to 1 (active) and Window = 9.
- Enter a DA Python ID for the data area.
Create Target Module
Objective- To create a module that can write a CSV file.
- Create a new module.
- Assign the
ppms.interface.CSVModulePython module subclass to the module. - Create a dummy data area.
- Alternatively, the 009C7H standard module can be used as a target module.
Create Configuration
Objective- To create an interface configuration
- Open the Configuration module.
- Create a new configuration.
- Enter an appropriate title, e.g. Project export.
- Enter the ID of the previously created source module in the source module field.
- Enter the respective target module in the Target module field.
- Click on the Edit parameters button.
- The Interface Parameters module is opened.
- Adjust the following parameters:
- da_name = Python ID of the project data area that has previously been created
- filepath = file name (e.g. projects.csv)
- The parameters of the target module are already preset with values and do not have to be adjusted.
Create Mapping
Objective- To create a mapping for the current configuration
- Click on the Generate mapping button in the record of the current configuration.
- The Generate Mapping module is opened.
- Select the Export option from the listbox.
- Click on the Generate button.
- An export mapping is automatically created and the dialog module is closed.
Process Transfer
Objective- To process the export
From DB 39.5.9
Procedure
- Right-click on the header area of the current configuration and select the Execute entry from the context menu.
- The Execution module is opened with the current record.
- Select the Load data from source to target transaction type and click on the Start transaction button.
- A dialog message is displayed, informing you that templates could not be run and offering to run a copy instead. Confirm the message.
- A copy of the configuration is created and the data is imported accordingly.
- After successful completion, the Completed checkbox NEW is activated.
- The CSV file can now be found in the configured path.
From DB 39.5.7
Procedure
- Right-click on the header area of the current configuration and select the Execute entry NEW from the context menu.
- The NEW Execution module is opened with the current record.
- Select the Load data from source to target transaction type and click on the Start transaction button.
- A dialog message is displayed, informing you that templates could not be run and offering to run a copy instead. Confirm the message.
- A copy of the configuration is created and the data is imported accordingly.
- After the successful completion, the Transferred checkbox is activated.s
- The CSV file can now be found in the configured path.
Up to DB 39.5.7
Procedure
- Right-click on the header area of the current configuration and select the Go to transaction entry from the context menu.
- The Transaction module is opened with the current record.
- Select the Load data from source to target transaction type and click on the Start transaction button.
- A dialog message is displayed, informing you that templates could not be run and offering to run a copy instead. Confirm the message.
- A copy of the configuration is created and the data is imported accordingly.
- After the successful completion, the Transferred checkbox is activated.s
- The CSV file can now be found in the configured path.
Export with Pool
Create Source Module
Objective- To create a module which provides loads from DT472 Load
- Login as customizer.
- In the user menu, open Customizer Module Customizer Modules
- Create a new module.
- Assign the
ppms.interface.MtsLoadModulePython module subclass module. - Create a data area and fill it with fields from DT472. In this example, the following fields are used:
- Make the following settings for the data fields:
- SAP status
- Filter from = 0 (not transferred)
- Filter to = 0 (not transferred)
- Window = 9.
- Load date
- Filter from = required period
- Filter to = required period
- Note: If no data is entered in the Filter from and Filter to parameters, all load records are displayed.
- SAP status
- Enter a DA Python ID for the data area.
Create Pool Module
Objective- To create a pool module to which the data from the load table can be copied.
From DB 39.5.9
Procedure
- Create a new module.
- Assign the
ppms.interface.MtsExportPoolLoadModulePython module subclass to the module.- This module class is important for the load export, as the data is stamped in DT472 in the pool after the transfer.
- The pool module can also be used to make further data adjustments before the export, e.g. to group data.
- Create a data area and fill it with fields from DT563 Load data pool. In this example, the following fields are used:
- Project ID
- Task ID
- Task name
- Resource
- Cost type
- Load date
- Actual load
- Cost center resource
- Position
- UUID
- Interface configuration
- Completed on NEW
- Status
- Note: The Interface configuration, Completed on NEW, and Status fields must be contained in the data area mandatorily.
- Make the following settings:
- Interface configuration
- Filter from = @L4
- Filter to = @L4
- Window = 9.
- Completed on NEW, Status and UUID fields:
- Window = 9.
- Interface configuration
- Enter a DA Python ID for the data area.
Up to DB 39.5.9
Procedure
- Create a new module.
- Assign the
ppms.interface.MtsExportPoolLoadModulePython module subclass to the module.- This module class is important for the load export, as the data is stamped in DT472 in the pool after the transfer.
- The pool module can also be used to make further data adjustments before the export, e.g. to group data.
- Create a data area and fill it with fields from DT563 Load data pool. In this example, the following fields are used:
- Project ID
- Task ID
- Task name
- Resource
- Cost type
- Load date
- Actual load
- Cost center resource
- Position
- UUID
- Interface configuration
- Transferred on
- Status
- Note: The Interface configuration, Transferred on NEW, and Status fields must be contained in the data area mandatorily.
- Make the following settings:
- Interface configuration
- Filter from = @L4
- Filter to = @L4
- Window = 9.
- Completed on, Status, and UUID fields:
- Window = 9.
- Interface configuration
- Enter a DA Python ID for the data area.
Create Target Module
Objective- To create a module that can write a CSV file.
- Create a new module.
- Assign the
ppms.interface.CSVModulePython module subclass to the module. - Create a dummy data area.
- Alternatively, the 009C7H standard module can be used as a target module.
Create Configuration
Objective- Creating a configuration that configures the interface
- Open the Configuration module.
- Create a new configuration.
- Enter an appropriate description, e.g. Load data export with stamps.
- Enter the ID of the created source module in the Source module.
- Enter the ID of the created pool module in the Pool module field.
- Enter the ID of the created target module in the Target module field.
- Enter the number of the Load data pool table (here 563) in the Pool table field.
- Click on the Edit parameters button.
- The Interface Parameters module is opened.
- da_name source module parameter = Python ID of the load data area that has previously been created
- da_name pool module parameter = Python ID of the load data pool data area that has previously been created
- l_var = 4 (since in the module it is filtered with @L4)
- filepath = file name (e.g. Export_Hours.csv)
- writeheader = 1 (so there are headings in the CSV file)
- The parameters of the target module are already preset with values.
Create Mapping
Objective- To create a mapping for the current configuration
- Click on the Generate mapping button in the record of the current configuration.
- The Generate Mapping module is opened.
- Select the Export option from the listbox.
- Click on the Generate button.
- An export mapping is automatically created and the dialog module is closed.
- Since an export to a file is processed here and the columns receive headings, they can still be adapted in the mapping if required.
- Change, e.g., the name in the Object field in the mapping element of the TARGET type: * e.g. Project instead of pr_id
- For the Load data from source to pool transaction type, the Position (item) field is necessary for stamping the SAP status. When exporting from the pool to a CSV file, the field is not required and can be removed from the mapping. It is not written in the file then.
Process Transfer
Objective- To process the export
From DB 39.5.9
Procedure
- Right-click on the record of the current configuration and select the Go to entry from the context menu.
- The Execution module is opened with the current record.
- Select the Load data from source to pool value from the Transaction type listbox, and click on the Start transaction button.
- A dialog message is displayed, informing you that templates could not be run and offering to run a copy instead. Confirm the message.
- A copy is created and the configuration is run.
- After the first run, the data is now in the pool table.
- In the next step, select the Load data from pool to target value from the Transaction type listbox and click on the Start transaction button.
- After successful completion, the Completed checkbox NEW is activated. The CSV file can now be found in the configured path.
From DB 39.5.7
Procedure
- Right-click on the record of the current configuration and select the NEW Go to entry from the context menu.
- The NEW Execution module is opened with the current record.
- Select the Load data from source to pool value from the Transaction type listbox, and click on the Start transaction button.
- A dialog message is displayed, informing you that templates could not be run and offering to run a copy instead. Confirm the message.
- A copy is created and the configuration is run.
- After the first run, the data is now in the pool table.
- In the next step, select the Load data from pool to target value from the Transaction type listbox and click on the Start transaction button.
- After the successful completion, the Transferred checkbox is activated.s The CSV file can now be found in the configured path.
Up to DB 39.5.7
Procedure
- Right-click on the record of the current configuration and select the Go to transaction entry from the context menu.
- The Transaction module is opened with the current record.
- Select the Load data from source to pool value from the Transaction type listbox, and click on the Start transaction button.
- A dialog message is displayed, informing you that templates could not be run and offering to run a copy instead. Confirm the message.
- A copy is created and the configuration is run.
- After the first run, the data is now in the pool table.
- In the next step, select the Load data from pool to target value from the Transaction type listbox and click on the Start transaction button.
- After the successful completion, the Transferred checkbox is activated.s The CSV file can now be found in the configured path.
PLANTA link: Universal Interface
In S 39.5.4, the former ERP interface has been replaced by the PLANTA link universal interface.General
Information- The universal interface (PLANTA link) is the basis for the use of arbitrary interfaces in PLANTA.
- On this basis, individual solutions can be realized that meet the specific demands of each customer in terms of data transfer extent and structure. Some predefined interface templates are already contained in the scope of supply of the PLANTA software (provided that the PLANTA link component has been licensed).
- The graphical interface of PLANTA link permits the simple creation, configuration, and visualization of interfaces. Intermediate steps for data conversion, checkup, or processing can be considered in this.
- PLANTA link supports different types of import/export data provision and reception, a.o. file formats (.csv, ), web service, and SAP RFC calls. As a result, both the mapping of the interface as well as the way in which data is made available can be adjusted independent of one another.
- The interfaces can be parameterized and automated.
- The following description provides you with an overview of the functions of the Universal Interface. For detailed information, please consider the links that will lead you to further topics of the table of contents of the complete interface documentation, which can be found at the bottom of this topic.
Prerequisites
Attention- In order to use the universal interface, the PLANTA _link_ add-on must be licensed. If you have any questions, please contact your PLANTA consultant.
- The PLANTA link role (ID: 01100028) must be assigned to the respective user.
- You do not need customizer rights to run this transfer and to adapt parameters. However, you do need customizer rights to create new transfer modules.
- Several modules that guarantee access to customizing records are only available in read mode if you do not have customizer rights.
- When exporting the files in PLANTA link, you have to note the following:
- Linux: Every user of the "others" group has read and write rights for the export files.
- Windows: The export files inherit the security settings from the folder in which they have been stored (files).
Terminology
Information- Source
- is a source module in which records are provided for the transfer
- Target
- is a target module that receives the records
- Pool
- is a pool module in which data can be saved temporarily
- The use of the pool module and hence of the pool tables is not mandatory. This is only required if either data in the pool is to be re-edited or the data set at the time of export is to be traceable in the future. Pool tables can also be used to prepare data from an external system before it will finally be written in PLANTA. In its standard system, PLANTA provides several pool data tables, e.g. DT563 Load data pool, DT566 Employee pool, DT567 Project pool. If data other than that for which PLANTA provides pool tables is imported/exported on part of the customer, the respective data tables must be created.
- is a pool module in which data can be saved temporarily
- Configuration
- contains the key data of an interface and represents the parent interface object.
- Mapping
- Specifies which columns in the source correspond to which columns in the target
- Additionally, a mapping allows to check, convert, and adapt values before they are sent to the target module.
- A mapping always leads from a source to a target. Between source and target, various mapping functions can be interposed.
Procedure
Schematic display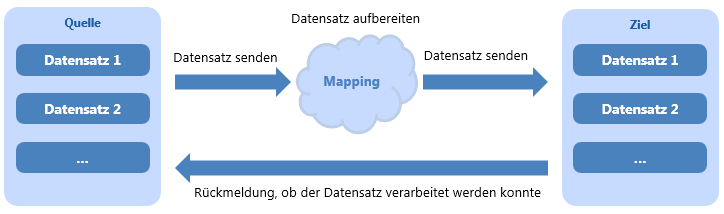
PLANTA link Modules
Information- In the PLANTA standard system, PLANTA link modules can be found in the PLANTA link role.
- Modules for setting up and editing interfaces are divided into three work areas on a topical basis:
- Interface configuration: here, modules are grouped in which interface configurations can be created, edited, and executed.
- Interface administration: here, modules are made available in which configurations can be managed. Open and completed configurations are managed separately here. Open configurations can be edited (e.g. the status) while completed ones can only be read.
- Special functions: this group contains modules with further configuration options and with the option to generate and sort interface definitions.
- Furthermore the PLANTA link role contains modules for setting up and editing the web interfaces and the PLANTA Standard interface to Jira and PLANTA pulse.
Frequently Asked Questions
What are the advantages and disadvantages of an interface with/without pool?
- In the interface pool, transfer data is cached before it is sent to its target.
- In direct transfer without pool, the source must always be cleaned up directly for invalid records that could not be received. This can be, e.g., the adjustment of lines of a csv file, or the direct editing of the lines in an ERP system. For large source files, it may make sense to remove already transferred records from the data volume of the source.
- The pool enables you to load the data without larger validation steps, which results in the data being directly available in PLANTA and the original source no longer being required for further processing.
- In the pool, data can be edited directly with the help of a direct module if necessary, which is often more comfortable than editing the data in the CSV file or in ERP itself.
- The pool also serves as a type of archive for the data that has been sent initially from the source before they were received via transformation rules.
- The pool table can be used to customize overview modules that show which records could not be processed by the interface with possible direct editing function for correcting the data and initiating the interface again.
| See also: Here you can find an overview of all PLANTA link contents |
|