The documentation from version 39.5.17 of PLANTA project can be found in the new PLANTA Online Help .
.
- Customizing Examples
- Overwrite menu items with Python functions
- Listbox Extension for Dynamic Grouping
- Display Logged-On Users
- Customizing Solution for Copying Technical Task IDs When Copying Schedules
- To display a Graphic from a Hyperlink Data Field in an OLE Data Item
- Customize Menu Item for Export in Excel
- Example of Individual Listbox Customizing
- Open E-mail Client
- Example of a Python Value Range
- Display of Menu Item 154/151 (Mark All/Unmark All) in Python
- Embed Customer Logo
- Facilitate the Reporting of External Hours
- Refresh Fields Upon Saving if a Value Has Been Changed
- Example of Drag & Drop Copying via Python
- Example of Opening an External Application With Python
- Example of a PDF Export Customizing
- Customize Format for Conversion of Decimal Places to Percentage Values
- Customize a Color Preview Field
- Customize Budget/Cost Modules with n-Cost Type Groups
- Customize a Process Rule for Copying a Phase
- Customize a Process Rule for Copying Process Steps to a Future Phase
- Customize an Individual Module for Editing Resources
Customizing Examples
From S 39.5.24
Overwrite menu items with Python functions
from ppms import ppms
from ppms.module_subclasses.base_class import Base
from ppms.constants import MENU_FILTER, MENU_RESET, MENU_SAVE

class ModuleThatOverwritesSave(Base):
    def menu_override(self, menu_id):
        if menu_id == MENU_SAVE:
            ppms.ui_message_box('No saving allowed!')
            return self.MENU_OVERRIDE_SUCCESS

        # Don't allow resetting as that brings up a save prompt
        elif menu_id == MENU_RESET:
            return self.MENU_OVERRIDE_SUCCESS

        return super(ModuleThatOverwritesSave, self).menu_override(menu_id)
Listbox Extension for Dynamic Grouping
Procedure- Create a text constant for the new criterion in the Text Constants module, e.g. for DI005352 Product.
- In the value range of DI029130, enter the new text constant at position 12.
- Enter DI005352 Product in listbox category 00000333 analogously to the others.
- Add product in ppms_cu.py under groupings 12 ( ./py/api/ppms/customizing/venus/ppms):
GROUPINGS = {1:'customer', 2:'pr_manager_name', 3:'ht_pr_code_name', 4:'pr_group_1',
             5:'pr_group_2', 6:'pr_group_3', 7:'ou_cctr_name', 8:'calculated_end_date',
9:'phase_name', 10:'ht_pr_plan_idea', 12:'product'}- Enter DI005352 in the value range in DI029160 analogously to the others.
- Restart server.
- Enter DI005352 in data area 041023 in W9.
- Restart client.
- The procedure applies to alphanumerical data fields. To include the date data fields in the listbox, please contact your PLANTA consultant since new DIs and value ranges must be created for this.
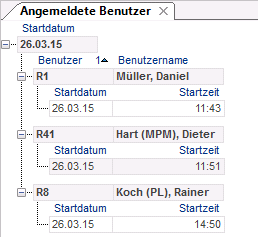
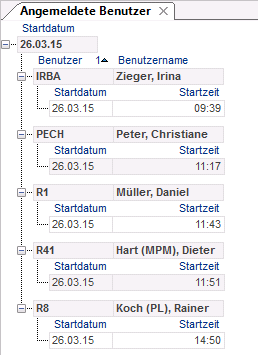
Display Logged-On Users
Objective- Customizing a module which displays the logged-on users.
- Create a module with three data areas.
- Data area 1:
- Grouped by DI001603 Start date
- Displayed in window 1: DI001603 Start date
- Data area 2:
- Grouped by DI001606 User
- Displayed in window 1 DI001606 User, DI010670 User name
- Data area 3:
- Displayed in window 1 DI001603 Start date (Filter from @15), DI = 004353 Start time (Filter from = 00:00, Window = 9)
- Data area 1:
- Create a new module with the required name in the Modules module and insert a macro which filters upon module start.
- Insert a new data area assignment.
- Create a new data area with the following parameters:
- Insert the following data field:
- DI = 001603 Start date
- Save.
- Assign data area to the module and adjust the following parameters:
- Pos. = 1
- Save module
- Insert a new data area assignment.
- Create a new data area with the following parameters:
- DDI = 001606 User
- Grouping =

- Insert two new data fields in the Data Areas module.
- DI = 001606 User
- DI = 010670 User name
- Save.
- Assign data area to the module and adjust the following parameters:
- Pos. = 2
- Parent area = 1
- Output =
- Save module
- Insert a new data area assignment.
- Create a new data area with the following parameters:
- DDI = 001595 Session
- Insert the following data fields in the Data Areas module:
- DI = 001603 Start date
- DI = 004353 Start time
- DI = 004376 End time
- For the Start time data field, enter @15 in the Filter from parameter
- Adjust the following parameters for the End time data field
- Filter from = 00:00
- Window = 9
- Save.
- Assign data area to the module and adjust the following parameters:
- Pos. = 3
- Parent area = 2
- Output =
- Save module
- Click on the Start current module button in the Modules module in order to test the newly created module.
- With activated tree display as well as with symbols, the result will, e.g., look like this:
Example:

New from S 39.5.0
Customizing Solution for Copying Technical Task IDs When Copying Schedules
Procedure- Open the customizer and
- delete the recursive relation in data area 041668 in module 0099J9
- Move DI001098 to the first position (window 1, if you want it to be visible)
- set DI008845 and DI008851 to input
- Save and restart PLANTA.
New from S 39.5.0
To display a Graphic from a Hyperlink Data Field in an OLE Data Item
Objective- To display a graphic from a hyperlink data field in an OLE data item
- Customize an OLE data item
- Store the following value range for the newly created DI:
- Legend:
<Python ID>and<data item ID>serve as placeholders for the Python ID as well as for the ID of the hyperlink data item.
- Legend:
Notesdef computeOutput(di): hl_di = di.get_dtp_record().get_di('<Python-ID>') hl = hl_di.get_hyperlink() if (hl != None): ppms.ui_message_box(hl.get_uid()) return hl.get_uid() else: return "" computeOutput.deps = ('DI<Dataitem-ID>',)
- This works for the common image formats jpg, bmp, gif and png.
- The used hyperlink DI must be a HL: files in the DB.
- The OLE is only displayed after the hyperlink has been saved.
| See also: OLE data item, Hyperlink Customizing |
New from C 39.5.2
Customize Menu Item for Export in Excel
Objective- To customize a customized Excel export
- Create a menu item for opening modules.
- Create a macro module with the following code for this menu item.
- If particular parameters, that can be specified in the export dialog, are preset, this macro has to be adjusted individually. If you have any questions, please consult your PLANTA consultant.
mod_obj = ppms.get_target_module()
uid = mod_obj.get_uid()

ppms.client_exec("""
env = get_Env()
mod = env.ActivePanel.ModuleManager.__getitem__('%s')
doc = mod.CreateExcelExportDocument()
env.GenerateExcelFile(doc)
""" % uid)| See also: IronPython Api |
Example of Individual Listbox Customizing
Objective- To build a listbox that directly selects a combined key.
-
get_listboxvalue()from the Customizing Helper module only implements a mapping between actual values in data tables and the IDs of fixed listbox values in the corresponding table. However, it cannot read any arbitrary value from a listbox record.- Approach: Combine and separate the key values via a Python value range
- A new DI of the X type / ALG is created as a Python value range.
- In the incarnation, this DI is used as an ID field, and in the data area of the listbox it is used for LB selection.
- The computeOutput method reads the corresponding key DIs and concatenates them with a pipe "|" as a separator, which can be done by using the format method of the string class in Python.
- The processInput method separates the values analogously and writes them in individual key DIs.
- In order for this procedure to work properly, it is forbidden to use the pipe sign in key values.
- Upon their composition, the example implementation does neither check the existence of pipes in key values nor that of redundant separators or values upon their separation.
def computeOutput(di):
    record = di.get_dtp_record()

    key0 = record.get_di_by_id(<key0_numeric_di_no>).get_value()
    # etc. for further DIs

    multicol_key_template = '{0}|{1}|{2}'
    multicol_key_value = multicol_key_template.format(key0, key1, key2)

    return multicol_key_value

computeOutput.deps = ('DI<key0_textual_di_no>', 'DI<key1_textual_di_no>', ) # etc. for further DIs
def processInput(di, oldvalue):
record = di.get_dtp_record()
key0_di = record.get_di_by_id(<key0_numeric_di_no>)
# etc. for further DIs
new_value = di.get_value()
key_values = new_value.split('|', 3)
key0_di.set_value(key_values[0])
return new_value
processInput.deps = ('DI<key0_textual_di_no>', 'DI<key1_textual_di_no>', ) # etc. for further DIs- A
textual_di_nois, for example, string 000123; anumeric_di_no, however, is the number 123 - Further documentation can be found under PythonValueRange as well as in the Python reference: http://docs.python.org/py3k/ or http://docs.python.org/py3k/library/stdtypes.html#str.split
Open E-mail Client
Objective- To customize hyperlink data fields in order to open an e-mail client via Python
- For data fields with data items that possess the AM DF type
- Open the Data Area module.
- Create a new data area
- Insert a data field with the following properties:
- For this data field, you have to set the following parameters:
- DF behavior = e4
- Action ID = 009AAK
- Symbol ID = 001807
- DF Python ID = email_id
- Open the tree structure of the data field and enter the following parameters in the Data field configuration field:
subject_text = "" body_text = ""
-
subject_text= subject of the e-mail -
body_text= content of the e-mail
- In the customizing shown above, subject and content are not filled. You have to fill them manually.
- In order to fill subject or content, you can use the PythonAPIReference.
- To do so, set the
subject_textandbody_textvariables in the Data Field Configuration data field via Python. - In order to access the values of the records, you can use the Record object which is an instance of the MTSRecord class.
- To do so, set the
subject_text = record.name.get_raw_value()
Example of a Python Value Range
Objective- DI041088 DF Python ID in the Data Area module.
from ppms import ppms_cu

di_prefix = "DI: "
di_prefix_lenghth = len(di_prefix)

def get_df_cust_name(di):
    df_name = di.get_dtp_record().df_customizing_name.get_value()
    if df_name: return df_name # return name on DF level if set
    return None

def get_di_cust_name(di):
    di_nr = di.get_dtp_record().di.get_value()
    di_cust_name = str()

    if not di_nr: return None

    di_record = ppms.search_record(412,[di_nr],[41035], True)

    if di_record: di_cust_name = di_record.di_customizing_name.get_value()
    else: return None

    if di_cust_name: return di_cust_name

def computeOutput(di):
    name = str()
    if get_df_cust_name(di):
        return get_df_cust_name(di)
    elif get_di_cust_name(di):
        return di_prefix + get_di_cust_name(di)
    return ""

computeOutput.deps = ("DI041036","DI000213","DI000984")

def checkInput(di, old_value):
    return ppms_cu.Helper.validate_python_id(di,di.get_value())
checkInput.deps=("DI001862",)

def processInput(di, old_value):
    new_value = di.get_value()
    rec = di.get_dtp_record()

    #in case of copy
    if new_value[:4]==di_prefix:
        rec.df_customizing_name.set_string_value("")
        return di_prefix + get_di_cust_name(di)

    #in case of empty python ID
    if not new_value.strip():
        rec.df_customizing_name.set_string_value("")
        if not get_di_cust_name(di):
            return ""
        return di_prefix + get_di_cust_name(di)

    #in case of new value = old value
    if new_value.strip() == old_value:
        return ppms_cu.Helper.get_python_id_by_license(new_value)

    rec.df_customizing_name.set_string_value(ppms_cu.Helper.get_python_id_by_license(new_value))
    return  ppms_cu.Helper.get_python_id_by_license(new_value)

processInput.deps = ("DI041036",)
Display of Menu Item 154/151 (Mark All/Unmark All) in Python
Objective- To map menu item 154 (Mark all) and 151 (Unmark all) in Python
From S 39.5.12
Example Mark all
Example Unmark all
# get module object
mod_obj=ppms.get_target_module()

#mark all records of all datareas in the module
with ppms.echo_disabled():
[[mts_rec.mark() for mts_rec in mts_rec_list]for mts_rec_list in [da_obj.get_records() for da_obj in mod_obj.get_das()]]# get module object
mod_obj=ppms.get_target_module()
#unmark all marked records of all data areas in the module
with ppms.echo_disabled():
[[mts_rec.unmark() for mts_rec in mts_rec_list]for mts_rec_list in [da_obj.get_marked_records() for da_obj in mod_obj.get_das()]]Up to S 39.5.12
Example Mark all
Example Unmark all
# get module object
mod_obj=ppms.get_target_module()

#mark all records of all datareas in the module
ppms.echo_off()
[[mts_rec.mark() for mts_rec in mts_rec_list]for mts_rec_list in [da_obj.get_records() for da_obj in mod_obj.get_das()]]
ppms.echo_on()
# get module object
mod_obj=ppms.get_target_module()

#unmark all marked records of all data areas in the module
ppms.echo_off()
[[mts_rec.unmark() for mts_rec in mts_rec_list]for mts_rec_list in [da_obj.get_marked_records() for da_obj in mod_obj.get_das()]]
ppms.echo_on()
Embed Customer Logo
Objective- The customer logo is to be displayed in modules (as a product logo), in the print header, and as a splash screen.
- PLANTA supports the .png and .jpg formats.
- The maximum picture size can, vary depending on the Windows settings.
- If you use the default Windows settings, the image sizes of the PLANTA logos stored by default can serve as an orientation (height * width).
- Product logo: 49 px * 458 px
- Print header 32 px * 32 px
- Splash screen: 478 px * 475 px
- If you use the default Windows settings, the image sizes of the PLANTA logos stored by default can serve as an orientation (height * width).
- Customizer Layout Objects OLEs Open the Product logos module variant.
- Insert a blank record.
- Allocate a name in the Name field.
- The OLE number is generated automatically.
- Select the Product logos value from the listbox in the Category field.
- Insert the provided file for the modules in the Standard OLE field.
- Save.
- Click on the Use system-wide as logo button for the newly created OLE.
- The Do you want to embed the required graphic as a product logo system-wide? The product logo of all modules will be replaced by this logo. dialog message is displayed.
- Confirm this message with Yes.
- Restart the program.
- All existing modules of the system now have the new product logo.
- For new modules, the new product logo is automatically set as the default product logo.
- Customizer Layout Objects Open OLEs.
- Allocate a name in the Name field.
- The OLE number is generated automatically.
- Insert the provided file for the print header in the Standard OLE field.
- Save.
- Customizer Layout Objects Open Skins.
- Remember the ID number of the module for print areas in the Module for print areas field or copy it using CTRL + C.
- Customizer Module Customizer Open Modules.
- Create the individual print module by copying the Module for print areas.
- Enter the ID number of the module to be copied in the Copy from data field.
- After you press ENTER, a new module number is generated in the MOD data field.
- Enter the new module title in the Module data field.
- Save. Upon saving, all parameters of the source module as well as its subobjects (submodules, data areas, module variants) are copied to the new module.
- Open the Print header data area in the individual print module.
- Enter the OLE ID (DBOLE (ID) in the Default value field.
- Adjust the position if necessary.
- Save.
- Customizer Layout Objects Open Skins.
- Select the required skin from the listbox.
- Enter the ID of the individual module in the Module for print areas field.
- Save.
- Replace the splash.png file under %client_folder%/Resources/ with the provided file.
| See also: Splash Screen |
Facilitate the Reporting of External Hours
Objectives- To switch from a newly created module for the resource overview to a shortened Employee Board panel.
- The shortened Employee Board panel is to be opened with the Time Recording module.
- Create a copy of the Employee Board (MOD0099GU). (Here: MOD100003)
- Delete unwanted submodules in the newly created module (here: My Activities, Week Calendar, Infos, My Planning Objects) or deactivate the checkboxes for these submodules in the Display field.
- Adjust the sequence of the remaining submodules so that the Time Recording submodule is opened first.
- Edit the following parameters in the Time Recording submodule:
- Enter 3 in the Positioning field.
- Enter 0.869 in the Module size field.
- Activate the Foreground checkbox.
- For reporting to unplanned tasks, listboxes may have to be individualized
- Edit the following parameters in the Time Recording submodule:
- Adjust the
call_resource()function in the macro of the copied employee board as follows:
def call_resource(resource_id=ppms.get_target_module().get_current_L_var()[5]):
    rec467=ppms.search_record(467, [resource_id[0]], [1218,3414], True)
    if (hl != None):
        message=ppms_cu.Helper.get_const_title("001247")
        ppms.ui_message_box(message.replace("@user_id",resource_id[0]), blocking=1)
        mod_obj.menu(49)
    elif rec467.get_di("resource_type").get_value() == "2":
        ppms.ui_message_id("0860")
        mod_obj.menu(49)
    else:
mod_obj.set_current_L_var(5, [resource_id[0]])- Create the Python ID for the new module (MOD100003) in the Python ID field in the Global Settings module, here: L100_employee_board_for_reporting
- Create a macro (here: 100004) which opens the shortened employee board with the required resource (@L5).
from ppms import ppms_cu

mod_obj = ppms.get_target_module()

rm_modul=ppms_cu.Helper.get_global_setting("L100_employee_board_for_reporting").alpha120.get_value()

inv_rec=ppms.get_context_df().get_record()
res_id = inv_rec.res_id.get_raw_value()
mod_obj.set_new_L_var(5, [res_id])

mod_obj.open_module(rm_modul)- Create a module with resource overview.
- If you want to open the module via a link on the resource ID,
- enter the number of the new macro (here: 100004) in the Action ID field of the required resource DI and e4 in the DF behavior field.
- If you want to open the module via a context menu,
- add DI 004336 Button/IronPython and enter the number of the new macro in its Action ID field (here 100004) and m4 in the DF behavior field.
Refresh Fields Upon Saving if a Value Has Been Changed
Objective- To refresh the individual Forecast from and Forecast to fields if the forecast value has been changed.
- Open Customizer System Customizer Data Dictionary.
- Create individual data items (here: DI100102 und DI100103).
- Open Customizer System Customizer Data Items.
- Adjust the value range of the Forecast data item as follows:
def processInput (di, oldvalue):
    rec = di.get_dtp_record()
    rec.get_di ("L100_prognose_vom").set_value(ppms.uvar_get ("@15"))
    rec.get_di ("L100_prognose_von").set_value(ppms.uvar_get ("@1"))
    return di.get_value()
processInput.deps = ("DI100102","DI100103")
Example of Drag & Drop Copying via Python
Objective- The value from the Planned effort field is to be transferred to the Planned effort fix field.
mod_obj = ppms.get_target_module()
mod_obj.menu(12)

for rec in mod_obj.get_da ("Python_ID_DA_name").get_records():
    rec.DF_Python_ID_planned_load_fixed.set_raw_value (rec.DF_Python_ID_planned_load.get_raw_value())

mod_obj.menu(34)
mod_obj.menu(49)
Example of Opening an External Application With Python
Objective- To open an application from within PLANTA and include a specific parameter that is to be sent along
PATH = r'C:\Program Files (x86)\Applikation\anwendung.exe'
# The string, which displays the path to the application is preceeded by "r",
# because otherwise the backslash \ is interpreted as an escape sign.
# see http://docs.python.org/reference/lexical_analysis.html#string-literals
ARGS = 'argument1=PLANTA argument2=Nocheins'
# declare the arguments, which are to be transferred to the application
# as a continuous string.

def execute_client_script(path, args):
    ppms.client_exec("""import clr
clr.AddReference('System')
from System.Diagnostics import Process

Process.Start(r'{path}', r'{args}')""".format(path=path, args=args))

execute_client_script(PATH, ARGS)
Example of a PDF Export Customizing
Objective- To customize a PDF export for selected status reports
- Here, only the general functionality is installed. Optimizations are to be carried out if necessary, e.g.:
- Editing messages
- Variable input of export path, file name, module variant, etc., e.g. in the Global Settings module.
- Handling of the PDF file (e.g. the behavior when the file has already been opened or the possibility to specify another name)
- Create a new module that displays the status reports to be printed with a Create PDF button (=selection module)
- The selection of these status reports can be done, e.g., via another module in which status reports are selected by activating a checkbox.
- Create a macro module for this button.
- Adjust the following parameters in this macro:
-
exp_path= save path of the created PDF file -
file_name= name of the created PDF file -
REPORT_MOD_ID= module, which is used for output (=report module). For status reports, e.g., the MOD009A52 Status Report default module -
REPORT_VARIANT_ID= required variant of the report module -
DA_PYTHON_ID= name of the source data area in selection mode
-
from ppms import ppms_cu

# module settings: Export path. Export file name, output module and variant to be used, Python ID of the source data area
exp_path = 'Exportpfad'.replace(chr(92),chr(92)+chr(92))
file_name = "name of the created PDF file"
REPORT_MOD_ID = "Modul-ID"
REPORT_VARIANT_ID = "Varianten-ID"
DA_PYTHON_ID = 'Python-ID'

#Reading out the print settings from the report module
module_customizing_record = ppms.search_record(405, [REPORT_MOD_ID], [25609,25610,1789,2947], True)
page_size = module_customizing_record.paper_format.get_value()
landscape = not bool(module_customizing_record.portrait_format.get_value())
zoom = float(module_customizing_record.zoom_print_preview.get_value())
fit_to_page = bool(module_customizing_record.default_zoom_col.get_value())

#Modulobjekte
macro_module = ppms.get_macro_module()
select_module = macro_module.get_invoker_module()

# composition of the Client command
CLIENT_CODE = """
e = get_Env()
pdf_list = e.PdfExportDocumentsList
list = e.PdfExportDocumentsList
page_size = '{page_size}'
landscape = {landscape}
zoom = {zoom}
fit_to_page = {fit_to_page}

for uid in {export_list}:
    module = e.ActivePanel.ModuleManager[uid]
    doc = module.CreatePdfExportDocument(pageSize=page_size, landscape=landscape, zoom=zoom, fitToPage=fit_to_page)
    pdf_list.Add(doc)
    e.ActivePanel.ModuleManager

e.GeneratePdfFile(pdf_list, '{exp_path}', '{file_name}')
"""


def get_selected_reports():
    export_list =[]
    modules_to_close = []

    for pr_rec in select_module.get_da(DA_PYTHON_ID).get_records():
        pr_id = pr_rec.pr_id.get_raw_value()
        main_pr_id = pr_rec.main_pr_id.get_raw_value()
        report_id = pr_rec.report_id.get_raw_value()

        #Set all filter criteria used in the report module
        select_module.set_new_L_var(30, [pr_id])
        select_module.set_new_L_var(78, [report_id])
        select_module.set_new_L_var(74, [main_pr_id])
        #select_module.set_new_L_var(26, [report_id]) - is set in the macro of the status report
        #select_module.set_new_L_var(25, [report_id]) - is empty in the standard

        #Open the module variant (docked outside the screen display)
        reporting_module=select_module.open_module(REPORT_MOD_ID,
                                                                  dock_to_module=select_module.get_uid(),
                                                                  forced_status=2,
                                                                  dock_style=3,
                                                                  dock_proportion=0.001,
                                                                  foreground=0,
                                                                  focus=0)
        reporting_module.apply_mv_by_id(REPORT_VARIANT_ID)
        reporting_module.menu(12)
        modules_to_close.append(reporting_module)
        #Internal number of the opened module
        uid = str(reporting_module.get_uid())

        #Add open modules to the PDF-interface list.
        export_list.append((uid))

    client_call = CLIENT_CODE.format(export_list=export_list, exp_path=exp_path, file_name=file_name,
                                     page_size=page_size, landscape=landscape,
                                     zoom=zoom, fit_to_page=fit_to_page)

    ppms.client_exec(client_call)

    for module in modules_to_close:
        module.menu(49)

    select_module.menu(49)

#Loop for module variant display
get_selected_reports() - For the transfer of the data to the client, an rpc service is to be used.
- When using the IronPython method
CreatePdfExportDocument(), the parameter names must be specified as well.-
doc = module.CreatePdfExportDocument(pageSize='A4',landscape=TRUE, zoom=100.0, fitToPage=TRUE)instead ofdoc = module.CreatePdfExportDocument('A4', TRUE, 100.0,TRUE)
-
Customize Format for Conversion of Decimal Places to Percentage Values
Objective- To customize a format for converting decimal digits to percentages (e.g. display of 10% instead of 0,1)
- Create a new number format in the Formats module with the settings shown in the screen shot below

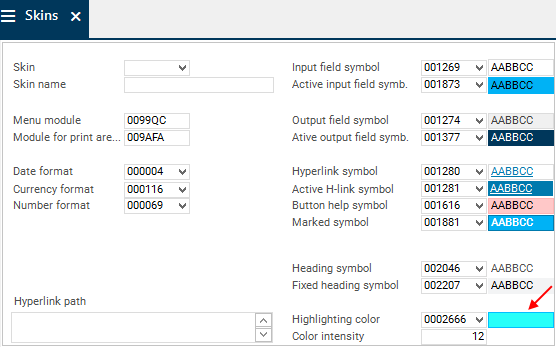
Customize a Color Preview Field
Objective- To customize a color preview field, here by the example of DI028197 Highlighting color in DT030 Skin
- In the Skins module, a preview for the selected color is missing in DI028197 Highlighting color.
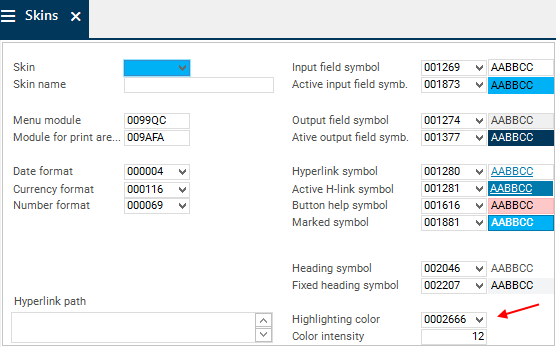
From S 39.5.20
Create DI
- Open DT030 with source DI 028197 in the Data Dictionary.
- Create a new DI and set the following parameters:
- Data item = Highlighting color
- DI Python ID = highlighting_color_incarnation
- Class = 4
- Virtual =
- Column type = Alpha
- This column type is only required for creating the DI ID and can be deleted afterwards.
- Symbol ID = 000188
- Save.
- NEW Update system customizing (via the Tools menu item Reload system customizing).
- Note: If you click on the menu item, all open client connections (sessions) are closed. During restart, new client connections are not possible.
Up to S 39.5.20
Create DI
- Open DT030 with source DI 028197 in the Data Dictionary.
- Create a new DI and set the following parameters:
- Data item = Highlighting color
- DI Python ID = highlighting_color_incarnation
- Class = 4
- Virtual =
- Column type = Alpha
- This column type is only required for creating the DI ID and can be deleted afterwards.
- Symbol ID = 000188
- Save.
- Update system customizing (via the Tools menu item Reload system customizing).
- Right-click on the DI you have just created and select the Edit data item context menu command.
- Right-click on DI -> Insert -> Subordinate data item.
- Insert the ID of the source DI ( 028197 ) in the SUBDI field.
- Select value C (color) from the Function listbox.

- Save.
- Now, assign the created DI to the data area which contains the source DI.
- Set the DF behavior to o (output).

- Save.
- In order for the data field to be displayable, the following fields must be adjusted:
Customize Budget/Cost Modules with n-Cost Type Groups
Click here for descriptionNew from S 39.5.14
Customize a Process Rule for Copying a Phase
Objective- To customize a process rule that you can use to copy a phase of another process model
- Create a new process rule in the Process Rules module with the code shown below.
- Adjust the following parameters in this code:
- <Process model ID>: process model ID containing the copied phase
- <Phase ID>: ID of the phase to be copied
def executeProcessAction(mts_rec=None,object_id=None):
    from ppms.processrules import copy_phase_into_model
    phase = mts_rec.phase.get_raw_value()
    copy_phase_into_model(object_id, mts_rec, <Process model ID>, <Phase ID>, phase)

    return True

ppms.get_session_dict()["planta_functions"]=[executeProcessAction]
- Create a new process step in the Process Model Templates module.
- Select this rule in the Process Rule Name field
New from S 39.5.15
Customize a Process Rule for Copying Process Steps to a Future Phase
Objective- To customize a process rule with which a future phase of a process model can be extended by existing process steps of another process model.
- Create a new process rule in the Process Rules module with the code shown below.
- Adjust the following parameters in this code:
- <Process model ID>: process model ID containing the process steps to be copied in
- <Phase ID>: ID of the phase the process steps of which are to be copied
- <Target phase ID>: ID of the future phase for which you want the rule to take effect
def executeProcessAction(mts_rec=None,object_id=None):
        from ppms.processrules import replace_phase_in_model
        replace_phase_in_model(project_id=object_id,
                               prozess_templ_id=<Process model ID>,
                               phase=<Phasen-ID>,
                               forced_phase=<Zielphasen-ID>)

        return True
ppms.get_session_dict()["planta_functions"]=[executeProcessAction]
- Create a new process step in the Process Model Templates module.
- Select this rule in the Process Rule Name field
Customize an Individual Module for Editing Resources
Information- If the parent resources or the start and end periods are to be adjusted in an individual module, the following adjustments must be made in this module:
- Store the
ppms.module_subclasses.resource.ResourceDatasheetPython module subclass in the Python module subclass parameter in the Modules module. - Overwrite the Save menu item with a macro that contains the following code:
- Store the
ppms.get_target_module().on_save_check_person_resource()


| I | Attachment | History | Size | Date | Comment |
|---|---|---|---|---|---|
| |
AngemeldeteBenutzer.PNG | r2 r1 | 4.9 K | 2015-03-26 - 16:54 | |
| |
ColorPreviewItem.PNG | r2 r1 | 15.5 K | 2019-09-24 - 09:13 | |
| |
ModulBudgetinEarth.png | r1 | 15.8 K | 2014-10-15 - 12:08 | |
| |
ModulBudgetinVenus.png | r1 | 23.9 K | 2014-10-15 - 12:21 | |
| |
ModulCustomizingBudgetKostenartengruppen.png | r1 | 16.2 K | 2014-10-15 - 12:12 | |
| |
ModulCustomizingBudgetinVenus.png | r1 | 25.3 K | 2014-10-15 - 12:21 | |
| |
ProzentFormat.PNG | r1 | 6.6 K | 2013-06-25 - 12:47 | |
| |
UnterDataItemFarbe.png | r2 r1 | 9.5 K | 2019-09-24 - 09:14 | |
| |
VorschauFehlt.png | r1 | 15.4 K | 2019-09-24 - 09:06 | |
| |
addColorPreviewItemToDA.PNG | r2 r1 | 7.5 K | 2019-09-24 - 09:13 |
|