Getting Started
Basics
How to Start PLANTA project
Procedure
- Double click on the PLANTA symbol.
- The initial logo screen is now displayed, and the network link to the server computer is established.
Login
Note
- The following description is intended for PLANTA software users. If you are a PLANTA software administrator who installed the PLANTA system, please click here to get information on the first login after installation.
Information
- After the program is started, a form with two input fields for user ID (user code) and password is displayed in front of the program logo.
Procedure for the first login
- Enter the user ID (user code) in the first form field.
- The user receives its user ID (user code) from the PLANTA project administrator (or a person that possesses the right to enter master data in PLANTA project systems).
- Confirm with OK.
- Confirm the Please change the password dialog with OK.
- An input field appears.
- Do not fill the Old password field.
- Enter a new password in the New password and Confirm new password fields.
- Click on OK.
- Confirm the Your password has been changed successfully message with OK.
- If a particular panel is defined as a startup panel for the respective user, it will be loaded.
- If no startup panel has been defined for the user, the user menu will be loaded.
- For further informationen on the startup panel, see the Define user startup section in the User Data Workflows.
Procedure for further logins
- Enter the user ID (user code) in the first form field.
- Enter the password in the lower form field.
- Confirm with Login or OK.
Notes
- If a wrong user ID or a wrong password are entered, the User and/or password are unknown error message is displayed. A new entry can be made.
- You can use PLANTA Standard users for demonstration purposes.
- The PLANTA Standard users are only available if PLANTA demo data is installed.
- These standard users contain assignments of PLANTA Standard roles.
- PLANTA Standard users are used without passwords.
- This does not apply to the P20 and R90 users. Please contact your PLANTA consultant to obtain the password for this user.
From DB 39.5.7
| Product area |
User |
Role |
| PLANTA project |
R41 |
Multi-Project Management, Project Management, PM Administration, Employee/Reporting of Hours Worked |
| PLANTA project |
R47 |
Management, Employee/Reporting of Hours Worked |
| PLANTA project |
R49 |
PM Administration, Employee/Reporting of Hours Worked |
| PLANTA project |
R60 |
Program Management, PM Administration, Employee/Reporting of Hours Worked |
| PLANTA project |
R43 |
Resource Management, Employee/Reporting of Hours Worked |
| PLANTA project |
R1 |
Employee/Reporting of Hours Worked |
| PLANTA project |
R8 |
Project Management, Employee/Reporting of Hours Worked |
| PLANTA project |
R40 |
Project Management, Employee/Reporting of Hours Worked |
| PLANTA portfolio |
R70 |
Portfolio Management, Employee/Reporting of Hours Worked |
| PLANTA request |
R50 |
Request Management, Employee/Reporting of Hours Worked |
| Product independent |
P20 |
Customizing&Technical Administration |
| PLANTA link |
R90 NEW |
PLANTA link |
Up to DB 39.5.7
| Product area |
User |
Role |
| PLANTA project |
R41 |
Multi-Project Management, Project Management, PM Administration, Employee/Reporting of Hours Worked |
| PLANTA project |
R47 |
Management, Employee/Reporting of Hours Worked |
| PLANTA project |
R49 |
PM Administration, Employee/Reporting of Hours Worked |
| PLANTA project |
R60 |
Program Management, PM Administration, Employee/Reporting of Hours Worked |
| PLANTA project |
R43 |
Resource Management, Employee/Reporting of Hours Worked |
| PLANTA project |
R1 |
Employee/Reporting of Hours Worked |
| PLANTA project |
R8 |
Project Management, Employee/Reporting of Hours Worked |
| PLANTA project |
R40 |
Project Management, Employee/Reporting of Hours Worked |
| PLANTA portfolio |
R70 |
Portfolio Management, Employee/Reporting of Hours Worked |
| PLANTA request |
R50 |
Request Management, Employee/Reporting of Hours Worked |
| Product independent |
P20 |
Customizing&Technical Administration |
Program Operation
Program operation
Exit Program
Procedure
- Use the Data Exit Program menu item or press ALT + F4
- If there are any unsaved changes, the following message is displayed: Save? Some data has been changed. After the message has been confirmed, the program is closed.
- If all changes have already been saved, the program is closed (without further prompt).
- If no panel is open, you can also exit the program using the x button in the title bar.
Information on the Surface
Screen
From C 39.5.27
Title bar
- forms the top line of the screen.
- contains the following elements:
- PLANTA Logo
- Menu bar
- includes menus with the individual menu items for execution of different actions and operations.
- Toolbar (Standard)
- shows the buttons of the most frequently used menu items. The buttons show graphical symbols of these menu items.
- Title
- of the active panel or
- of the main module, in case no panel title has been defined or
- the system title, in case no panel is opened.
User Menu
- is a module which is displayed on the left hand side of the screen and contains the following elements:
- Links to the panels with editing or view modules The links in the user menu are grouped by work area and role.
- The rights of the logged-on user determine which links are contained in the user menu.
- NEW Links to the panels of the recently viewed planning objects (projects, programs, ideas, proposals) and planning objects marked as favorites by the user.
- Name of the logged on user.
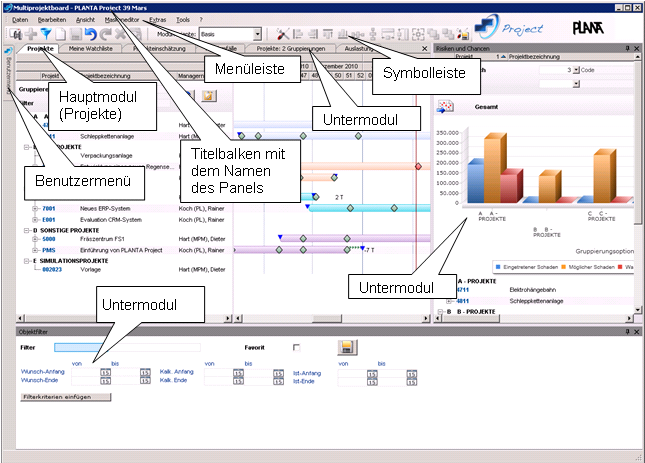
Panel
- In PLANTA, a panel is a unit which is used to group modules.
- It contains a user menu, a main module and possibly one or more submodules.
Module
- In PLANTA, a module is a unit which enables the display and editing of data from the database (e.g. project data).
Status line
- In the status line, messages on the progress of the program which do not require confirmation are displayed, e.g.:
- The status line is placed at the bottom margin of the screen.
Up to C 39.5.27
Title bar
- forms the top line of the screen.
- The name of the active panel and the system name are displayed here.
Menu bar
- includes menus with the individual menu items for execution of different actions and operations.
- forms the second line of the screen.
- A click on a menu item displays the associated pull-down menu.
Toolbar (Standard)
- shows the buttons of the most frequently used menu items. The buttons show graphical symbols of these menu items.
- forms the third line of the screen.
- If the mouse cursor is moved over a button, the button's name is displayed in a tooltip on the screen after a brief delay.
- Special toolbars
- For toolbar menu items you can enter a text or comment in the Text field in the Menu Items module.
Panel
- In PLANTA, a panel is a unit which is used to group modules.
Module
- In PLANTA, a module is a unit which enables the display and editing of data from the database (e.g. project data).
Status line
- In the status line, messages on the progress of the program which do not require confirmation are displayed, e.g.:
- The status line is placed at the bottom margin of the screen.

Panel
Panel Structure
Information
- Panel consist of a user menu, a main module, and possibly of one or several submodules.
- The main module and the submodules can be arranged (docked) at different positions on the screen. They can be lapped like tabs or positioned next to or above/below one another.
- Main module
- is the leading module of the panel.
- is usually displayed in the first position when the panel is opened.
- Via customizingyou can define which module is the main module of the panel.
- Submodule
- is any other module of the panel which is neither the main nor the user menu module.
- Submodules can, but do not have to be, structural and/or contextual child modules of the main module.
- Which submodules are displayed in a panel can also be set individually via customizing.
- If submodule tabs do not fit into the screen window, a blue triangle is displayed in the tab bar indicating that the panel contains more modules.
- By clicking on this triangle, a list of all modules of the panel is opened.
- By clicking on the module title, the corresponding module is activated.
- If a submodule is closed, it is no longer available and not displayed in the panel. To have the closed submodule displayed again, you have to reopen the panel.
- User menu
- is a module window which is aligned at the left side of the display and contains links which lead to the panels. For further information, see here.
- Panel title
- is usually displayed in the title bar of the screen, no matter which module of the panel is currently activated.
- is the title of the main module, unless an extra panel title was defined by a customizer.
- Task bar
- Each open panel has an entry in the task bar. If a new panel is opened, a new entry in the task bar is displayed.
- Dialog module
- Dialogmodules are auxiliary modules which do not have any stand-alone function. They are opened from another module and have an immediate functional relation to the source module.
- Dialog modules are closed:
- by pressing Escape (Esc) or
- by clicking on the x in the title bar of the dialog module or by clicking in the panel from the dialog module (if it has been customized respectively)
Dialog modules are to be distinguished from dialog messages.
- Dialog messages show information, notes or simple queries to the user which the user must then confirm or answer. They are panel independent. Without having confirmed a dialog message, you will not be able to continue to work with the program. The system title is displayed in the header bar of a dialog message.
- In contrast, dialog modules are real modules. They do, however, not have a stand-alone function but they provide options for more complex actions or selection operations. They are panel independent and can be closed without having carried out the required actions or operations. In the header bar of a dialog module, the name of the dialog module is displayed.
How to Operate Panels
How to Open Panel/Modules
Procedure
- There are several ways to open panels/modules:
- by clicking on a link in the user menu
- within a panel: by clicking on the respective tab (if the required tab is invisible, click on the blue triangle in the tab bar and select the name of the module from the list).
- within a module: by clicking on a button
- within a module: by clicking on a link
- within a module: by right-clicking to display the context menu and to select the required command.
How to Close Panels/Modules
Procedure
- Close
- the panel:
- by closing the main module:
- click on the x button in the main module tab or
- select the Close command from the context menu on the main module tab or
- select the Data Panel/Module menu item or press CTRL + F4.
- by clicking on the x button in the title bar.
- the submodules:
- click on the x button in the main module tab or
- select the Close command from the context menu on the submodule tab or
- select the Data Panel/Module menu item or press CTRL + F4.
Details
- On the module tab in the context menu, two further context menu commands are available in addition to the Close context menu command:
- If the Close all submodule tabs except the active one is selected in a submodule, all other submodules except this submodule and the main module of the panel are closed. If you select this command in a main module, all submodules of the panel are closed.
- Via the Close all submodule tabs to the right of the active one command, all modules to the right of the module for which the context menu command has been selected are closed.
Note
- The user menu module cannot be closed.
Module Window Behavior (Floating/Frozen)
Information
- All modules (main and submodules) can be arranged as tabs within a panel or docked as floating/frozen windows at the margin of the panel.
- A module window with "floating" behavior is a movable module window.
- By default, you see the module title bar only.
- If you move the mouse over the title bar, you can see the complete window which is hidden as soon as you move the mouse away from the title bar.
- If you click into the floating module window, it will not be hidden if you move the mouse away from the bar. It is only hidden if you click on another module.
Change behavior
- Move the mouse over the bar.
- Click on the pin symbol in the module title bar: the module window is frozen.
- To change to "floating" mode again, click on the pin symbol once more.
Note
- By default, the user menu is set to "floating" mode . If you change the user menu behavior to "frozen", this behavior only applies to the current panel. When you open a new panel the user menu of this panel is "floating" by default.
How to Move Modules within a Panel
Information
- Modules can be moved within a panel.
Details
- You can move modules which are frozen windows or tabs without further ado.
- If you want to move modules which are displayed as floating windows, you have to freeze them.
Procedure
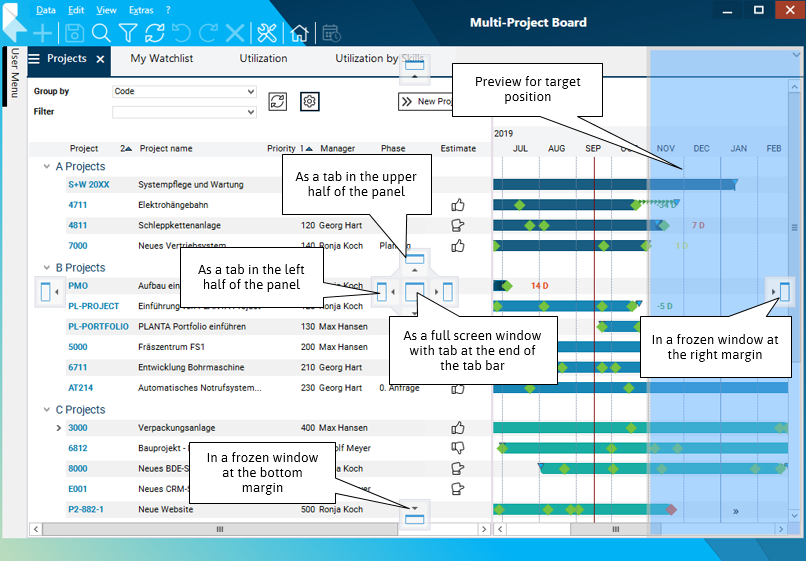
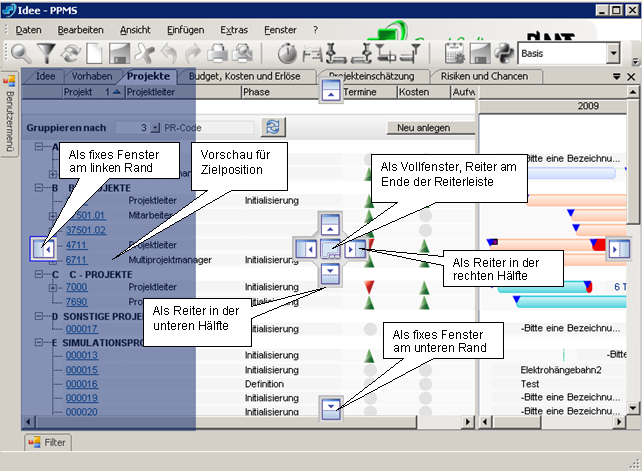
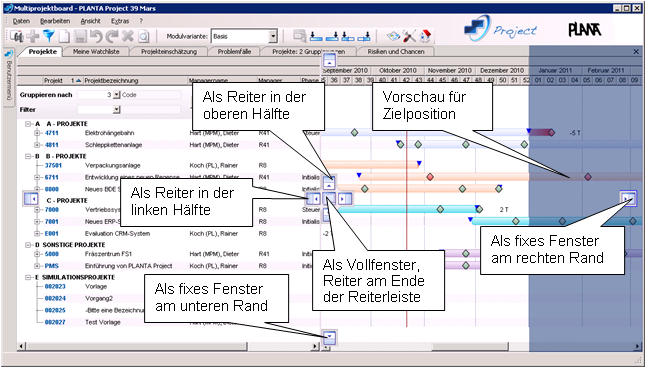
- Click on the title bar of the required module or on the required tab and move it in the required direction by pressing and holding the left mouse button.
- As a result, navigation symbols are displayed in the middle and at the margins of the panel.
- Drag the module to one of these symbols.
- As soon as you have reached the symbol with the mouse button, the further position of the module is displayed with transparent blue background (see the figure below). If you release the mouse button, the module is placed exactly at this position.
Navigation symbols
- The navigation symbols at the margins of the panel are used to position modules as frozen windows at the margins of the panel.
- Subsequently you can unfreeze the window by clicking on the pin symbol. The module is then displayed as a floating window.
- The navigation symbols in the middle of the panel are used to position modules as tabs in the right, left, upper or bottom half of the panel or as a full screen window.
- In the full screen window mode, the appropriate tab is moved to the end of the tab bar.
Example
Note
- Modules that can be positioned at the panel margins can be displayed as module windows (blue title bar if focused, gray title bar if not focused), or as module tabs (white title bar).
Module
Module Structure: Interface
Module components
- Module title
- contains the name of the module.
- Data windows
- Data fields
- Scrollbar
- As soon as the data cannot be displayed completely, vertical or horizontal scroll bars are displayed.
Module Structure: Technology + Logic
Information
- From a technical point of view, a module consists of data areas which in turn contain data fields from data tables.
- From a users point of view, a module consists of records.
- A record summarizes attributes/parameters of an object with their corresponding values.
- Values are displayed in separate data fields.
- What data fields belong to a record (record structure) is defined by the customizing of the corresponding data area.
- A record can be displayed differently on the interface: in the form of a line (horizontal layout), in the form of a column (vertical layout), or arranged arbitrarily (in forms).
- The same data field over several records forms a data logical column.
- Depending on the layout, a data logical column can consist of the visualization of a column (horizontal layout), a line (vertical layout) or a form from the field which is always at the same position across all records.
- If there is only one record in a data area, one column = one data field.
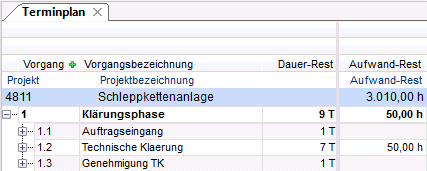
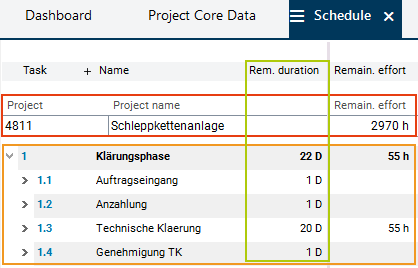
Example

- Here, six records are displayed: one project record and five task records.
- The project record consists of three data fields (Project, Project name and Remaining effort), and their corresponding values.
- The task records consist of four data fields (Task, Task name, Remaining duration, and Remaining effort) with the corresponding values.
- All Remaining duration fields form a column. The data logical Remaining duration column equates to the layout column.
- Caution with Remaining effort: Although optically it looks like one column (due to the layout positioning and the same name), they really are two columns: one Remaining effort column of the project record and the Remaining effort column of the task records.
 .
. 
