The documentation from version 39.5.17 of PLANTA project can be found in the new PLANTA Online Help .
.
- Master Data Entry up to DB 39.5.0
- User Data Workflow
- User Data Workflow (Tutorial)
- Resources MOD0099DQ
- Miscellaneous Listbox Values MOD0099E4
- Programs MOD0099E1
- Programs MOD009C9U
- Skills MOD0099DU
- Process Model Templates MOD0099TY
- Process Rules MOD0099X6
- Cost Centers MOD0099E0
- Cost Types MOD009AWF
- Cost Types MOD009BQE
- Cost Type Groups MOD0099DZ
- Conversion Factors MOD0099E3
- DT476 Conversion Factor Item
- Conversion Factors MOD0099E3
- Conversion Factors MOD0099E3
- Conversion Factors MOD0099E3
- Conversion Factors MOD0099E3
- Conversion Factors MOD0099E3
- Load Profiles MOD0099E2
Master Data Entry up to DB 39.5.0
User Data Workflow
- Master Data Entry up to DB 39.5.0
- User Data Workflow
- User Data Workflow (Tutorial)
- Resources MOD0099DQ
- Miscellaneous Listbox Values MOD0099E4
- Programs MOD0099E1
- Programs MOD009C9U
- Skills MOD0099DU
- Process Model Templates MOD0099TY
- Process Rules MOD0099X6
- Cost Centers MOD0099E0
- Cost Types MOD009AWF
- Cost Types MOD009BQE
- Cost Type Groups MOD0099DZ
- Conversion Factors MOD0099E3
- DT476 Conversion Factor Item
- Conversion Factors MOD0099E3
- Conversion Factors MOD0099E3
- Conversion Factors MOD0099E3
- Conversion Factors MOD0099E3
- Conversion Factors MOD0099E3
- Load Profiles MOD0099E2
User Data Workflow (Tutorial) Up to DB 39.5.0
Please note- The following tutorial applies to PLANTA versions up to DB 39.5.0.
- The following table contains links to the other versions:
| DB 39.5.14 | go to the tutorial |
| DB 39.5.13 | go to the tutorial |
| DB 39.5.0 - DB 39.5.12 | go to the tutorial |
| < DB 39.5.0 | go to the tutorial |
| go to further tutorials |
Introduction
Objective- This workflow teachs users with administrator rights how set up PLANTA project to enable employees to work with PLANTA software.
- In order to be able to work with PLANTA software, an employee must first be created and defined as a person, user, resource and stakeholder in the program by the administrator.
- Employee data and rights can be entered and administrated in the Administration panel of PLANTA project which contains all the required modules.
- In a standard system, the roles of the customizer (P20), the project administrator (R49) and the multi-project manager (R41) have the access rights for these modules.
- For entering the resource data, multi-project management rights are additionally required. This authorization is assigned in the Users module in the Object rights: name field.
- Authorizations (roles and rights) can be changed in PLANTA project depending on individual company requirements. For more information see rights control.
- All exercises are based on the PLANTA demo data. This data must be installed beforehand.
- The screenshots used are merely examples of functions. The screenshot layout may deviate from the program.
Create Persons (R41)
Task- Mr. Schulze, the new employee, has to be entered in the system as a person, so that he can work with the program.
- Persons are part of the basic elements in PLANTA software.
- They are necessary in order to assign further attributes e.g. user names to the employees (persons) or to define them as resources so that they can be planned in projects.
- Logon with user R41.
- In the user menu, call up Project Administration Master Data.
- Select the Administration link in the user menu.
- The panel with the same name and the Persons main module is opened.
- Press the New button in the Persons module.
- As a result, a new person data record is inserted in which the personal data of the new employee can be entered.
- Fill Name, First name and Code fields.
- Save.
- Result:
Notes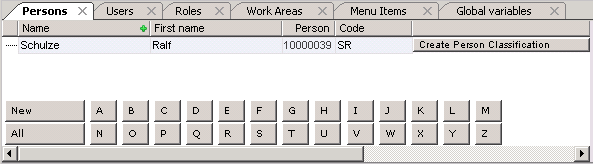
- By using the letter buttons, the data of employees whose last names start with the appropriate letter are displayed.
- By using the All button, an overview of all already created persons is given.
- If a person already exists, then, by clicking on the appropriate letter button, a new person can also be created by right-clicking on an already existing person and selecting Insert Person.
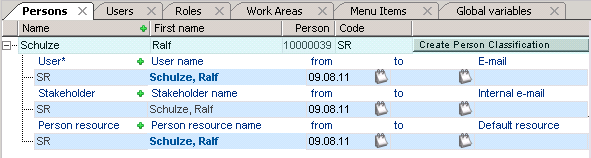
Create Person Classifications
Task- Mr. Schulze needs to be assigned a user name so that he can log on to the program.
- Furthermore, Mr. Schulze has to be defined as:
- stakeholder so that he can join project teams
- resource so that he can be scheduled in projects and report his worked hours to the appropriate projects.
- Person classifications are attributes of persons.
- Each person is given three attributes: user, stakeholder and person resource
- In the Persons module in the data record for Mr. Schulze press the Create Person Classification button and save.
- To the person of Mr. Schulze three attributes (User, Stakeholder and Person resource) and the corresponding code are assigned automatically.
- The code for all three attributes is the same as the person code.
- To the person of Mr. Schulze three attributes (User, Stakeholder and Person resource) and the corresponding code are assigned automatically.
Define a Person as Resource
Task- Although Mr. Schulze is given a resource code when the classifications were created, this is not sufficient in order to schedule him in projects as a resource. Further settings have to be made.
- Mr. Schulze's available capacity for project work must first be defined.
- In the Persons module in the person resource data record for Mr. Schulze click on the link on the person resource name.
- This takes you to the Resource Data Sheet.
- The person header data are automatically copied from the Persons module to the Resource Data Sheet module. The following required data must now be defined for the resource:
- Resource type
- To resources of resource type = 1I or 1E (Internal Employee and External Employee) a person have to be assigned. To do this, select a person from the Person listbox. If no person is selected, the Person is not selected message appears after saving.
- For resources of another resource type the Resource name field has to be filled. If no name has been entered, the Required entry missing, saving terminated. message appears.
- When calling up the module, in the Start and End period fields the date of the current day is automatically entered. For a resource to be planned in a project the calendar must have an end period that comes after the period in which the resource is expected to do the work.
- Cost center
- Default cost type
- Costs of resources of Default cost type = "-" are summarized in the application modules (e.g. in the Budget module) to the Miscellaneous (Costs) column.
- Resource type
- Save.
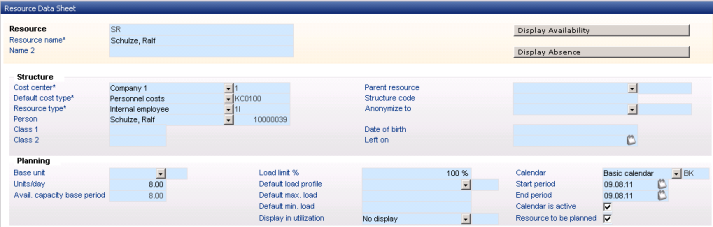
- More entries may be added at a later point in time if required.
- By clicking on the Display Availabilty button you switch to the Availability module in which the resource's availability per day is defined.
Define User Data (R41)
Note- The persons' user data are not defined and edited directly in the Persons module, but in the Users module.
- To do so, click on the link on the user name in the user data record of the corresponding person. As a result, you will be switched to the Users module and the data record of the required user will be presented.
User Password
Note- Mr. Schulze, the newly created user, requires a password in order to be able to log on to the program.
- When creating a user, a blank default password is saved in the data base.
- This password has to be changed immediately by the user into the password of their choosing after the first logon.
- If no blank passwords are desired for security reasons, the administrator can alternatively create a temporary password for each new user that has to be entered when logging on for the first time. This will also need to be changed immediately by the user as well.
Assign Roles to a User
Task- In company X, Mr. Schulze is to assume the role of project manager for project Y.
- To be able to do this, the role of the project manager in PLANTA project must be assigned to Mr. Schulze.
- Through the role assignment the user is given access rights to certain objects (modules, menu items that are grouped in work areas).
- To each user at least two roles have to be assigned. One controls the access to menu items and the other one(s) to modules.
- When delivering the program, the standard roles defined by PLANTA are made available for the customer. In the Roles module, these roles can be edited or adapted according to the company requirements and individual roles can be created.
- Further information about rights control in PLANTA project.
- Please read this information carefully as the following tasks assume an understanding of the PLANTA role and rights concept.
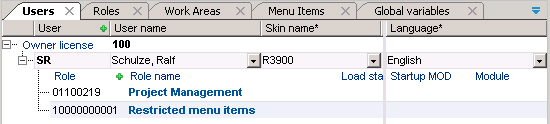
- In the Users modul, right-click on the user data record of Mr. Schulze and select Insert--> Role.
- A role data record is inserted.
- Select the role of the project manager, in the standard system 01100219 Project Management from the listbox in the Role field. Save.
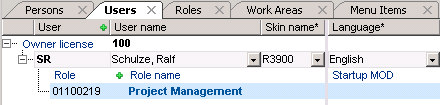
- Insert another role data record and select one of the standard roles for menu items, e.g. 01100192 R39 MI All, from the listbox.
- For every user it is obligatory that they be assigned a menu item role. Without such a role the user cannot start the program. Attempting to log on with a user not having access to menu items results in the follwoing message: IEmenu_send(): menuitems couldn't be fetched. Closing application. (See log file for further information).
- Save.
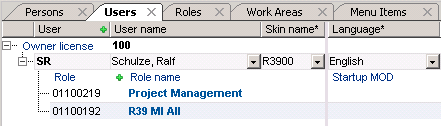
- After Mr. Schulze has logged on to the system, he can see the menus that are assigned to him and the corresponding menu items in his toolbar. In his user menu, he can see the role that is assigned to him.
Note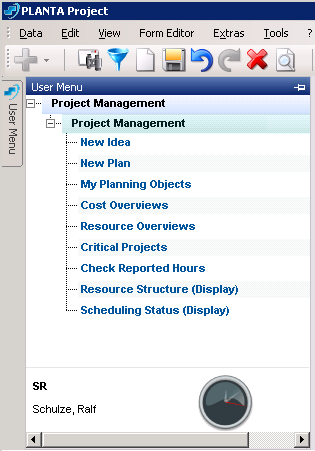
- If the PLANTA standard roles Project Manager and R39 MI All do not meet with the requirements of company X, the user with administration rights can create new roles.
Excursion: Create a New Role
Procedure- Switch from the Administration panel to the Roles module.
- As PLANTA supplies standard roles when delivering the program, they are available when calling up the module.
- Right-click on an already existing role and select the Insert Role command.
- In the Role name field, assign a name to the new role. Save.
- Soon saving an ID number is automatically generated in the Role field.
- Is the new role a menu item, the Invisible in menu check box of this role has to be activated.
- Assign work areas to the new role:
- Right-click on Insert Work area and select the required work area from the listbox.
- Save.
- Standard work areas are offered for selection.
- If an individual work area has to be assigned it has to be created and defined in the Work Areas module first.
- For this procedure see Excursion: Create A New Work Area.
Excursion: Create a New Work Area
Procedure- Call up the Work Areas module.
- In the Work Areas module, new work areas for modules are created and compiled. New work areas für menu items are created in a seperate module, the Menu Item module. For this, also see Restrict Access To Menu Items section.
- Automatically a blank work area data record appears.
- In the Work area name field assign a name to the new work area.
- After the input has been confirmed, a number is generated automatically in the Work area field.
- Select GR Module grouping from the listbox on the Category name field.
- Assign modules to the work area. To do this:
- Right-click on the work area data record and select the Module command.
- The module data record is inserted.
- Select the number of the required module from the listbox or enter it manually. Save.
- In the same way, assign further modules to the work area.
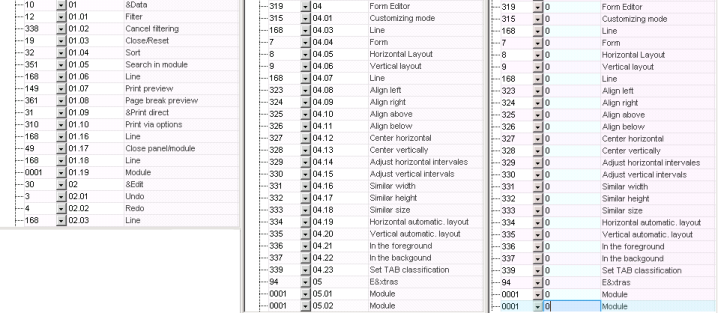
Restrict Access to Menu Items
Task- The multi-project manager of company X thinks that Mr. Schulze should only have access to certain menu items and these are Data, Edit and View. That is why he wants the access to menu items for Mr. Schulze to be changed.
- Open the Administration panel in the Menu Item module.
- The module contains two PLANTA standard work areas for menu items that are not allowed to be changed.
- In order to restrict the access to menu items for Mr. Schulze, an individual work area has to be created that has to be assigned to an individual role.
- Copy work area R390 All (CU) via Drag&Drop.
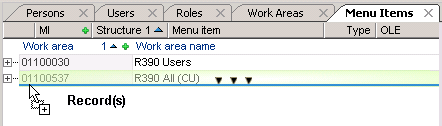
- Doing this, a new work area is created automatically and all data records (in this case menu items) are copied from the source work area to the new one.
- Assign a name to the new work area, e.g. R390 Restricted access.
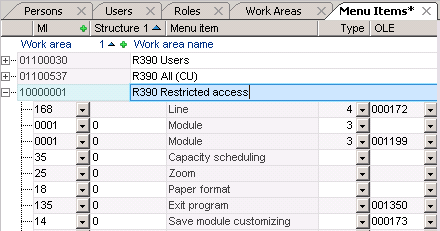
- In the new work area menu items can be deleted or deactivated, according to requirements.
- There are two ways deactivating menu items.
- Normal menu items:
- are hard-coded and cannot be deleted from the work area.
- In order to deactivate menu items, enter 0 in the Structure field.
- are hard-coded and cannot be deleted from the work area.
- Menu items for calling up macros and modules (marked the number 0001) can be created, deleted or like normal menu items deactivated individually per work area.
-
- To deactivate them enter 0 in the Structure field or delete them from the work area.
-
- Normal menu items:
- That is why in the case of Mr. Schulze enter 0 in all menus apart from Data, View and Edit in the Structure field.
- There are two ways deactivating menu items.
- Switch to the Roles module and create a new role data record. For this, see Excursion: Create A New Role section.
- Activate the Invisible in menu check box of this role.

- By right-clicking and selecting Insert Work area a new work area is assigned to this role.
- Save.
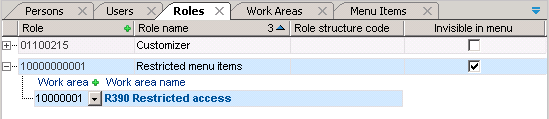
- Switch to the Users module and assign the new role to Ralf Schulze manually.
- Delete the standard menu item role R39 All (CU):
- After Mr. Schulze has logged on to the system, he can see the menus Data, Edit and View and the corresponding menu items in his toolbar.
Note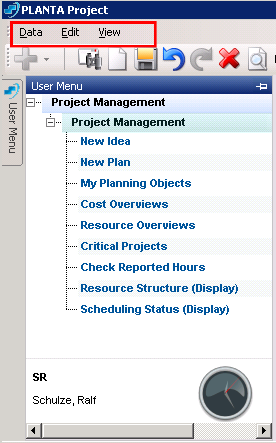
- In the same way, single menu items within menus can be deactivated.
Define User Start-Up Module (P20)
Task- When Mr. Schulze logs on to PLANTA project, the Critical Projects module shall be automatically opened.
- In order to complete this take the corresponding start-up macro has to be assigned to the user Mr. Schultz.
- Log on with user R41.
- In the Critical Projects module, select ? Module information in the toolbar.
- Look for the module number below the code MOD and note it down. Log on with user P20.
- In the Global variables module, add a new global variable by right-clicking and selecting Insert Global variables.
- Below Class select Module ID from the listbox.
- Below Alpha 120 enter the previously noted module number of the Critical Projects module.
- Enter a python ID in the Python ID field, e.g.:
- L100_startup_module_problemfaelle for the startup of the Critical Projects module.
Note
- The license number L100 is just an example. Depending on the customer's license number, it will be entered here automatically.
- Save.
- In order to define a startup macro, create a new module in the Modules module.
- For this, enter a description below Module (e.g. Call up Critical Projects).
- Below Class select 6 macro module from the listbox.

- Switch to the Python macros module by pressing the
 Call up macro editing button.
- Here, press on the
 Open Python macro editing button.
- Insert the following macro via copy/paste:
from ppms import ppms_cu

mod_obj=ppms.get_target_module()

module_id=ppms_cu.Helper.get_global_setting("L100_startup_module_problemfaelle").alpha120.get_value()

ppms_cu.Action(mod_obj).call_startup_module(module_id)- The result in PLANTA project will look like this:

- Assign the new macro module to the 01100111 Startup Modules work area (right-click Assign module to a work area) so that later the new macro module is displayed in the Startup macro name listbox in the Users module.
- Switch to the Administration panel (with R41) and open the Users module.
- In the Startup macro name field in the user data record for Mr. Schulze select the newly created Call up Critical Projects macro from the listbox. In the Startup macro field, the number of this macro is displayed.
- Save.

- After Mr. Schulze logs on again, the Critical Projects module is started automatically.
Notes
- For the procedure described above, the startup module is defined permanently for the user.
- The administrator can assign a startup macro to the user that enables him to decide by himself which of the already defined startup modules are called up and which ones not when logging on to the program. For more information see here.
- Already created startup modules do not have to be defined again but can be selected directly from the Startup macro name field in the user data record.
Resources MOD0099DQ
Access path- PM Administration Master Data Resources Resources
- This module shows resources in table form, grouped by resource type.
- It provides a quick overview as well as a comparison of the parameters of the different resources and makes it possible to edit or change the parameters for several resources at once.
- Only resources which the current user is allowed to see according to his/her access rights are displayed.
- By clicking on the All button at the bottom module margin, you get an overview of all available resources.
- Via letter buttons, resources the name of which begins with the corresponding letter can be displayed.
| Resources left | Only resources for which a Left on date is filled are displayed. |
| Check of Invalid Resource Data | Only employee and department resources for which the Start and/or End period fields are not filled in the Resource Data Sheet module are displayed. |
Edit Resources
Procedure- Adjust or define the resource parameters
- directly in the Resources module, or
- in the Resource Data Sheet module, which is opened by clicking on the link in the Resource name field.
From DB 39.5.11
- If resource parameters are changed after period records have already been created, the changes are not copied to the existing period records automatically, so that they NEW must be updated manually. However, this can only be done in the Resource Data Sheet module.
- For this purpose, see the Edit periods in the module description.
Up to DB 39.5.11
- If resource parameters are changed in the Resource Data Sheet after period records have already been created, the changes are not applied to the existing period records automatically, so that they must be adjusted by deleting them and creating them anew. The procedure for this varies depending on the requirements:
- 1: If the change is not to be applied to all existing periods, but only from a particular date on,
- delete the periods and create them anew by changing the date in the End period field. For more information, see procedure 1 in the Delete Periods section. As a result, the new parameters are copied to the newly created period records.
- 2: If the change is to be applied to all already existing periods,
- delete the periods completely by marking the required resources and clicking on the Delete periods button, and subsequently creating them anew.
- For both procedures, details and notes are to be considered throughout the Create, Edit, Delete Resource Periods chapter.
- delete the periods completely by marking the required resources and clicking on the Delete periods button, and subsequently creating them anew.
- 1: If the change is not to be applied to all existing periods, but only from a particular date on,
Create Resources
Procedure- Click on the New button at the bottom margin of the module.
- You switch to the Resource Data Sheet module. Here, a new resource can be created and required resource parameters can be defined.
- It is only recommended to create new resources in the Resources module if these resources are no person resources.
- Person resources are to be created in the Persons module in order to avoid inconsistencies between persons and the corresponding person resources.
Define Standard Work Days (Only for MSP Export)
Note- The settings are exclusively relevant when exporting to Microsoft Project.
- By activating the corresponding checkbox in the Standard work days of the calendar area it is possible to specify which week days are work days. The setting made applies to all weeks of the calendar by default.
- Only the deviations in the calendar for the defined standard work days are exported in order for the file size to be as small as possible.
| See also: Microsoft Project Interface |
Assign Calendar
Information- In PLANTA project, calendars can be stored on different levels.
- The calendar is stored in the System calendar (DT345) in the License, system parameters and DB instances module for the entire system.
- For projects, the calendar is defined in the Calendar parameter (DT461). This parameter is not used in the Standard but can be integrated in the required modules in customized systems.
- For tasks, the calendar is entered in the Task calendar parameter (DT463) in the Schedule module.
- For links, the calendar is entered in the Link parameter (DT465) in the Schedule module
- For resources, the calendar is entered in the Calendar parameter (DT467) in the Resource Data Sheet module
- The calendar assigned to the resources is used for the creation of resource periods. Some user modules refer to periods, others refer directly to the calendar. So you may experience different behaviors in modules, if, e.g., the calendar assigned to the resources has been changed after creating the resource periods.
- If changes are made to the calendar afterwards, they do not have an effect on existing periods of the current resources but only on new periods. If you want changes to take effect on existing resource periods, you have to delete the periods of the respective resources which use the changed calendars and create them anew.
| See also: Effect of the calendar in date scheduling |
Delete Calendar
Procedure- Right-click on the effect calendar and select the delete context menu command.
- Confirm the Do you really want to delete this calendar? dialog message with Yes.
- Save.
- Upon deletion, it is checked whether the calendar is in use (in sytem parameters, in global variables or as a resource calendar).
- If it is in use, it cannot be deleted. A respective dialog message with the specification of use is output.
- PM Administration Master Data Checklists
- In this module, checklist templates are created and administrated, which are used as a copy template when creating and assigning checklists to todo items (in the Open Item module).
Create Checklist Templates
Procedure- By clicking on the Insert button in the toolbar or by selecting the Insert Checklist context menu command, a blank record is inserted.
- Enter the Checklist name.
- As a result, the number is automatically generated in the Checklist field.
- Select the Subject area from the listbox of the same name.
- Select Insert--> Checklist item from the context menu to enter the individuals items.
- Enter the required text in the Checklist item field.
- Add further items if necessary.
- After saving, the newly created checklist can be used as a copy template.
- Checklists from checklist templates can only be assigned to the open items in the Open Item module, in which individual open items are edited in the form of a data sheet.
- Individual checklist items can be assigned to the todo items in the Open Items, Schedule or Task.modules
Miscellaneous Listbox Values MOD0099E4
Access path- Project Administration Master Data Miscellaneous Listbox Values
- This module offers an option to adjust the listbox values of different project parameters without customizing rights.
- In PLANTA, all listbox values are organized in listbox categories. In order for the listbox categories to be displayed in this module and their values to be editable, the listbox categories must be marked as project categories. This is done via the "project" entry in the Area name field in the Listbox Values customizing module.
- New listbox categories can only be created or edited in the Listbox Values module.
- Select the required listbox category from the listbox in the Listbox category name field.
- Change the listbox value in question or create a new listbox value by right-clicking and selecting the context menu command Insert Listbox Values or Listbox Values (Old).
- Save.
Programs MOD0099E1
Programs MOD009C9U New from DB 39.5.0
From DB 39.5.13
Access path
- Program Management Planning Multi-Program Board panel Programs
- Multi-Project Management NEW Program Planning Multi-Program Board panel Programs
From DB 39.5.9
Access path
- Program Management NEW Planning Multi-Program Board Programs
- NEW Multi-Project Management Planning Multi-Program Board panel Programs
Up to DB 39.5.9
Access path
- Program Management Program Management --> Panel Program Overview Programs
- This module shows an overview of all programs created and all projects contained in the programs.
From DB 39.5.15
Details
- By clicking on the ID of the required program, you can switch to the corresponding Program panel in which you can edit or view the program data depending on your user rights.
- By expanding the tree structure, the projects assigned to the programs can be displayed or hidden.
- Below the scale, the dates of programs and projects as well as their master milestones are additionally visualized by the bars.
- NEW When you click on the arrows in the scale area (
 for incoming and
  for outgoing links), external links of the planning object can be opened in a dialog module. By clicking on the arrow once more, the module is closed again.
Up to DB 39.5.15
Details
- By clicking on the ID of the required program, you can switch to the corresponding Program panel in which you can edit or view the program data depending on your user rights.
- By expanding the tree structure, the projects assigned to the programs can be displayed or hidden.
- Below the scale, the dates of programs and projects as well as their master milestones are additionally visualized by the bars.
Legend: Program/ProjectFrom DB 39.5.15
Symbol Meaning Color Comment 
Requested dates Requested start and Requested end are defined in the Key dates area in the corresponding core data sheet (Project Core Data, Idea Core Data, Proposal Core Data, Program Core Data).

Calculated dates The color of the bar is determined by the code of the planning object.
Code A
Code B
Code C
Code D
Code E
Calc. start and Calc. end of a planning object are calculated by clicking on the calculation button or by selecting the respective menu item.
In the Planning Objects (In Table Form) module, the code of planning objects is defined and can be changed; for projects and proposals this can also be done in the Project Core Data and Proposal Core Data modules.
Actual dates The bar is white hatched. The background color depends on the Code of the planning object. Actual start and Actual end (if there is any, otherwise Latest time recording date) of a planning object. They are determined from the actual dates of the tasks (Actual start/Actual end) when calculating the schedule of the respective planning object. 
Date delay A date delay occurs if the calculated end date (Calc. end) of the planning horizon is later than the requested end date (Requested end).
The date delay bar immediately follows the bar for calculated dates and is customized with a color gradient so that the red color has various shades.

Gates Gate with date delay
Main gate/main milestone
Gates are master milestones of planning objects. Without date delay means: Total float 0 With date delay means: Total float < 0 Gates are only displayed in the schedule module if the Schedule with gates checkbox has been activated in the Project Core Data in the core data module of the respective planning object. 
Master milestone date delay A master milestone date delay occurs if its Calc. end is later than its Latest end. 
external links incoming
From DB 39.5.14
Symbol Meaning Color Comment Requested dates Requested start and Requested end are defined in the Key dates area in the corresponding core data sheet (Project Core Data, Idea Core Data, Proposal Core Data, Program Core Data).
Calculated dates The color of the bar is determined by the code of the planning object.
Calc. start and Calc. end of a planning object are calculated by clicking on the calculation button or by selecting the respective menu item.
In the Planning Objects (In Table Form) module, the code of planning objects is defined and can be changed; for projects and proposals this can also be done in the Project Core Data and Proposal Core Data modules.Actual dates The bar is white hatched. The background color depends on the Code of the planning object. Actual start and Actual end (if there is any, otherwise Latest time recording date) of a planning object. They are determined from the actual dates of the tasks (Actual start/Actual end) when calculating the schedule of the respective planning object. Date delay A date delay occurs if the calculated end date (Calc. end) of the planning horizon is later than the requested end date (Requested end).
The date delay bar immediately follows the bar for calculated dates and is customized with a color gradient so that the red color has various shades.
Gates Gates are master milestones of planning objects. Without date delay means: Total float 0 With date delay means: Total float < 0 Gates are only displayed in the schedule module if the Schedule with gates checkbox has been activated in the Project Core Data in the core data module of the respective planning object. Master milestone date delay A master milestone date delay occurs if its Calc. end is later than its Latest end. From DB 39.5.12
Symbol Meaning Color Comment 
Requested dates Requested start and Requested end are defined in the Key dates area in the corresponding core data sheet (Project Core Data, Idea Core Data, Program Core Data).

Calculated dates The color of the bar is determined by the code of the planning object.
Code A
Code B
Code C
Code D
Code E
Calc. start and Calc. end of a planning object are calculated by clicking on the calculation button or by selecting the respective menu item.
In the Planning Objects (In Table Form) module, the code of planning objects is defined and can be changed; for projects and proposals this can also be done in the Project Core Data and Proposal Core Data modules.
Actual dates Actual start and Actual end (if there is any, otherwise Latest time recording date) of a planning object. They are determined from the actual dates of the tasks (Actual start/Actual end) when calculating the schedule of the respective planning object. Date delay A date delay occurs if the calculated end date (Calc. end) of the planning horizon is later than the requested end date (Requested end).
The date delay bar immediately follows the bar for calculated dates and is customized with a color gradient so that the red color has various shades.

Gates Gate with date delay
Main gate/main milestone
Gates are master milestones of planning objects. Without date delay means: Total float 0 With date delay means: Total float < 0 Gates are only displayed in the schedule module if the Schedule with gates checkbox has been activated in the Project Core Data in the core data module of the respective planning object. Master milestone date delay A master milestone date delay occurs if its Calc. end is later than its Latest end. From DB 39.5.11
Symbol Meaning Color Comment Requested dates Requested start and Requested end are defined in the Key dates area in the corresponding core data sheet (Project Core Data, Idea Core Data, Program Core Data).

Calculated dates The bar color is defined by the code of the planning object.
Code A
Code B
Code C
Code D
Code E
Calc. start and Calc. end of a planning object are determined in the calculation of the schedule of the respective planning object.
In the Planning Objects (In Table Form) module, the code of planning objects is defined and can be changed; for projects and proposals this can also be done in the Project Core Data and Proposal Core Data modules.
Actual dates Actual start and Actual end (if there is any, otherwise Latest time recording date) of a planning object. They are determined from the actual dates of the tasks (Actual start/Actual end) when calculating the schedule of the respective planning object. Date delay A date delay occurs if the calculated end date (Calc. end) of the planning horizon is later than the requested end date (Requested end).
The date delay bar immediately follows the bar for calculated dates and is customized with a color gradient so that the red color has various shades.
Gates Gates are master milestones of planning objects. Without date delay means: Total float 0 With date delay means: Total float < 0 Gates are only displayed in the schedule module if the Schedule with gates checkbox has been activated in the Project Core Data in the core data module of the respective planning object. Master milestone date delay A master milestone date delay occurs if its Calc. end is later than its Latest end. From DB 39.5.9
Symbol Meaning Color Comment Calculated dates The bar color is defined by the code of the planning object.
Calc. start and Calc. end of a planning object are determined in the calculation of the schedule of the respective planning object.
In the Planning Objects (In Table Form) module, the code of planning objects is defined and can be changed; for projects and proposals this can also be done in the Project Core Data and Proposal Core Data modules.Actual dates Actual start and Actual end (if there is any, otherwise Latest time recording date) of a planning object. They are determined from the actual dates of the tasks (Actual start/Actual end) when calculating the schedule of the respective planning object. Date delay A date delay occurs if the calculated end date (Calc. end) of the planning horizon is later than the requested end date (Requested end).
The date delay bar immediately follows the bar for calculated dates and is customized with a color gradient so that the red color has various shades.
Gates Gates are master milestones of planning objects. Without date delay means: Total float 0 With date delay means: Total float < 0 Gates are only displayed in the schedule module if the Schedule with gates checkbox has been activated in the Project Core Data in the core data module of the respective planning object. Master milestone date delay A master milestone date delay occurs if its Calc. end is later than its Latest end. Up to DB 39.5.9
Symbol Meaning Color Comment 
Calculated project dates Calc. start and Calc. end of a project are calculated by clicking on the calculation button or by selecting the respective menu item. 
Master milestones with date delay
Tasks are defined as master milestones in the Schedule module.
Skills MOD0099DU
Access path- PM Administration Master Data Skills panel Skills
- In the Skills module, skills are created, which can be assigned to the resources.
- Below the skills, resources to which the respective skills are assigned can be viewed by expanding them.
- In the Resource Data Sheet module skills can be assigned to a resource.
- Skills are qualifications that can be assigned to resources.
- This makes it possible to assess which of the available resources have the qualification which is currently required, and their level of utilization.
From DB 39.5.12
Create skills
- Insert a new record by clicking on the Insert button or by clicking on the Skill ID field and selecting the context menu command Insert Skill.
- Fill the Skill ID and Skill fields.
- Save.
- Fill further fields if necessary (Skill group, Person responsible).
Up to DB 39.5.12
Create skills
- Insert a new record by clicking on the Insert button or by clicking on the Skill field and selecting the context menu command Insert Skill.
- Fill the Skill and Skill name fields.
- Save.
- Fill further fields if necessary (Skill group, Person responsible name).
Process Model Templates MOD0099TY
Access path- PM Administration Master Data Process Model Templates Process Model Templates
- Request management Master Data Process Model Templates Process Model Templates
- PLANTA offers process model-based project management.
- Depending on company requirements, different process models can be used and assigned to the planning objects (projects, ideas, proposals, requests).
- You can use the Process Model Template module to create and edit process model templates.
- If a model is changed, this does not affect projects for which the model has already been activated. If you want to use the adjusted process model for a project, you have to reset the model that has been used before and copy the new model.
- A process model contains several phases, each of which contains process steps.
| Object type: project, proposal, idea | Only the templates for projects, ideas, and proposals are displayed |
| Object type: request | Only the templates for requests are displayed |
- Several demo process models related to the DIN 69901/1-5 standard are provided in the PLANTA program delivery.
- The process model data stored in the templates (process model, process phase, process step) is displayed in accordance with the user language. To use the data in different languages, particular customizing adjustments are necessary. In this case, please contact your PLANTA consultant.
Create Process Models
Procedure- Click on the Insert button (if no process model has been created yet) or right-click on the already created process model and select the Insert Process model context menu command.
- A blank record is inserted.
- Enter a name for the model in the Process model field.
- In the Object type field, define for which planning objects the model is to be applied.
- In the Comment field, a comment regarding the process model can be entered.
- Save.
Assign and Define Phases
Procedure- Right-click on the newly created model and select the Insert--> Phase context menu command.
- Enter the phase name in the field of the same name.
- In the Comment field, a comment regarding the phase can be entered.
- Assign further phases.
- Save.
- The order of phases within a model is defined by means of the values in the Order field.
- For each phase you can specify a process rule that is executed when changing to the next phase. You can define process rules in the Process Rules module.
Assign and Define Process Steps
Information- There are two types of process steps:
- Project-specific process steps: These are certain project activities.
- Submission/Approval process steps: Using these process steps, you can check and approve process steps of each phase.
- Each phase must contain at least a submission and an approval process step.
- If a phase contains project specific steps, the Submission and Approval process steps must be the last in this phase.
- Between these two steps no project-specific process step should be defined.
- Right-click on the phase and select the Insert--> Process step context menu command.
- A blank record is inserted.
- Fill the Process step name field and, if necessary, the Comment field.
- Project-specific process steps have to be created first.
- Submission and approval process steps have to be created last.
- The order of process steps within a phase is defined by means of the values in the Order field.
- For the submission and approval process steps, select the corresponding entry from the listbox in the Class field. These entries are obligatory.
- Save.
- Phases which only consist of submission/approval process steps are not permitted!
- For each process step, you can define what action is to be performed when the Focus task context menu command is selected or when the arrow button next to the process step name in the Process Status module is clicked on. To do so, you have the following options:
- Focus the module.
- To do so, enter the Python ID of the required module in the Module field.
- You find the Python ID of the required module in the Python ID field in the Global Settings module.
- To do so, enter the Python ID of the required module in the Module field.
- Focus the module and scroll to a data area.
- For this, enter the Python ID of the required module in the Module field.
- Additionally, enter the Python ID of the required data area in the Data area field.
- You can find the Python ID of the data area in the DA Python ID field in the Data Areas module.
- Focus the module and set the focus on a certain data field
- For this, enter the Python ID of the required module in the Module field.
- Additionally, enter the Python ID of the required data field in the Data field field.
- You can find the Python ID of the data field in the DF Python ID field in the Data Areas module.
- Focus the module.
- If you want a check to be performed for every process step you have to enter the corresponding process rule in the Process rule name field and a rule parameter in the Rule parameters field. You can define process rules in the Process Rules module.
- The check procedure is not required for process steps that are not performed via the software.
- In the Process action name field it can be defined what process step actions should be executed when selecting the context menu Execute Process Step Action on the process step in the Process Status module.
- You can define process actions in the Process Rules module.
New from S 39.5.13
Define Authorizations to Delete or Insert Process Steps
Information- For each process model, phase, or process step you can define whether a particular process step can be deleted. Here, deletion is only possible if the parameter has been set on all levels.
- For each process model or phase you can define whether a new individual process step is to be inserted. Here, deletion is only possible if the parameter has been set on both levels.
- Activate the Deletion permitted checkbox on process model level.
- Activate the Deletion permitted checkbox on phase level.
- Activate the Deletion permitted checkbox on process step level.
- Activate the Insertion permitted checkbox on process model level.
- Activate the Insertion permitted checkbox on phase level.
- The following table demonstrates four possible settings for the Deletion permitted checkbox.
Level Case 1 Case 2 Case 3 Case 4 Model 

Phase Process Step 1 Process Step 2 Process Step 3
- In case 1, only the deletion of process step 1 is possible.
- In case 2, deletion is not possible on any level.
- In case 3, deletion is not possible on any level either.
- In case 4, however, deletion is possible on all levels.
Release Process Model
Information- A process model can only be used for planning if it has been released.
- For the required process model activate the checkbox in the Release field.
- Save.
Process Rules MOD0099X6
Access path- Project Administration Master Data Process Model Templates Process Rules
- Project Administration Master Data Process Model Templates Process Rules
- In the Process Rules module, rules are defined which can then be assigned to individual process steps in the Process Model Templates module.
- In the Process Model Templates module, you can define with the help of the process rules whether a check is to be done or a process action is to be carried out for a process step.
- Project object type
- Only the process rules for projects are displayed.
- Request object type
- Only the process rules for requests are displayed.
Create Process Rules
Procedure- Right-click on an already existing process rule.
- Select Insert Process Rules from the context menu.
- A blank record is inserted.
- Enter the process rule name in the field of the same name.
- Fill the Rule type, Class, Object type fields.
- These fields are mandatory data fields. As long as they have not been filled, saving in the module is not possible.
- Define the required rule in the Rule field.
- If you select Class = "Python", a template is automatically copied to the Rules field in accordance with your selection in the Rule type field. The template can be edited subsequently.
- If the rule is written in Python you can switch to the window for macro editing via the Open Python macro editing button in which the rule can be defined. The button can be found next to the Rule field.
- Save.
Cost Centers MOD0099E0
Access path- PM Administration Master Data Cost Master Data panel Cost Centers
- Some companies have complex organizational structures. This poses two fundamental questions:
- Which projects belong to which organizational area (cost center)?
- Which resources are involved?
- In the Cost Centers module, the cost center/organizational structure is exactly reconstructed.
- The access rights to projects are defined by this structure.
| Transfer data | Display of the transferred data |
| Export data | Display of the exported data |
- Insert a blank record:
- If no cost centers are available, click on the Insert button.
- If some cost centers already exist, activate the required cost center and click on the Insert button or select the Insert Cost center context menu command by right-clicking.
- Enter the name in the Cost center name field and the cost center ID in the Cost center field.
- Fill further data fields.
- Save.
- Unlike cost types or conversion factors, cost centers are not considered in cost calculation. They are only used to receive particular cost analyses and to control project access.
Cost Types MOD009AWF
- Master Data Entry up to DB 39.5.0
- User Data Workflow
- User Data Workflow (Tutorial)
- Resources MOD0099DQ
- Miscellaneous Listbox Values MOD0099E4
- Programs MOD0099E1
- Programs MOD009C9U
- Skills MOD0099DU
- Process Model Templates MOD0099TY
- Process Rules MOD0099X6
- Cost Centers MOD0099E0
- Cost Types MOD009AWF
- Cost Types MOD009BQE
- Cost Type Groups MOD0099DZ
- Conversion Factors MOD0099E3
- DT476 Conversion Factor Item
- Conversion Factors MOD0099E3
- Conversion Factors MOD0099E3
- Conversion Factors MOD0099E3
- Conversion Factors MOD0099E3
- Conversion Factors MOD0099E3
- Load Profiles MOD0099E2
Cost Types MOD009BQE New from DB 39.5.0
- PM Administration Master Data Cost Master Data panel Cost Types
- In the current module, you can define (create) and edit cost types.
- A cost type structure can also be defined here via Drag&Drop move records.
- Cost types are used to break down, summarize, and calculate costs.
- Cost types correspond to the cost or activity types which are otherwise customary.
- Before creating the cost types, you have to make the following decisions:
- How deep is the cost recording supposed to go?
- Are conversion factors to be assigned to the cost types as well? This may be reasonable if the evaluation of the work of the same resource is subject to different monetary levels depending on the todo item or on the invoicing modalities
- Cost types without conversion factors serve to summarize costs to cost type groups (in this case, the costs are calculated directly on the conversion factors on the resources)
- Cost types with conversion factor are considered in cost calculation.
- If a conversion factor is entered on the resource as well, the factors have an additive effect.
- After cost types have been created, a cost type must be assigned to each resource as a default cost type.
- When planning resources in projects, the default cost type of the resource can be replaced by another cost type both on resource assignment level (DT466) as well as on load level (DT472).
From DB 39.5.7
Create Cost Types and Assign Cost Type Groups
Information- In PLANTA project, costs and budget are planned and displayed summarized to cost type groups in the Budget module.
- For this reason you have to assign cost types to the cost type groups.
- Costs the cost types of which are not assigned to any cost type group are not displayed in the Budget module and are not considered in the planning.
- Exception: Revenues. Revenue cost types are not assigned to any cost type group because the data of the revenue resources (Resource type=8) is not summarized to the cost or effort cost type groups, but is treated as an individual group in the Budget module.
- Insert a blank record:
- If no cost types exist, click on the Insert button in the menu bar.
- If cost types exist, activate the required resource and click on the Insert button, or select the Insert Cost type context menu command via right-click.
- Enter the cost type name in the Cost type name field and the cost type ID in the Cost type field.
- Fill the Cost type category field. The value to be entered here, depends on the cost type group to which the new cost type is to be assigned.
- Make the respective assignment in the right window depending on the Cost type category by making a selection in the Cost cost type group name and/or Effort cost type group name fields.
- Save.
- During saving, it is checked whether the assignment equates to the selected cost type group type. If this is not the case, a message is displayed.
- Each cost type can optionally
- be assigned to a cost cost type group,
- and/or an effort cost type group,
- or to no cost type group (e.g. in the case of revenues)
- If the cost type group assignment is changed, click on the Summarize costs and effort button so the summarization of the cost and effort data to cost type groups in the user modules (e.g. Budget module) is refreshed.
From DB 39.5.6
Create Cost Types
Stop- If you use PLANTA version DB 39.5.6, we recommend that you carry out the cost type and cost type group creation together with your PLANTA Consultant.
- Insert a blank record:
- If no cost types exist, click on the Insert button in the menu bar.
- If cost types exist, activate the required resource and click on the Insert button, or select the Insert Cost type context menu command via right-click.
- Enter the cost type name in the Cost type name field and the cost type ID in the Cost type field.
- Fill further data fields.
- Save.
Group Cost Types (Assignment to Cost Type Groups)
Information- Each cost type can optionally be assigned to a cost cost type group, and/or to an effort cost type group.
- Every cost type record possesses the Cost cost type group name and Effort cost type group name fields, among others.
- By selecting the required cost type group from the listboxes on these fields, which only display cost type groups of the respective type, cost types are assigned to cost type groups.
- If the cost type group assignment is changed, click on the Summarize costs and effort button so the summarization of the cost and effort data to cost type groups in the user modules (e.g. Budget module) is refreshed.
- A cost cost type group and no effort cost type group is assigned to the cost type.
- The costs are summarized to the cost cost type group.
- A cost cost type group and an effort cost type group are assigned to the cost type.
- The costs are summarized to the cost cost type group.
- The effort is summarized to the effort cost type group.
- This functionality can, e.g., be used to display internal and external resource costs/effort.
- No cost cost type group but an effort cost type group is assigned to the cost type.
- The effort is summarized to the effort cost type group.
- This functionality can, e.g., be used to display efforts without cost relevance.
- The effort is summarized to the effort cost type group.
- Revenue types are not assigned to any cost type group because the data of the revenue resources (Resource type=8) is not summarized to the cost or effort cost type groups, but is treated as an individual group in the Budget module.
Up to DB 39.5.6
Create Cost Types
Procedure- Insert a blank record:
- If no cost types exist, click on the Insert button in the menu bar.
- If cost types exist, activate the required resource and click on the Insert button, or select the Insert Cost type context menu command via right-click.
- Enter the cost type name in the Cost type name field and the cost type ID in the Cost type field.
- Fill further data fields.
- Save.
Group Cost Types (Assignment to Cost Type Groups)
Information- Each cost type can optionally be assigned to a cost cost type group, and/or to an effort cost type group.
- Every cost type record possesses the Cost cost type group name and Effort cost type group name fields, among others.
- By selecting the required cost type group from the listboxes on these fields, which only display cost type groups of the respective type, cost types are assigned to cost type groups.
- If the cost type group assignment is changed, click on the Summarize costs and effort button so the summarization of the cost and effort data to cost type groups in the user modules (e.g. Budget module) is refreshed.
- A cost cost type group and no effort cost type group is assigned to the cost type.
- The costs are summarized to the cost cost type group.
- A cost cost type group and an effort cost type group are assigned to the cost type.
- The costs are summarized to the cost cost type group.
- The effort is summarized to the effort cost type group.
- This functionality can, e.g., be used to display internal and external resource costs/effort.
- No cost cost type group but an effort cost type group is assigned to the cost type.
- The effort is summarized to the effort cost type group.
- This functionality can, e.g., be used to display efforts without cost relevance.
- The effort is summarized to the effort cost type group.
- Revenue types are not assigned to any cost type group because the data of the revenue resources (Resource type=8) is not summarized to the cost or effort cost type groups, but is treated as an individual group in the Budget module.
Assign Default Cost Type to the Resource
Procedure- Select the required resource (hereinafter referred to as X) in the Resource Data Sheet module and select the cost type in the Default cost type field.
- This cost type is automatically copied to the resource assignment record in the project during planning of resource X (when assigning resource X to the tasks). It can, however, be changed in the resource assignment record if necessary. For more information on this subject, see the following section.
- Save.
- If the default cost type of resource X is changed in the Resource Data Sheet module, the new default cost type is used for all assignments of resource X that are created afterwards.
- The cost type in already existing assignments of resource X to tasks A, B, C however, is not changed automatically but further on equates to the default cost type applicable at the time of assignment of resource X to the tasks. It must be changed manually if required.
- If a capacity scheduling is carried out after the resource has been planned, the cost type of the resource assignment is copied to each single load record.
- The cost type on load level (the cost type of the load records) is applicable to the summarization of costs and effort to the cost type groups and to their display in the Budget module.
Change Cost Type per Resource Assignment
Procedure- Open the Schedule module for the required project.
- Display the Cost type field in the record of the required resource assignment (the field is hidden by default).
- Change the displayed cost type to the required cost type by making a selection in the listbox.
From S 39.5.12
- If the cost type on the resource assignment is changed, the schedule must be
- unloaded (by selecting the respective menu item in the Edit menu) and
- rescheduled (by clicking on the calculation button in the toolbar).
- As a result, the cost types
- of the future remaining load records are overwritten.
- of the existing actual load record are not overwritten.
- of the load record created manually (for resources with MAN load profile) are not overwritten.
- As a result, the cost types
Up to S 39.5.12
- unloaded (by selecting the respective menu item in the Edit menu and subsequently
- rescheduled (by clicking on the calculation button in the toolbar).
- Due to the calculation behavior (see details), manual changes to the cost type on load records are only possible (and only reasonable) for actual loads and manually created loads.
- The cost type on load level (the cost type of the load records) is applicable to the summarization of costs and effort to the cost type groups and to their display in the Budget module.
| See also: Details on Cost and Budget Planning |
Cost Type Groups MOD0099DZ
Access path- PM Administration Master Data Cost Master Data Cost Type Groups
- Cost type groups are used to group cost types.
- In the system, five cost type groups are preset by default:
- Internal personnel and
- External personnel
- Personnel costs of internal and external staff (resources). Personnel costs are calculated by multiplying the planned effort of individual resources within the effort estimate and the corresponding conversion factor.
- Material costs
- Material costs embrace all (consumable) materials (for example building material, raw material for producing prototypes, printing and paper costs for producing a brochure) that need to be bought so that a task can be processed.
- Investments
- Investments are costs for the purchase of equipment (for example a new building machine, measuring instruments, a new computer or software) to support the project. Since this equipment is usually used beyond the end of the project it would make sense to charge the purchasing costs to the project budget proportionally .
- Miscellaneous
- Miscellaneous costs cover all costs that cannot be assigned to the four other categories, for example travel costs, costs for gifts, etc.
- The database model provides the option to summarize to more than five cost type groups in DT493 on the main project level. This data can be displayed in the project data sheet. There will be no automatic allocation in project masks. The extension of the overall model to more than five cost type groups is realizable via customizing.
- Click on the Insert button or right-click on the already created cost type group and select Insert--> Cost type group from the context menu.
- Fill the data fields.
- Save.
- The Column data field is required for capacity scheduling in order to assign the costs to the right cost type group. The field defines the order of cost type groups displayed in user modules such as the Budget module.
Conversion Factors MOD0099E3
Access path- PM Administration Master Data Cost Master Data panel Conversion Factors
- In the Conversion Factors module, conversion factors can be created, edited, and deleted for monetary effort evaluation.
- You can store two different basic factors internal (intra-corporate) and external (extra-corporate) for every conversion factor.
- Furthermore, these basic factors are subdivided into actual, planned, and remaining factors.
DT476 Conversion Factor Item
DI000341 Conversion factor
ID of the conversion factor Note- In user modules, the respective data field is hidden by default and can be displayed by the user if necessary.
DI000373 Valid from
Here, you can enter from what date on the respective conversion factor item is to be effective.The parameter can be edited by users with modification rights in the following modules:
DI000343 Conversion factor position ID
ID of the conversion factor positionFrom DB 39.5.13
DI000398 Factor value planned costs+remaining
Here, an internal hourly rate for actual and remaining effort is entered. With this value, the cost planning calculates internal planned and remaining costs from actual and remaining effort.The parameter can be edited by users with modification rights in the following modules:
Conversion Factors MOD0099E3
Access path- PM Administration Master Data Cost Master Data panel Conversion Factors
- In the Conversion Factors module, conversion factors can be created, edited, and deleted for monetary effort evaluation.
- You can store two different basic factors internal (intra-corporate) and external (extra-corporate) for every conversion factor.
- Furthermore, these basic factors are subdivided into actual, planned, and remaining factors.
- Warning
- Can't INCLUDE CurrentEN.DT476ConversionFactorItem repeatedly, topic is already included.
Create, Edit, Deletes Conversion Factors
From DB 39.5.13
Create conversion factors
- Insert a blank record:
- If no conversion factors exist, click on the Insert button.
- If some conversion factors already exist, activate the required conversion factor and click on the Insert button, or select the Insert context menu command Conversion factor via the right mouse button.
- Fill the Conversion factor name and Conversion factor fields.
- Right-click on the newly created conversion factor and select the Insert Conversion factor item context menu command. A blank record is inserted.
- Enter the time limits for validity in the Valid from field, and the hourly rate in the Factor value planned+remaining costs, Factor value planned+remaining costs external, Factor value actual costs and Factor value actual costs external fields.
- The Factor value planned+remaining costs external and Factor value actual costs external fields are hidden by default and can be displayed if required.
- Save.
Up to DB 39.5.13
Create conversion factors
- Insert a blank record:
- If no conversion factors exist, click on the Insert button.
- If some conversion factors already exist, activate the required conversion factor and click on the Insert button, or select the Insert context menu command Conversion factor via the right mouse button.
- Fill the Conversion factor name and Conversion factor fields.
- Right-click on the newly created conversion factor and select the Insert Conversion factor item context menu command. A blank record is inserted.
- Enter the time limits for validity in the Valid from field, and the hourly rate in the Factor value planned+remaining costs internal, Factor value planned+remaining costs external, Factor value actual costs internal and Factor value actual costs external fields.
- Save.
From DB 39.5.10
- The conversion factor can be deleted by clicking on the Delete conversion factor button.
- If the conversion factor contains positions to be deleted, they are deleted as well.
- NEW The last available item in a conversion factor cannot be deleted, as a conversion factor needs to contain at least one item.
- Individual positions can also be deleted.
- To do so, right-click on the required position and select the Delete conversion factor item command from the context menu.
- If conversion factors have already been assigned to resources, they and their positions cannot be deleted. This is indicated by a message when you click on the Delete conversion factor button
New from DB 39.5.5
- To do so, right-click on the required position and select the Delete conversion factor item command from the context menu.
Assign Conversion Factors
Procedure- In order for conversion factors to take effect, they must
- either be assigned to the respective resources (in the Conversion factor name field in the Resource Data Sheet module),
- and/or to the cost types of the respective resources (in the Conversion factor name field in the Cost Types module).
- If conversion factors are assigned to both the resources and their cost types, both conversion types take effect as a sum.
- The factors entered in the Resource Data Sheet and Cost Types modules immediately take effect in the calculation of schedule or costs if the respective resources are planned in the project to be calculated.
- When changing conversion factors of already planned resources, please note that the changes will apply to all cost values in the current planning (also to actual values). However, the values of the status reports remain unchanged. If for this reason the actual values of the current planning are to remain unchanged as well, please create a new conversion factor with two positions. The first conversion factor position applies up to the time of change, the second one applies from the time of change.
From DB 39.5.0
- Costs are calculated in accordance with the factors in DT472 Load which the cost calculation is based on.
- Both internal and external costs/revenues (planned/actual/remaining/total costs/revenues/ internal and planned/actual/remaining/total costs/revenues external) are calculated.
- The calculated costs/revenues are
- summarized to DT463 Task and DT461 Project via DT466 Resource assignment (total costs and revenues).
- NEW summarized to DT282 (annual costs) and from there to DT281 (total costs) and to DT861 (both annual revenues and total revenues).
Up to DB 39.5.0
- summarized to DT463 Task and DT461 Project via DT466 Resource assignment (total costs and revenues).
- summarized to DT861 (annual costs and revenues).
Up to DB 39.5.13
DI000398 Factor value planned costs+remaining internal
Here, an internal hourly rate for actual and remaining effort is entered. With this value, the cost planning calculates internal planned and remaining costs from actual and remaining effort.The parameter can be edited by users with modification rights in the following modules:
Conversion Factors MOD0099E3
Access path- PM Administration Master Data Cost Master Data panel Conversion Factors
- In the Conversion Factors module, conversion factors can be created, edited, and deleted for monetary effort evaluation.
- You can store two different basic factors internal (intra-corporate) and external (extra-corporate) for every conversion factor.
- Furthermore, these basic factors are subdivided into actual, planned, and remaining factors.
- Warning
- Can't INCLUDE CurrentEN.DT476ConversionFactorItem repeatedly, topic is already included.
Create, Edit, Deletes Conversion Factors
From DB 39.5.13
Create conversion factors
- Insert a blank record:
- If no conversion factors exist, click on the Insert button.
- If some conversion factors already exist, activate the required conversion factor and click on the Insert button, or select the Insert context menu command Conversion factor via the right mouse button.
- Fill the Conversion factor name and Conversion factor fields.
- Right-click on the newly created conversion factor and select the Insert Conversion factor item context menu command. A blank record is inserted.
- Enter the time limits for validity in the Valid from field, and the hourly rate in the Factor value planned+remaining costs, Factor value planned+remaining costs external, Factor value actual costs and Factor value actual costs external fields.
- The Factor value planned+remaining costs external and Factor value actual costs external fields are hidden by default and can be displayed if required.
- Save.
Up to DB 39.5.13
Create conversion factors
- Insert a blank record:
- If no conversion factors exist, click on the Insert button.
- If some conversion factors already exist, activate the required conversion factor and click on the Insert button, or select the Insert context menu command Conversion factor via the right mouse button.
- Fill the Conversion factor name and Conversion factor fields.
- Right-click on the newly created conversion factor and select the Insert Conversion factor item context menu command. A blank record is inserted.
- Enter the time limits for validity in the Valid from field, and the hourly rate in the Factor value planned+remaining costs internal, Factor value planned+remaining costs external, Factor value actual costs internal and Factor value actual costs external fields.
- Save.
From DB 39.5.10
- The conversion factor can be deleted by clicking on the Delete conversion factor button.
- If the conversion factor contains positions to be deleted, they are deleted as well.
- NEW The last available item in a conversion factor cannot be deleted, as a conversion factor needs to contain at least one item.
- Individual positions can also be deleted.
- To do so, right-click on the required position and select the Delete conversion factor item command from the context menu.
- If conversion factors have already been assigned to resources, they and their positions cannot be deleted. This is indicated by a message when you click on the Delete conversion factor button
New from DB 39.5.5
- To do so, right-click on the required position and select the Delete conversion factor item command from the context menu.
Assign Conversion Factors
Procedure- In order for conversion factors to take effect, they must
- either be assigned to the respective resources (in the Conversion factor name field in the Resource Data Sheet module),
- and/or to the cost types of the respective resources (in the Conversion factor name field in the Cost Types module).
- If conversion factors are assigned to both the resources and their cost types, both conversion types take effect as a sum.
- The factors entered in the Resource Data Sheet and Cost Types modules immediately take effect in the calculation of schedule or costs if the respective resources are planned in the project to be calculated.
- When changing conversion factors of already planned resources, please note that the changes will apply to all cost values in the current planning (also to actual values). However, the values of the status reports remain unchanged. If for this reason the actual values of the current planning are to remain unchanged as well, please create a new conversion factor with two positions. The first conversion factor position applies up to the time of change, the second one applies from the time of change.
From DB 39.5.0
- Costs are calculated in accordance with the factors in DT472 Load which the cost calculation is based on.
- Both internal and external costs/revenues (planned/actual/remaining/total costs/revenues/ internal and planned/actual/remaining/total costs/revenues external) are calculated.
- The calculated costs/revenues are
- summarized to DT463 Task and DT461 Project via DT466 Resource assignment (total costs and revenues).
- NEW summarized to DT282 (annual costs) and from there to DT281 (total costs) and to DT861 (both annual revenues and total revenues).
Up to DB 39.5.0
- summarized to DT463 Task and DT461 Project via DT466 Resource assignment (total costs and revenues).
- summarized to DT861 (annual costs and revenues).
From DB 39.5.13
DI006427 Factor value actual costs
Here, an internal (company internal) hourly rate for actual effort is entered. With this value, the cost planning calculates internal actual costs from actual effort.Conversion Factors MOD0099E3
Access path- PM Administration Master Data Cost Master Data panel Conversion Factors
- In the Conversion Factors module, conversion factors can be created, edited, and deleted for monetary effort evaluation.
- You can store two different basic factors internal (intra-corporate) and external (extra-corporate) for every conversion factor.
- Furthermore, these basic factors are subdivided into actual, planned, and remaining factors.
- Warning
- Can't INCLUDE CurrentEN.DT476ConversionFactorItem repeatedly, topic is already included.
Create, Edit, Deletes Conversion Factors
From DB 39.5.13
Create conversion factors
- Insert a blank record:
- If no conversion factors exist, click on the Insert button.
- If some conversion factors already exist, activate the required conversion factor and click on the Insert button, or select the Insert context menu command Conversion factor via the right mouse button.
- Fill the Conversion factor name and Conversion factor fields.
- Right-click on the newly created conversion factor and select the Insert Conversion factor item context menu command. A blank record is inserted.
- Enter the time limits for validity in the Valid from field, and the hourly rate in the Factor value planned+remaining costs, Factor value planned+remaining costs external, Factor value actual costs and Factor value actual costs external fields.
- The Factor value planned+remaining costs external and Factor value actual costs external fields are hidden by default and can be displayed if required.
- Save.
Up to DB 39.5.13
Create conversion factors
- Insert a blank record:
- If no conversion factors exist, click on the Insert button.
- If some conversion factors already exist, activate the required conversion factor and click on the Insert button, or select the Insert context menu command Conversion factor via the right mouse button.
- Fill the Conversion factor name and Conversion factor fields.
- Right-click on the newly created conversion factor and select the Insert Conversion factor item context menu command. A blank record is inserted.
- Enter the time limits for validity in the Valid from field, and the hourly rate in the Factor value planned+remaining costs internal, Factor value planned+remaining costs external, Factor value actual costs internal and Factor value actual costs external fields.
- Save.
From DB 39.5.10
- The conversion factor can be deleted by clicking on the Delete conversion factor button.
- If the conversion factor contains positions to be deleted, they are deleted as well.
- NEW The last available item in a conversion factor cannot be deleted, as a conversion factor needs to contain at least one item.
- Individual positions can also be deleted.
- To do so, right-click on the required position and select the Delete conversion factor item command from the context menu.
- If conversion factors have already been assigned to resources, they and their positions cannot be deleted. This is indicated by a message when you click on the Delete conversion factor button
New from DB 39.5.5
- To do so, right-click on the required position and select the Delete conversion factor item command from the context menu.
Assign Conversion Factors
Procedure- In order for conversion factors to take effect, they must
- either be assigned to the respective resources (in the Conversion factor name field in the Resource Data Sheet module),
- and/or to the cost types of the respective resources (in the Conversion factor name field in the Cost Types module).
- If conversion factors are assigned to both the resources and their cost types, both conversion types take effect as a sum.
- The factors entered in the Resource Data Sheet and Cost Types modules immediately take effect in the calculation of schedule or costs if the respective resources are planned in the project to be calculated.
- When changing conversion factors of already planned resources, please note that the changes will apply to all cost values in the current planning (also to actual values). However, the values of the status reports remain unchanged. If for this reason the actual values of the current planning are to remain unchanged as well, please create a new conversion factor with two positions. The first conversion factor position applies up to the time of change, the second one applies from the time of change.
From DB 39.5.0
- Costs are calculated in accordance with the factors in DT472 Load which the cost calculation is based on.
- Both internal and external costs/revenues (planned/actual/remaining/total costs/revenues/ internal and planned/actual/remaining/total costs/revenues external) are calculated.
- The calculated costs/revenues are
- summarized to DT463 Task and DT461 Project via DT466 Resource assignment (total costs and revenues).
- NEW summarized to DT282 (annual costs) and from there to DT281 (total costs) and to DT861 (both annual revenues and total revenues).
Up to DB 39.5.0
- summarized to DT463 Task and DT461 Project via DT466 Resource assignment (total costs and revenues).
- summarized to DT861 (annual costs and revenues).
The parameter can be edited by users with modification rights in the following modules:
DI028470 Factor value planned costs+remaining external
Here, an external hourly rate for planned and remaining effort is entered. Cost planning uses this parameter to calculate internal planned and remaining costs from actual and remaining effort.Conversion Factors MOD0099E3
Access path- PM Administration Master Data Cost Master Data panel Conversion Factors
- In the Conversion Factors module, conversion factors can be created, edited, and deleted for monetary effort evaluation.
- You can store two different basic factors internal (intra-corporate) and external (extra-corporate) for every conversion factor.
- Furthermore, these basic factors are subdivided into actual, planned, and remaining factors.
- Warning
- Can't INCLUDE CurrentEN.DT476ConversionFactorItem repeatedly, topic is already included.
Create, Edit, Deletes Conversion Factors
From DB 39.5.13
Create conversion factors
- Insert a blank record:
- If no conversion factors exist, click on the Insert button.
- If some conversion factors already exist, activate the required conversion factor and click on the Insert button, or select the Insert context menu command Conversion factor via the right mouse button.
- Fill the Conversion factor name and Conversion factor fields.
- Right-click on the newly created conversion factor and select the Insert Conversion factor item context menu command. A blank record is inserted.
- Enter the time limits for validity in the Valid from field, and the hourly rate in the Factor value planned+remaining costs, Factor value planned+remaining costs external, Factor value actual costs and Factor value actual costs external fields.
- The Factor value planned+remaining costs external and Factor value actual costs external fields are hidden by default and can be displayed if required.
- Save.
Up to DB 39.5.13
Create conversion factors
- Insert a blank record:
- If no conversion factors exist, click on the Insert button.
- If some conversion factors already exist, activate the required conversion factor and click on the Insert button, or select the Insert context menu command Conversion factor via the right mouse button.
- Fill the Conversion factor name and Conversion factor fields.
- Right-click on the newly created conversion factor and select the Insert Conversion factor item context menu command. A blank record is inserted.
- Enter the time limits for validity in the Valid from field, and the hourly rate in the Factor value planned+remaining costs internal, Factor value planned+remaining costs external, Factor value actual costs internal and Factor value actual costs external fields.
- Save.
From DB 39.5.10
- The conversion factor can be deleted by clicking on the Delete conversion factor button.
- If the conversion factor contains positions to be deleted, they are deleted as well.
- NEW The last available item in a conversion factor cannot be deleted, as a conversion factor needs to contain at least one item.
- Individual positions can also be deleted.
- To do so, right-click on the required position and select the Delete conversion factor item command from the context menu.
- If conversion factors have already been assigned to resources, they and their positions cannot be deleted. This is indicated by a message when you click on the Delete conversion factor button
New from DB 39.5.5
- To do so, right-click on the required position and select the Delete conversion factor item command from the context menu.
Assign Conversion Factors
Procedure- In order for conversion factors to take effect, they must
- either be assigned to the respective resources (in the Conversion factor name field in the Resource Data Sheet module),
- and/or to the cost types of the respective resources (in the Conversion factor name field in the Cost Types module).
- If conversion factors are assigned to both the resources and their cost types, both conversion types take effect as a sum.
- The factors entered in the Resource Data Sheet and Cost Types modules immediately take effect in the calculation of schedule or costs if the respective resources are planned in the project to be calculated.
- When changing conversion factors of already planned resources, please note that the changes will apply to all cost values in the current planning (also to actual values). However, the values of the status reports remain unchanged. If for this reason the actual values of the current planning are to remain unchanged as well, please create a new conversion factor with two positions. The first conversion factor position applies up to the time of change, the second one applies from the time of change.
From DB 39.5.0
- Costs are calculated in accordance with the factors in DT472 Load which the cost calculation is based on.
- Both internal and external costs/revenues (planned/actual/remaining/total costs/revenues/ internal and planned/actual/remaining/total costs/revenues external) are calculated.
- The calculated costs/revenues are
- summarized to DT463 Task and DT461 Project via DT466 Resource assignment (total costs and revenues).
- NEW summarized to DT282 (annual costs) and from there to DT281 (total costs) and to DT861 (both annual revenues and total revenues).
Up to DB 39.5.0
- summarized to DT463 Task and DT461 Project via DT466 Resource assignment (total costs and revenues).
- summarized to DT861 (annual costs and revenues).
The parameter can be edited by users with modification rights in the following modules:
DI028471 Factor value planned costs external
Here, an external hourly rate for actual effort is entered. Using this value, the cost planning calculates external costs from actual effort.Conversion Factors MOD0099E3
Access path- PM Administration Master Data Cost Master Data panel Conversion Factors
- In the Conversion Factors module, conversion factors can be created, edited, and deleted for monetary effort evaluation.
- You can store two different basic factors internal (intra-corporate) and external (extra-corporate) for every conversion factor.
- Furthermore, these basic factors are subdivided into actual, planned, and remaining factors.
- Warning
- Can't INCLUDE CurrentEN.DT476ConversionFactorItem repeatedly, topic is already included.
Create, Edit, Deletes Conversion Factors
From DB 39.5.13
Create conversion factors
- Insert a blank record:
- If no conversion factors exist, click on the Insert button.
- If some conversion factors already exist, activate the required conversion factor and click on the Insert button, or select the Insert context menu command Conversion factor via the right mouse button.
- Fill the Conversion factor name and Conversion factor fields.
- Right-click on the newly created conversion factor and select the Insert Conversion factor item context menu command. A blank record is inserted.
- Enter the time limits for validity in the Valid from field, and the hourly rate in the Factor value planned+remaining costs, Factor value planned+remaining costs external, Factor value actual costs and Factor value actual costs external fields.
- The Factor value planned+remaining costs external and Factor value actual costs external fields are hidden by default and can be displayed if required.
- Save.
Up to DB 39.5.13
Create conversion factors
- Insert a blank record:
- If no conversion factors exist, click on the Insert button.
- If some conversion factors already exist, activate the required conversion factor and click on the Insert button, or select the Insert context menu command Conversion factor via the right mouse button.
- Fill the Conversion factor name and Conversion factor fields.
- Right-click on the newly created conversion factor and select the Insert Conversion factor item context menu command. A blank record is inserted.
- Enter the time limits for validity in the Valid from field, and the hourly rate in the Factor value planned+remaining costs internal, Factor value planned+remaining costs external, Factor value actual costs internal and Factor value actual costs external fields.
- Save.
From DB 39.5.10
- The conversion factor can be deleted by clicking on the Delete conversion factor button.
- If the conversion factor contains positions to be deleted, they are deleted as well.
- NEW The last available item in a conversion factor cannot be deleted, as a conversion factor needs to contain at least one item.
- Individual positions can also be deleted.
- To do so, right-click on the required position and select the Delete conversion factor item command from the context menu.
- If conversion factors have already been assigned to resources, they and their positions cannot be deleted. This is indicated by a message when you click on the Delete conversion factor button
New from DB 39.5.5
- To do so, right-click on the required position and select the Delete conversion factor item command from the context menu.
Assign Conversion Factors
Procedure- In order for conversion factors to take effect, they must
- either be assigned to the respective resources (in the Conversion factor name field in the Resource Data Sheet module),
- and/or to the cost types of the respective resources (in the Conversion factor name field in the Cost Types module).
- If conversion factors are assigned to both the resources and their cost types, both conversion types take effect as a sum.
- The factors entered in the Resource Data Sheet and Cost Types modules immediately take effect in the calculation of schedule or costs if the respective resources are planned in the project to be calculated.
- When changing conversion factors of already planned resources, please note that the changes will apply to all cost values in the current planning (also to actual values). However, the values of the status reports remain unchanged. If for this reason the actual values of the current planning are to remain unchanged as well, please create a new conversion factor with two positions. The first conversion factor position applies up to the time of change, the second one applies from the time of change.
From DB 39.5.0
- Costs are calculated in accordance with the factors in DT472 Load which the cost calculation is based on.
- Both internal and external costs/revenues (planned/actual/remaining/total costs/revenues/ internal and planned/actual/remaining/total costs/revenues external) are calculated.
- The calculated costs/revenues are
- summarized to DT463 Task and DT461 Project via DT466 Resource assignment (total costs and revenues).
- NEW summarized to DT282 (annual costs) and from there to DT281 (total costs) and to DT861 (both annual revenues and total revenues).
Up to DB 39.5.0
- summarized to DT463 Task and DT461 Project via DT466 Resource assignment (total costs and revenues).
- summarized to DT861 (annual costs and revenues).
The parameter can be edited by users with modification rights in the following modules:
Create, Edit, Deletes Conversion Factors
From DB 39.5.13
Create conversion factors
- Insert a blank record:
- If no conversion factors exist, click on the Insert button.
- If some conversion factors already exist, activate the required conversion factor and click on the Insert button, or select the Insert context menu command Conversion factor via the right mouse button.
- Fill the Conversion factor name and Conversion factor fields.
- Right-click on the newly created conversion factor and select the Insert Conversion factor item context menu command. A blank record is inserted.
- Enter the time limits for validity in the Valid from field, and the hourly rate in the Factor value planned+remaining costs, Factor value planned+remaining costs external, Factor value actual costs and Factor value actual costs external fields.
- The Factor value planned+remaining costs external and Factor value actual costs external fields are hidden by default and can be displayed if required.
- Save.
Up to DB 39.5.13
Create conversion factors
- Insert a blank record:
- If no conversion factors exist, click on the Insert button.
- If some conversion factors already exist, activate the required conversion factor and click on the Insert button, or select the Insert context menu command Conversion factor via the right mouse button.
- Fill the Conversion factor name and Conversion factor fields.
- Right-click on the newly created conversion factor and select the Insert Conversion factor item context menu command. A blank record is inserted.
- Enter the time limits for validity in the Valid from field, and the hourly rate in the Factor value planned+remaining costs internal, Factor value planned+remaining costs external, Factor value actual costs internal and Factor value actual costs external fields.
- Save.
From DB 39.5.10
- The conversion factor can be deleted by clicking on the Delete conversion factor button.
- If the conversion factor contains positions to be deleted, they are deleted as well.
- NEW The last available item in a conversion factor cannot be deleted, as a conversion factor needs to contain at least one item.
- Individual positions can also be deleted.
- To do so, right-click on the required position and select the Delete conversion factor item command from the context menu.
- If conversion factors have already been assigned to resources, they and their positions cannot be deleted. This is indicated by a message when you click on the Delete conversion factor button
New from DB 39.5.5
- To do so, right-click on the required position and select the Delete conversion factor item command from the context menu.
Assign Conversion Factors
Procedure- In order for conversion factors to take effect, they must
- either be assigned to the respective resources (in the Conversion factor name field in the Resource Data Sheet module),
- and/or to the cost types of the respective resources (in the Conversion factor name field in the Cost Types module).
- If conversion factors are assigned to both the resources and their cost types, both conversion types take effect as a sum.
- The factors entered in the Resource Data Sheet and Cost Types modules immediately take effect in the calculation of schedule or costs if the respective resources are planned in the project to be calculated.
- When changing conversion factors of already planned resources, please note that the changes will apply to all cost values in the current planning (also to actual values). However, the values of the status reports remain unchanged. If for this reason the actual values of the current planning are to remain unchanged as well, please create a new conversion factor with two positions. The first conversion factor position applies up to the time of change, the second one applies from the time of change.
From DB 39.5.0
- Costs are calculated in accordance with the factors in DT472 Load which the cost calculation is based on.
- Both internal and external costs/revenues (planned/actual/remaining/total costs/revenues/ internal and planned/actual/remaining/total costs/revenues external) are calculated.
- The calculated costs/revenues are
- summarized to DT463 Task and DT461 Project via DT466 Resource assignment (total costs and revenues).
- NEW summarized to DT282 (annual costs) and from there to DT281 (total costs) and to DT861 (both annual revenues and total revenues).
Up to DB 39.5.0
- summarized to DT463 Task and DT461 Project via DT466 Resource assignment (total costs and revenues).
- summarized to DT861 (annual costs and revenues).
Load Profiles MOD0099E2
Access path- PM Administration Master Data Resources Load Profiles
- The Load Profiles module provides an overview of all load profiles which are contained in the scope of supply of the PLANTA software.
- The creation of individual load profiles is currently not supported.
Load profiles control how the resource load (for cost resources of the costs) is spread across the duration of the task.Details
- PLANTA project distinguishes between
- "real" load profiles which cause a percentage distribution of load, and
- "pseudo load profiles the use of which causes a programmed calculation method.
- Which load profile takes effect in the respective task of the respective resource assignment is determined by the Load profile parameter on the resource assignment in the Schedule module.
- Here, the required load profile can be selected via the listbox. If no load profile is selected, the resource load is distributed linearly.
- When you assign a resource to a task, the Default load profile of the resource is applied automatically but can be changed on the resource assignment if necessary.
- The default load profile is determined per resource in the Default load profile field in the Resource Data Sheet.
|